A GNUstep Programming Tutorial
Time is on our side...
Yen-Ju Chen
Dennis Leeuw
Copyright © 2003 Yen-Ju Chen, Dennis Leeuw
Permission is granted to copy, distribute and/or modify this document under the terms of the GNU Free Documentation License, Version 1.2 or any later version published by the Free Software Foundation; with no Invariant Sections, no Front-Cover Texts, and no Back-Cover Texts.
- Table of Contents
- 1. Before we start
- 2. How to start GNUstep programming
- 3. The GUI
- 4. Unknown 1
- 5. Services
- 6. Regular expressions
- 7. Language support
- 8. Advanced GNUstep Programming
- List of Tables
- 4-1. Methods for loading and saving files
- List of Figures
- 3-1. HelloWorld Window
- 3-2. Gorm main window
- 3-3. Gorm palettes
- 3-4. Gorm inspector
- 3-5. Add title into window
- 3-6. Change title
- 3-7. Add menu
- 3-8. Change file owner
- 3-9. Connect menu action
- 3-10. Choose action
- 3-11. Connect action for "Hide" menu
- 4-1. Simple TimeMachine
- 4-2. Interface of simple TimeMachine
- 4-3. Change title of button
- 4-4. Classes in Gorm
- 4-5. Create subclass of NSObject
- 4-6. Change class name
- 4-7. Add outlet
- 4-8. Add action
- 4-9. NSOwner
- 4-10. Connect outlet
- 4-11. Connect action
- 4-12. TimeMachine with custom view
- 4-13. NSControl in Gorm
- 4-14. Add subclass of NSControl
- 4-15. Interface with custom view
- 4-16. Change class of custom view
- 4-17. Custom view with TimeView class
- 4-18. Add outlet
- 4-19. Add action
- 4-20. Connect outlet
- 4-21. Custom view with analog clock
- 4-22. Panel in Gorm
- 4-23. Interface of time zone panel
- 4-24. Panel attributes
- 4-25. Outlets for time zone panel
- 4-26. Actions for time zone panel
- 4-27. Set NSOwner to TimeView class
- 4-28. Connect outlet
- 4-29. Connection NSTextField action
- 4-30. Connect nextKeyView
- 4-31. Connect menu action
- 4-32. Menu of document-base application
- 4-33. Create instance of NSDocumentController
- 4-34. Create NSDocument subclass
- 4-35. Set document as NSOwner of window
- 4-36. Connect NSOwner to window
- 4-37. Connect delegate to NSOwner
- 4-38. Add table into window
- 4-39. Attributes of NSTableView
- 4-40. Set resize attribute of table view
- 4-41. Add outlet for table view
- 4-42. Connect data source and delegate of table view
- 4-43. Connect outlet to table view
- 4-44. Interface of Overview
- 4-45. Autoresizing attribute of NSOutlineView
- 4-46. Select column in NSOutlineView
- 4-47. Change attribute of NSTableColumn
- 4-48. Create subclass in Gorm
- 4-49. Create outlet
- 4-50. Connect outlet to NSOutlineView
- 4-51. Connect data source of NSOutlineView
- 4-52. Assign delegate of NSApp
- 4-53. Overview
- 4-54. CalendarView
- 4-55. Interface of LunarCalendar
- 4-56. Add outlet
- 4-57. Connect outlet
- 5-1. Interface of NSLookupService
- 5-2. Connect outlet
- 5-3. Connect action.
- 5-4. Connect delegate of NSApp
- 7-1. Interface of Localization example
- 7-2. Interface of Search
Chapter 1. Before we start
Introduction
And now you can forget everything you know about Objective-C programming, because there is GNUstep. While not entirely true, this section will explain why I wrote this sentence and what GNUstep is and how it relates to Objective-C.
GNUstep tries to be a platform independend programming environment. That means it tries to give you an abstraction layer on which you can program your applications, so that they are portable to every platform that adheres to the OpenStep standard. Currently that means that with the least possible effort your applications can be compiled for GNU/Linux (and most other POSIX compliant systems), MacOS X (using Cocoa), and to a certain extend to Windows with the use of GNUstep and Cygwin.
This means: write once, compile anywhere.
With this abstraction comes also the runtime abstraction. That means that your root of all objects is not the Objective-C runtime Object, but NSObject. All objects eventually have NSObject as their root object.
The fact that you can't completely forget Objective-C is that fact that GNUstep is programmed in Objective-C. And all you need to program your program is GNUstep and Objective-C. It's the next logical step in evolution. First there was C, then there was Objective-C and now there is GNUstep.
Developement Tools & Resources
GNUstep offers ProjectCenter and Gorm to help you with the development of GNUstep applications. Both are similiar to Project Builder and Interface Builder on MacOS X. ProjectCenter is for project management, and Gorm for interface building. We will come back to them later.
ProjectCenter and Gorm can be found on ftp://ftp.gnustep.org/pub/gnustep/dev-apps/.
There are many GNUstep related resources:
GNUstep.org - The Official site.
GNUstep.it - Another GNUstep site with documents and examples.
GNUstep wiki - GNUstep Wiki.
GNUstep Help Center - A GNUstep document collection.
Cocoa - The Cocoa environment of MacOS X.
Stepwise.com - OpenStep/Cocoa programming site.
Cocoa Dev Central - Cocoa programming site.
Objective-C Programming
Objective-C is called a superset of the C language. It is C plus object-oriented design. It is suggested to use GCC 3.x series in order to get better Objective-C support.
The syntax of Objective-C can be found at Apples site. There is also a PDF file to download. It is very easy to learn Objective-C if you have some idea about C.
There are some more documents about Objective-C:
Chapter 2. How to start GNUstep programming
Introduction
The basis of GNUstep is formed by the GNUstep makefile system and GNUstep base. With only these two you are able to program platform independend non-graphical programs.
The makefile system is an extension to the normal Makefile. You need GNU make, which might on your system be present as gmake. The makefiles are called GNUmakefile. The GNUstep makefile system simplyfies your makefiles, all makefile logic will be done for you so that makefile functionality will be consistent across all GNUstep programs.
GNUstep base contains what is defined in the OpenStep standard as the Foundation. It has the logic for creating strings, arrays, file handling and the like. All objects are prefixed with NS or GS. The NS prefixed objects are the ones that comply to the OpenStep standard as closely as possible, while the GS ones are GNUstep extensions.
Tools & Applications
We start with the traditional "Hello World" program, which is mainly a demonstration of gnustep-make.
main.c:
#include <stdio.h>

int main(void)
{
   printf("Hello World\n");
} |
This is a very simple C program. In order to compile it, we create a GNUmakefile file, which is a simplified, but powerful version of a Makefile.
GNUmakefile:
include $(GNUSTEP_MAKEFILES)/common.make CTOOL_NAME = HelloWorld HelloWorld_HEADERS = HelloWorld_C_FILES = main.c HelloWorld_RESOURCE_FILES = include $(GNUSTEP_MAKEFILES)/ctool.make |
Type make and do ./shared_obj/HelloWorld. It will print "Hello World", as you might have expected.
This example shows you a couple of powerful things about the GNUstep makefile system. As you can see there are no targets. You can type make and it works. You might also have noticed that you told, through the CTOOL_NAME variable, the system that your application is called HelloWorld.
Let's do the same for an Objective-C version of Hello World.
main.m:
#include <objc/Object.h>

@interface Greeter:Object
{
  /* This is left empty on purpose:
   ** Normally instance variables would be declared here,
   ** but these are not used in our example.
   */
}

- (void)greet;

@end

#include <stdio.h>

@implementation Greeter

- (void)greet
{
	printf("Hello, World!\n");
}

@end

#include <stdlib.h>

int main(void)
{
	id myGreeter;
	myGreeter=[Greeter new];

	[myGreeter greet];

	[myGreeter free];
	return EXIT_SUCCESS;
} |
GNUmakefile:
include $(GNUSTEP_MAKEFILES)/common.make OBJC_PROGRAM_NAME = HelloWorld HelloWorld_HEADERS = HelloWorld_OBJC_FILES = main.m HelloWorld_RESOURCE_FILES = include $(GNUSTEP_MAKEFILES)/objc.make |
The basic logic for Objective-C files is included through objc.make and off you go for plain Objective-C programs.
GNUstep knows two kinds of programs: Tools and Applications. Tools are mostly non-graphical programs, but more exactly Tools are programs with no-resources, while Applications are programs with resources.
main.m:
#include <Foundation/Foundation.h>

@interface Greeter:NSObject
{
  /* This is left empty on purpose:
   ** Normally instance variables would be declared here,
   ** but these are not used in our example.
   */
}

- (void)greet;

@end

#include <stdio.h>

@implementation Greeter

- (void)greet
{
	printf("Hello, World!\n");
}

@end

#include <stdlib.h>

int main(void)
{
	id myGreeter;
	myGreeter=[[Greeter alloc] init];

	[myGreeter greet];

	[myGreeter release];
	return EXIT_SUCCESS;
} |
GNUmakefile:
include $(GNUSTEP_MAKEFILES)/common.make TOOL_NAME = HelloWorld HelloWorld_HEADERS = HelloWorld_OBJC_FILES = main.m HelloWorld_RESOURCE_FILES = include $(GNUSTEP_MAKEFILES)/tool.make |
To show you the difference more clearly type make clean and change the line
include $(GNUSTEP_MAKEFILES)/tool.make |
include $(GNUSTEP_MAKEFILES)/application.make |
This HelloWorld.app directory is a self contained GNUstep application. Type openapp HelloWorld.app and you see that it works. Now out of curiosity list the contents of the HelloWorld.app directory and you have your first glimps at the difference between a Tool and an Application.
Stuff you get for free
Apart from being able to select the kind of program you want to create you get a couple of things for free. The first thing you hopefully already noticed is make clean, but there is more. make install will install your program in it's default place, which for Tools is GNUSTEP_LOCAL_ROOT/Tools and as you might have quessed GNUSTEP_LOCAL_ROOT/Applications for applications.
Ofcourse that path can be overridden by using e.g. make PREFIX=/my/path install, but remember that Tools and Applications are only searched within the GNUstep tree. It is a self contained system with three so called domains: GNUSTEP_SYSTEM_ROOT, GNUSTEP_LOCAL_ROOT and GNUSTEP_NETWORK_ROOT. Tools like openapp will only search through these domains and the current directory to find Applications and Tools.
A couple of the most used make options are:
Basic options
all. The same as make without options
check. Run tests if applicable
clean. Remove all that is build during make
distclean. Remove all that is build during make and ... ???
install. Install all that is build, and if nothing is build, do the build first.
uninstall. Uninstall a previously install program.
cvs-dist, cvs-snapshot, strings. ??? What do these???
Boolean options
debug=[yes|no]. yes builds a program with debugging symbols. With debugging symbols the program can be started with debugapp.
filelist=[yes|no]. Creates a filelist of the installed files (easy for packaging binaries).
messages=[yes|no]. More verbose messaging when building sources.
shared=[yes|no]. ???
standalone=[yes|no]. ???
strip=[yes|no]. Strip the created programs and libraries.
There are some GNUmakefile tutorials. Therefore, I won't touch this topic too much. Here is another example, which is a real Objective-C program. If you are not familiar with Objective-C, read the Objective-C book from apple first.
Headers
Since GNUstep is build with Objective-C, which in turn is based on C, headers are important. Within the GNUstep domains they can be found in the Library/Headers directory where all have their own subdirectory; all foundation headers can be found in Library/Headers/Foundation.
To include header files in your code you can use the C syntax:
#include <Foundation/NSArray.h> |
#ifndef HAVE_NSARRAY_H #define HAVE_NSARRAY_H #include <Foundation/NSArray.h> #endif |
Easier would be to use the Objective-C macro #import. import takes care of all the things that concern headers:
#import <Foundation/NSArray.h> |
And since GNUstep is here to make it easier on you, you might want to use:
#import <Foundation/Foundation.h> |
 | Foundation tries to implement as close as possible the OpenStep standard. Which means that the Foundation/ directory holds the headers that correspond to that standard. The extensions of GNUstep can be found in GNUstepBase/. The same goes for AppKit/ and GNUstepGUI/. |
Strings
There are four files:
say.h:
#ifndef _Say_H_
#define _Say_H_

#include <Foundation/NSObject.h>
@interface Say: NSObject
{
}
- (void) sayHello;
- (void) sayHelloTo: (NSString *)name;
@end

#endif /* _Say_H_ */ |
say.m:
#include "say.h"
#include <Foundation/Foundation.h>

@implementation Say
- (void) sayHello
{
   NSLog(@"Hello World");
}

- (void) sayHelloTo: (NSString *)name
{
   NSLog(@"Hello World, %@", name);
}
@end |
main.m:
#include "say.h"
#include <Foundation/Foundation.h>

int main (void)
{
   id speaker;
   NSString *name = @"GNUstep !";
   NSAutoreleasePool *pool;

   pool = [NSAutoreleasePool new];
   speaker = [[Say alloc] init];

   [speaker sayHello];
   [speaker sayHelloTo:name];

   RELEASE(speaker);
   RELEASE(pool);
} |
GNUmakefile:
include $(GNUSTEP_MAKEFILES)/common.make APP_NAME = HelloWorld HelloWorld_HEADERS = say.h HelloWorld_OBJC_FILES = main.m say.m HelloWorld_RESOURCE_FILES = include $(GNUSTEP_MAKEFILES)/application.make |
Again, use 'make' and 'openapp' to compile and run this application. This example is self-explained. There are several things worthy to metion.
The class "Say" inherits from "NSObject", which is the root class of GNUstep. Always inherit from NSObject if you don't know which class to use. NSObject contains many fundamental methods which you won't want to implement by yourself.
NSLog() is used instead of printf() because it is as easy as printf(). And most importantly, NSLog() accept the %@ symbol, which represents an object. That means you can print objects in NSLog(). Very handy for debug.
NSString is one of the most used classes in GNUstep. You can use @"..." to create a NSString. There are many useful methods in NSString to manipulate strings and pathes. Check these articles: String in Cocoa: Part I, Part II
NSAutoreleasePool is the place for autoreleased instances. In this example, it is not much useful, but I think it is a good habit to use it. When the application should end, remember to release it. Methods -alloc and -init is the standard method to create an instance. Method -new is a shortcut if there is no messages for -init.
Arrays
Arrays are defined by NSArray. There is static version and a dynamic version. The dynamic version is called NSMutableArray. To define them in your code goes the same for both:
NSArray *anArray; NSMutableArray *anMutableArray; |
Now let us create a simple array:
NSArray           *weekArray;
NSAutoreleasePool *pool;

pool      = [NSAutoreleasePool new];
weekArray = [NSArray arrayWithObjects: @"Sun", @"Mon" @"Tue", @"Wed", \
                                       @"Thr", @"Fri", @"Sat", nil];

printf("Day 0: %@\n", [weekArray objectAtIndex: 0]);
RELEASE(pool); |
To output the elements from the array we ask from weekArray to output the object at a certain index. Note that arrays start counting at 0!
Debugging your application
Debugging your application often involves watching what happens while the program is running. You could use a debugger for that, like gdb, but there are some other options that make life easy.
Since you can mix C and Objective-C you could use normal printf statements, or it's GNUstep counterpart GSPrintf. GNUstep however also has a function NSLog and the Makefile system offers you to use make debug=yes and use ifdefs in your code.
To make this all a bit more clear we use and example.
#include <Foundation/Foundation.h>

int main(void)
{
        NSArray           *outArray;
	NSAutoreleasePool *pool;

	pool = [NSAutoreleasePool new];
	outArray = [NSArray arrayWithObjects: @"Msg1", @"Msg2" @"Msg3" "Msg4";

	printf("%@\n", [outArray objectAtIndex: 0]);

	GSPrintf(stdout, "%@",[outArray objectAtIndex: 1]);

	NSLog(@"%@\n", [outArray objectAtIndex: 2]);

	#ifdef DEBUG
		NSLog(@"%@\n", [outArray objectAtIndex: 3]);
	#endif

	RELEASE(pool);
} |
printf prints it's output naar stdout, while NSLog outputs to stderr and with GSPrintf you have full control. You can print to stdout or stderr.Now run make clean; make debug=yes and rerun the command from the obj directory. Your output should look like this:
Msg1 Msg2 2003-12-30 17:40:53.846 array[10769] Msg3 2003-12-30 17:40:53.848 array[10769] Msg4 |
With these you can simply debug the most common problems, apart from code that won't compile :)
Memory Management
Memory management is very important, but easy, in GNUstep. Here are some good articles:
GNUstep offers some good macros to ease the coding related to memory management. Take a look at NSObject.h for ASSIGN(), RELEASE(), RETAIN(), etc.
The most common way to handle release/retain is this:
@interface MyObject: NSObject
{
  id myData;
}
-(void) setMyData: (id) newData;
-(id) myData;
@end

@implementation MyObject
- (void) setMyData: (id) newData
{
  ASSIGN(myData, newData);
}

- (id) myData
{
  return myData;
}

- (void) dealloc
{
  RELEASE(myData);
}
@end |
Basically it works for me. ASSIGNCOPY() can also be used to copy object. Always use [self setMyData: newData] to set myData, or at least use ASSIGN(myData, newData). Don't use myData = newData. By this way, you don't need to worry about the memory management.
In some case, I will use mutable classes because they are thread-safe. For example:
@interface MyObject: NSObject
{
  NSMutableArray *myArray;
}
-(void) setMyArray: (NSArray *) newArray;
-(NSArray *) myArray;
@end

@implementation MyObject
- (id) init
{
  myArray = [NSMutableArray new];
}

- (void) setMyArray: (NSArray *) newArray
{
  [myArray setArray: newArray];
}

- (NSArray *) myArray
{
  return myArray;
}

- (void) dealloc
{
  RELEASE(myArray);
}
@end |
Mutable classes cost more resources. But it is a lazy way to avoid problems.
Also be aware of the return values from GNUstep classes. Some are autoreleased. For example, [NSArray arrayWith...], or [@"A string" stringBy...]. If you release them again, the application usually crashes. And remember to retain them if you want to use them later, and release them in -dealloc. It's safe to use ASSIGN() in this case. For example:
ASSIGN(myString, [@"A string", stringBy...]) |
ASSIGN() will handle all the details. Again, once you use ASSIGN(), release it in -dealloc.
File I/O
Here is a demonstration of file I/O. GNUstep offer NSFileHandle and NSFileManager to handle files. NSFileHandle is mainly to read and write, and NSFileManager is for file management.
main.m:
#include <Foundation/Foundation.h>

int main (void)
{
   NSString *path;
   NSAutoreleasePool *pool;
   NSFileHandle *readFile, *writeFile;
   NSData *fileData;

   pool = [NSAutoreleasePool new];
   path = @"main.m";

   readFile = [NSFileHandle fileHandleForReadingAtPath:path];
   fileData = [readFile readDataToEndOfFile];

   writeFile = [NSFileHandle fileHandleWithStandardOutput];
   [writeFile writeData:fileData];
   RELEASE(pool);

   return 0;
} |
GNUmakefile:
include $(GNUSTEP_MAKEFILES)/common.make APP_NAME = FileHandle FileHandle_HEADERS = FileHandle_OBJC_FILES = main.m FileHandle_RESOURCE_FILES = include $(GNUSTEP_MAKEFILES)/application.make |
It is not too much useful to only trasfer data in NSData. Here, I can take the data out of NSData and manipulate it in C. By this way, I can combine GNUstep with C libraries.
main.m:
#import <Foundation/Foundation.h>

int main (void)
{
  NSString *path;
  NSAutoreleasePool *pool;
  NSFileHandle *readFile;
  NSData* fileData;

  char *buffer;
  unsigned int length;

  pool = [NSAutoreleasePool new];
  // path = @"main.m";
  path = @"GNUmakefile";
  readFile = [NSFileHandle fileHandleForReadingAtPath:path];
  fileData = [readFile readDataToEndOfFile];

  length = [fileData length];
  buffer = malloc(sizeof(char)*length);
  [fileData getBytes: buffer];

  printf("%s\n", buffer);
  printf("%d\n", length);
  free(buffer);

  RELEASE(pool);

  return 0;
} |
Chapter 3. The GUI
A First Window Application
Before using Gorm, it would be better to know how to write a program from scratch, because Gorm is still under development, and sometimes it is useful to manipulate the user interface from source code. It is also good to know the logic of GNUstep application so that you won't get lost when mixing Gorm files with source code. There are other tutorials which give more details.
The idea of GNUstep application is that you start up the default NSApplication, and it will keep running and receiving events. When NSApplication, or NSApp as the shorter form, receives events, it will call it's delegate, which is user-defined. Therefore, programmers are responsible to write the delegate. If the delegate is interested in some specific events, it can intercept them. Otherwise, NSApp will handle them by itself. Therefore, delegate only need to intercept the events which it is interested. This makes the design of delegate very easy.
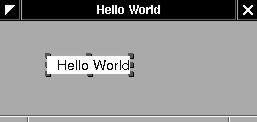
The example here looks like this:
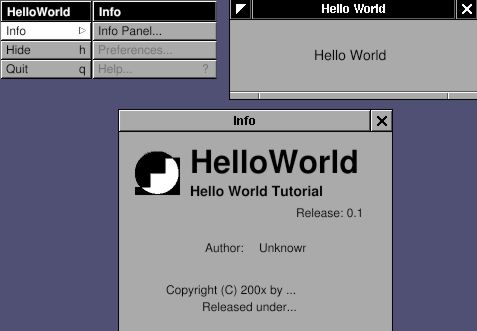 >
>The "Info" window is a built-in function of GNUstep. I only need to make the menu and the "Hello World" window.
Start with the main.m file.
main.m:
#include "AppController.h"
#include <AppKit/AppKit.h>

int main(int argc, const char *argv[])
{
   NSAutoreleasePool *pool;
   AppController *delegate;

   pool = [[NSAutoreleasePool alloc] init];
   delegate = [[AppController alloc] init];

   [NSApplication sharedApplication];
   [NSApp setDelegate: delegate];

   RELEASE(pool);
   return NSApplicationMain (argc, argv);
} |
I define a class called "AppController" as the delegate of this application. After the NSApp starts up ( [NSApplication sharedApplication] ), I set an instance of AppController as the delegate of this application ( [NSApp setDelegate: delegate] ). Then let the NSApp run ( NSApplicationMain (argc, argv) ).
Then what even should I intercept ? I want to display the menu, a window and a text inside. Therefore, I need to know when the application is *going* to launch, and when it is *finished* launching. Here is the AppController.h.
AppController.h:
#ifndef _AppController_H_
#define _AppController_H_

#include <Foundation/NSObject.h>

@class NSWindow;
@class NSTextField;
@class NSNotification;

@interface AppController : NSObject
{
   NSWindow *window;
   NSTextField *label;
}

- (void)applicationWillFinishLaunching:(NSNotification *) not;
- (void)applicationDidFinishLaunching:(NSNotification *) not;

@end

#endif /* _AppController_H_ */ |
The NSWindow and NSTextField are the window and text field in GNUstep. I just declare them here for later use. These two methods: -applicationWillFinishLaunching: and -applicationDidFinishLaunching: are self-explained. When NSApp is going to launch, it will call the method -applicationWillFinishLaunching, in delegate. So does NSApp finish launching. No matter what class the delegate is, it can be the delegate of NSApp, as long as it implements the proper methods so that NSApp can notify the delegate when proper events come. If the delegate doesn't implement these two methods, NSApp will handle the events by itself. Therefore, implement proper methods when you want to intercept some specific events. The usage of delegate is everywhere in GNUstep, which makes the programming very easy.
Usually, not always, I set up the user interface in method -applicationWillFinishLaunching:, and display the user interface in method -applicationDidFinishLaunching:. Here is the implementation.
AppController.m:
#include "AppController.h"
#include <AppKit/AppKit.h>

@implementation AppController
- (void) applicationWillFinishLaunching: (NSNotification *) not
{
   /* Create Menu */
   NSMenu *menu;
   NSMenu *info;

   menu = [NSMenu new];
   [menu addItemWithTitle: @"Info"
                   action: NULL
            keyEquivalent: @""];
   [menu addItemWithTitle: @"Hide"
                   action: @selector(hide:)
            keyEquivalent: @"h"];
   [menu addItemWithTitle: @"Quit"
                   action: @selector(terminate:)
            keyEquivalent: @"q"];

   info = [NSMenu new];
   [info addItemWithTitle: @"Info Panel..."
                   action: @selector(orderFrontStandardInfoPanel:)
            keyEquivalent: @""];
   [info addItemWithTitle: @"Preferences"
                   action: NULL
            keyEquivalent: @""];
   [info addItemWithTitle: @"Help"
                   action: @selector (orderFrontHelpPanel:)
            keyEquivalent: @"?"];

   [menu setSubmenu: info
            forItem: [menu itemWithTitle:@"Info"]];
   RELEASE(info);

   [NSApp setMainMenu:menu];
   RELEASE(menu);

   /* Create Window */
   window = [[NSWindow alloc] initWithContentRect: NSMakeRect(300, 300, 200, 100)
                                        styleMask: (NSTitledWindowMask |
                                                    NSMiniaturizableWindowMask |
                                                    NSResizableWindowMask)
                                          backing: NSBackingStoreBuffered
                                            defer: YES];
   [window setTitle: @"Hello World"];

   /* Create Label */
   label = [[NSTextField alloc] initWithFrame: NSMakeRect(30, 30, 80, 30)];
   [label setSelectable: NO];
   [label setBezeled: NO];
   [label setDrawsBackground: NO];
   [label setStringValue: @"Hello World"];

   [[window contentView] addSubview: label];
   RELEASE(label);
}

- (void) applicationDidFinishLaunching: (NSNotification *) not
{
   [window makeKeyAndOrderFront: self];
}

- (void) dealloc
{
  RELEASE(window);
  [super dealloc];
}

@end |
Firstly, menu is created. NSMenu is a collection of NSMenuItem. Add NSMenuItem into NSMenu, connect the NSMenuItem to an action, or to another NSMenu. For example, the NSMenuItem "Hide" is connected to the action "hide:" ( @selector(hide:) ). When this NSMenuItem "Hide" is clicked, the method -hide: will be called. But where is the method -hide: ? It is a built-in method in NSApp. Therefore, I don't need to implement it. So does the method -terminate:. NSMenuItem will automatically find these methods. The NSMenuItem "Info" is connected to the NSMenu "Info", which is how the submenu is constructed. That's the reason why the action of NSMenuItem "Info" is NULL. Once NSMenu "info" is set into NSMenu "menu" ( [menu setSubmenu: forItem:] ), NSMenu "info" will be retained by NSMenu "menu". Therefore I can release the NSMenu "info". So does the NSMenu "menu" after it is set into the main menu of NSApp ( [NSApp setMainMenu: ] ). The methods, -orderFrontStandardInfoPanel and -orderFrontHelpPanel, are also the built-in methods in NSApp.
Secondly, NSWindow is created and title is set. NSMakeRect is a shortcut function to create a NSRect structure. The origin of GNUstep is at left-bottom. The first two numbers are the left-bottom position (x, y) of the window related to the monitor, and the rest two numbers are the width and height of the window. GUI classes are usually initialized with -initWithFrame: method or something similar in order to assign the position and size. GNUstep use absolute position/size rather than relative position/size in most of the cases.
Finally, a NSTextField is set up with many properties. Most important one is the method -setStringValue:, which sets the text in NSTextField.
The way GNUstep build up the user interface is that you add some GUI classes on other GUI classes. In this case, I want to add the NSTextField on the NSWindow. Therefore, NSTextField will be the *subview* of NSWindow, and NSWindow will be the *superview* of NSTextField. The only tricky part is that NSWindow is not a single view, but contains many components, like the title, border, etc. Therefore, you can not add NSTextField on top of NSWindow, but you can add NSTextField on top of the content view of NSWindow. That's how I build up the user interface. Read Drawing and Views for more details about NSViews.
Once everything is set up, they are ready to display. Menu is already set to NSApp. So NSApp will handle the display by itself. I only need to display the window. In method -applicationDidFinishLaunching:, I use [window makeKeyAndOrderFront:] to display the window and its subviews. This method will put the window in front of the display, and make it is the key window, the window which can accept the key-in.
So the idea is very simple: create the menu and user interface you want to display; connect the menu to the methods, which could be built-in or user-defined; put all the GUI into the window, then display it.
Again, I need the GNUmakefile.
GNUmakefile:
include $(GNUSTEP_MAKEFILES)/common.make APP_NAME = HelloWorld HelloWorld_HEADERS = AppController.h HelloWorld_OBJC_FILES = main.m AppController.m HelloWorld_RESOURCE_FILES = HelloWorldInfo.plist include $(GNUSTEP_MAKEFILES)/application.make |
You will notice that there is a file called "HelloWorldInfo.plist". This is the file which will be used by the info panel from the method -orderFrontStandardInfoPanel:. The file name has to be the "application name" + "Info.plist". In this case, it is "HelloWorldInfo.plist". If this file exists, the info panel of the application will display its content automatically.
Here is the content of Info.plist file. You can modify the content.
HelloWorldInfo.plist:
{
   ApplicationDescription = "Hello World Tutorial";
   ApplicationIcon = "";
   ApplicationName = HelloWorld;
   ApplicationRelease = 0.1;
   Authors = "";
   Copyright = "Copyright (C) 200x by ...";
   CopyrightDescription = "Released under...";
   FullVersionID = 0.1;
   URL = "";
} |
Use Gorm
Gorm is the tool to build the user interface for GNUstep application. The idea is that there is an instance called "controller", and an user interface called "view". The "view" is created by Gorm, and the "controller" controls the behavior of "view". Therefore, any event from this "view" will go to this "controller", and this "controller" can control the GUI component of this "view". Since the "view" is created by Gorm, and the "controller" is written as source code, there must be some way to connect these two instances. "Controller" must define the variables which correspond to the components on the "view" in order to control them. These variables called "outlets". Once these outlets (variables) are connected to the components on the "view", manipulation on these outlets equals to the manipulation on these components. Any event on the "view" should call a specific method in the "controller". For example, when user click the menu "Quit", it should call the method -terminate: in NSApp so that this application can quit. The methods called by the components on the "view" are called "actions". So the "actions" are the "methods" in the "controller" which are called when the components on the "view" are triggered. And the "outlets" are the variables in "controller" which corresponds to the components on the "view".
There is a tutorial which use the older Gorm. The operation might be a little bit different, but the comcept of "action" and "outlet" are the same. They are worthy to read. Gorm can also be used with ProjectCenter.
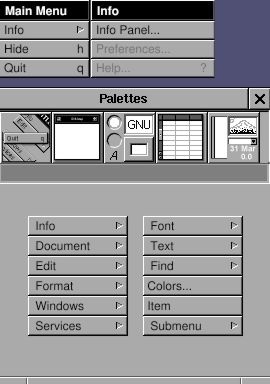
Assume the Gorm is installed. Use 'openapp Gorm" to start. You should see these window/panels of Gorm:
 >
> >
> >
>Choose "Document->New Application" to create a new user interface for this application. A window and a menu will appear. They are the main window and the main menu for this new application.
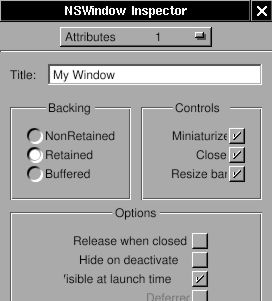
Click the window, and the inspector will become "NSWindow Inspector". Change the "Title" in "Attributes". Remember to press enter key to make it effective. You can change the size of this windows by drag the border, or set the number in "Size" in inspector.
For the text inside the window, drag the "title" from palettes into the main window like this:
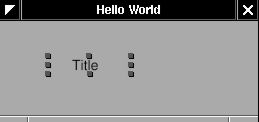 >
>Double-click it and type.
 >
>That's all for the main window. Let's work on the menu. Besides the default "Hide" and "Quit", I need an "Info" menu. Click on the left button of the palettes to show up the menus. Drag the "Info" submenu into the main menu. Clicking on the new "Info" menu item will show the submenu "Info".
 >
>That's all the user interface I need. Since I don't manipulate any GUI component in this example, I don't need any outlet. But some GUI component need to set the "action" so that they can trigger the specific events. Therefore, I need to connect these GUI components to the "actions".
"Actions" are the methods in the controller for this view. And where is the controller for the main window ? The answer is the NSApp in this case. Since NSApp already exist, and contains many built-in methods, I don't even need to write any method by my own. I only need to connect each GUI component to the existing method in NSApp. The more general examples about "outlets" and "actions" will be in the following tutorials.
There are two steps to connect GUI component to the action in an specific instance. The first step is connect the GUI component to the instance which has the "action". The second is to specify the "action" I want to use in this instance.
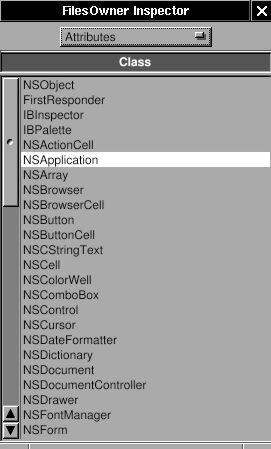
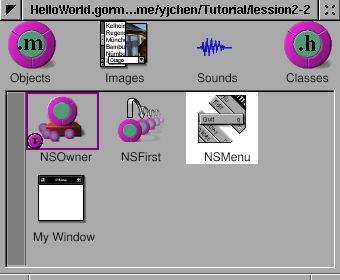
I start with the "Info Panel...", which is a "NSMenuItem". There is a method -orderFrontStandardInfoPanel in NSApp. Therefore, I need to connect the NSMenuItem "Info Panel" to NSApp. Then where is NSApp ? Since this is the main menu of this application, its owner is this application. Therefore, the instance NSOwner is NSApp. Look at the "Attributes" of NSOwner. It will tell you which class the NSOwner is.
 >
>Hold on the "Ctrl" key, and drag the "Info Panel..." into the NSOwner. There should be a small green circle with "s" (source) and a red circle with "t" (target). That means the source is connected to the target.
 >
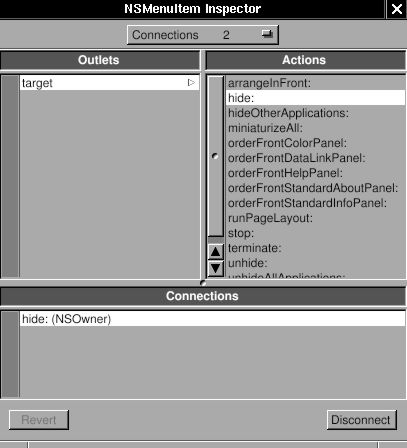
>Look at the inspector now. It should be the "NSMenuItem Inspector" because the "Info Panel" is a NSMenuItem instance. Choose the "Connections" in the inspector. In the "Outlets" column, there is a "target", which means the target of this NSMenuItem. Since I connect "Info Panel" to NSOwer, which is NSApp, the target refers to NSApp. Click on this target, it will show all the actions available in the target, NSApp. In the "Actions" column, you can find the method -orderFrontStandardInfoPanel:. Choose it, and click the "Connect" button in the inspector.
 >
>In the "Connections" column, you can see this NSMenuItem is connected to the method -orderFrontStandardInfoPanel: of NSOwer, which is NSApp in this case. Keep doing that for the menu "Hide" and "Quit": Ctrl-drag, and connect the proper action.
 >
>  >
> >
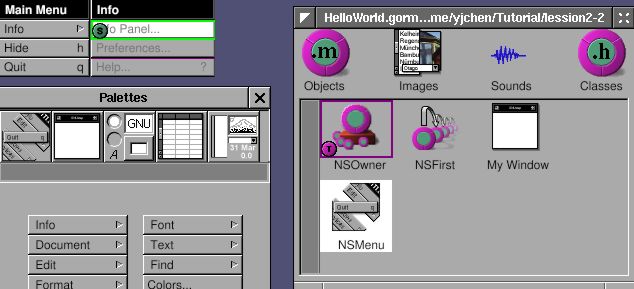
>Then the part for Gorm is done ! Save it as "HelloWorld.gorm", which is actually an directory and contains all the stuff it needs.
I still need the basic GNUmakefile and main.m to make it work. Here are the files:
GNUmakefile:
include $(GNUSTEP_MAKEFILES)/common.make APP_NAME = HelloWorld HelloWorld_HEADERS = HelloWorld_OBJC_FILES = main.m HelloWorld_RESOURCE_FILES = HelloWorldInfo.plist HelloWorld.gorm HelloWorld_MAIN_MODEL_FILE = HelloWorld.gorm include $(GNUSTEP_MAKEFILES)/application.make |
main.m:
#include <AppKit/NSApplication.h>

int main(int argc, const char *argv[])
{
   return NSApplicationMain (argc, argv);
} |
HelloWorldInfo.plist:
{
   ApplicationDescription = "Hello World Tutorial";
   ApplicationIcon = "";
   ApplicationName = HelloWorld;
   ApplicationRelease = 0.1;
   Authors = "";
   Copyright = "Copyright (C) 200x by ...";
   CopyrightDescription = "Released under...";
   FullVersionID = 0.1;
   URL = "";
} |
You can find the extra entry, HelloWorld_MAIN_MODEL_FILE, which means the HelloWorld.gorm is the main user interface file for this application. It is a shortcut to use the main user interface. Therefore, in main.m, I can use very simple codes than previous lesson. In the following tutorials, I will show the more general usage of Gorm file.
Chapter 4. Unknown 1
TimeMachine
Single Window Application
Single window application is one of the most commonly used application type. Here, a TimeMachine application is made to demonstrate several techniques of GNUstep programming.
Outlet and Action
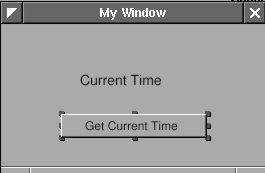
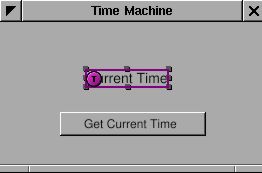
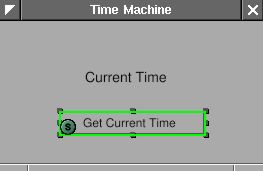
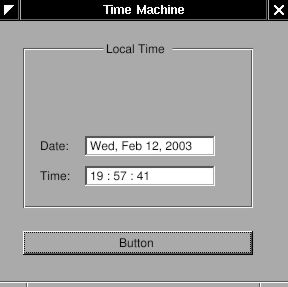
I'll write an application which show the current time with a button to update. It looks like this:
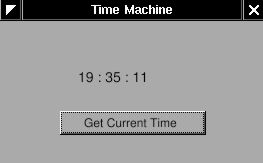 >
>This application is very easy. Just to show how to use "outlet" and "action" in Gorm, and the relation between "controller" and "view".
Open Gorm, choose "Document->New Application", and build a window with a title and a button.
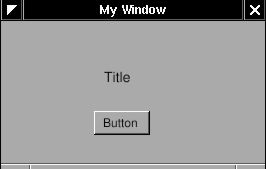 >
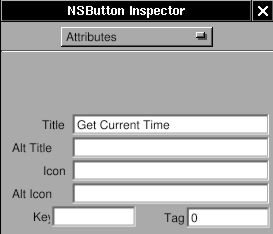
>You can set the title of the button in the inspector. So does the title of window.
 >
> >
>That's all I need to do on the interface.
Now, I need an "controller" to receive the action from the "view", and display the time on the "view". I need to create a object for this "controller".
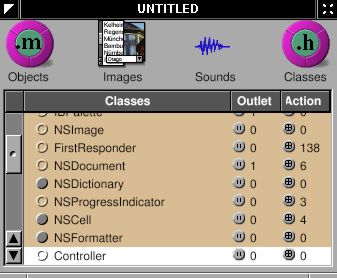
First, I need to design the class of this "controller". Click the "classes" in the main window of Gorm.
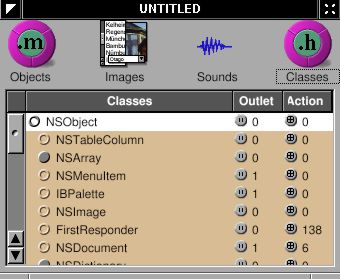 >
>It will show all the classes you can use. I want the class of this "controller" to inherit from NSObject. Therefore, choose "NSObject", then select the menu "Classes->Create Subclass...". It will create a new class under the NSObject.
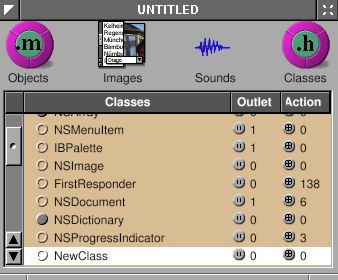 >
>Double-click on it to change the name. I call it "Controller" here. That's the name of this class.
 >
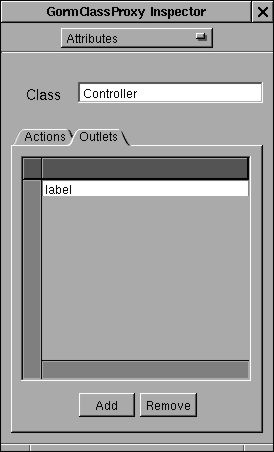
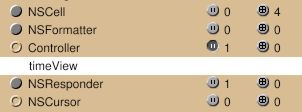
>Then I need a "outlet" in this class to connect to the label in the window, and an "action" which is triggered when the button is press.
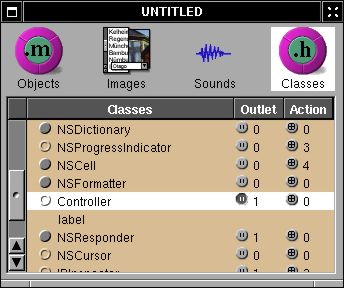
Choose the "Controller" class and click "Outlets" tab in the inspector. Press "Add" button, and change the name to "label" by double-clicking the "newOutlet". You will notice that "Controller" class now has one outlet. Click on the small round button will list the outlets it has.
 >
>
 >
>
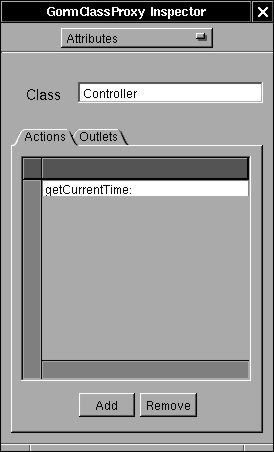
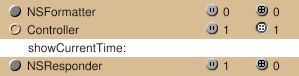
Now, click "Actions" tab and add a new action called "showCurrentTime:". You should notice that the action is ended with colon (:), which will be explained later.
 >
>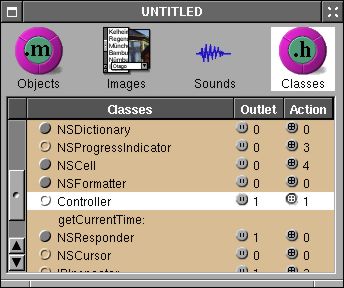 >
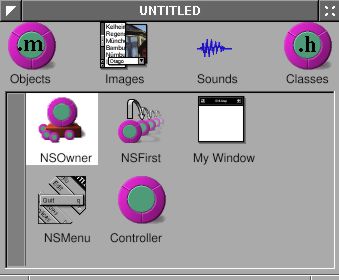
>Once I finish designing this class, I can create an instance from it.
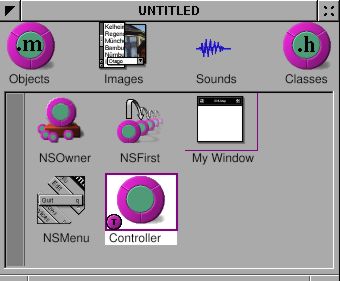
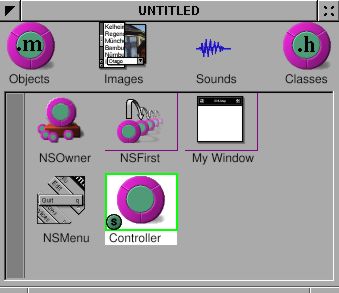
Choose the class "Controller", then select the menu "Classes->Instantiate". Look at the objects of Gorm main window. You should find a new instance, called "Controller". That's the instance I want to connect to the interface.
 >
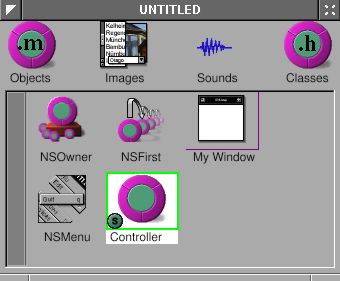
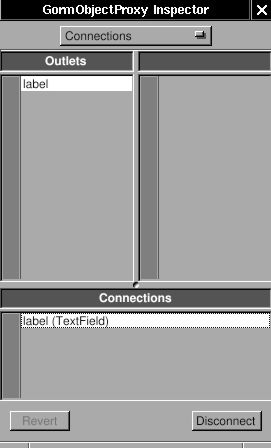
>Now, I can connect the "controller" to the "view" for the outlet. Hold on "Ctrl", select the "Controller" instance, drag to the label in the window. Look at the inspector, which will show all the outlet the "Controller" instance has. Select the only one "label", click the "connect" button. That's it.
 >
> >
>  >
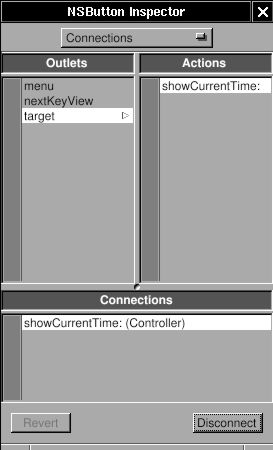
> Again, I can connect the "view" to the "controller" for the action. Hold on "Ctrl", select the button in the window, drag to the "Controller" instance. Look at the inspector, which will show all the outlet the button has. Select the "target" in the outlet column, then select the only one action the target has, "showCurrentTime". Click the "connect" button. That's it.
 >
> >
>  >
>Finally, I need to create the files for this "Controller" class in order to add the the source code. Otherwise, this class has not function at all. Select the class "Controller" ( not the instance !) in the Gorm main window. Choose menu "Classes->Create Class Files". A "Save" panel will show up and ask the filename. The default is "Controller.m", which is good enough. Click "O.K.". Save this Gorm file as "TimeMachine.gorm", then leave Gorm.
Now, I have a directory, "TimeMachine.gorm", and two file, "Controller.h" and "Controller.m".
Controller.h:
/* All Rights reserved */

#import <AppKit/AppKit.h>

@interface Controller : NSObject
{
   id label;
}
- (void) showCurrentTime: (id)sender;
@end |
Controller.m:
/* All Rights reserved */

#import <AppKit/AppKit.h>
#import "Controller.h"

@implementation Controller

- (void) showCurrentTime: (id)sender
{
   /* insert your code here */
} |
That's the source code of the class "Controller" I just created in Gorm. The method -showCurrentTime: has the message "sender". That's the reason the action name in Gorm must has the colon (:) in the end. In the "Controller.h", you can find the outlet "label" and the action "showCurrentTime:". Therefore, whatever you do on the outlet "label" will reflect to the "label" in the interface, and when the button "Get Current Time" is pressed, the action -showCurrentTime: will be called. That's how the outlet and action work.
Now, I can put some source code in this class.
Controller.m:
/* All Rights reserved */

#import <AppKit/AppKit.h>
#import "Controller.h"

@implementation Controller

- (void) showCurrentTime: (id)sender
{
   /* insert your code here */
  NSCalendarDate *date = [NSCalendarDate date];
  [date setCalendarFormat: @"%H : %M : %S"];
  [label setStringValue: [date description]];
} |
First, [NSCalendarDate date] will create an instance with the current date and time. After setting the format, put the description of current time into the outlet "label". When users click the "Get Current Time" button, it will show the current time.
That's it. Add the main.m and GNUmakefile, then it is ready to go.
main.m:
#import <AppKit/AppKit.h>

int main(int argc, const char *argv[])
{
   return NSApplicationMain (argc, argv);
} |
GNUmakefile:
include $(GNUSTEP_MAKEFILES)/common.make APP_NAME = TimeMachine TimeMachine_HEADERS = Controller.h TimeMachine_OBJC_FILES = main.m Controller.m TimeMachine_RESOURCE_FILES = TimeMachineInfo.plist TimeMachine.gorm TimeMachine_MAIN_MODEL_FILE = TimeMachine.gorm include $(GNUSTEP_MAKEFILES)/application.make |
In this example, the owner of the interface is NSApp, which is the NSOwner in Gorm, but the controller is the "Controller" instance. Sometimes, the owner and the controller could be the same. In simple application, the owner/controller of the window can also be the delegate of NSApp. That's all depending on the design of your application.
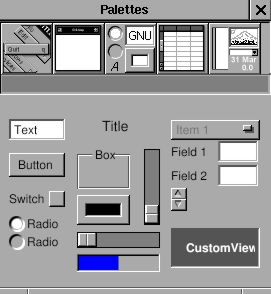
Custom View
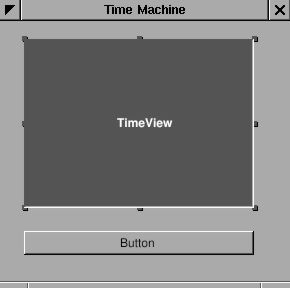
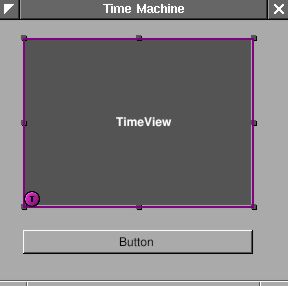
Gorm can work on the custom view, which is designed by the programmer, not the built-in GUI component. Here, I continue my "time machine" application to demonstrate how to do that. The new interface looks like this:
 >
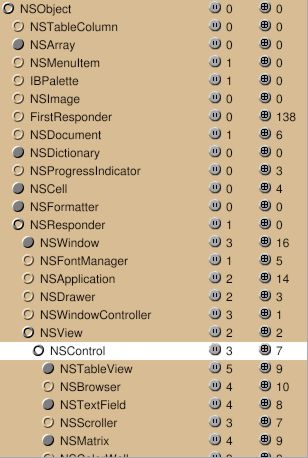
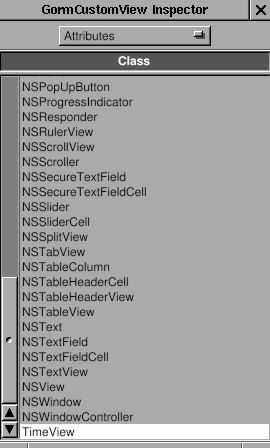
>Since I want to use the custom view in Gorm, I have to design the class first. The custom view can inherit from NSView, or NSControl, depending on what kind of functions you want. Actually, NSControl is a subclass of NSView. So I will inherit from NSControl. Click on the small circle of NSResponder to open its subclasses, then do the same thing on NSView and NSControl. Now, you can see that many GUI component inherit from NSControl, ex. NSTextField.
 >
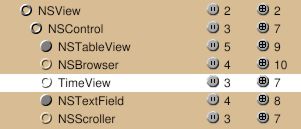
>I want my custom view, called "TimeView", inherit from NSControl. Choose "NSControl", then select menu "Classes->Create Subclass...". Double-click to change the name.
 >
>You can notice that class "TimeView" also inherits 3 outlets and 7 actions from NSControl. Once the class "TimeView" is created, I can use it as custom view.
Build the interface as below:
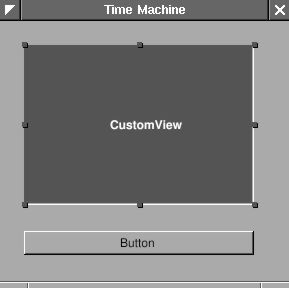 >
>Look at the "Attributes" in inspector of CustomView. Choose the class "TimeView".
 >
>The "CustomView" becomes "TimeView". That's it !
 >
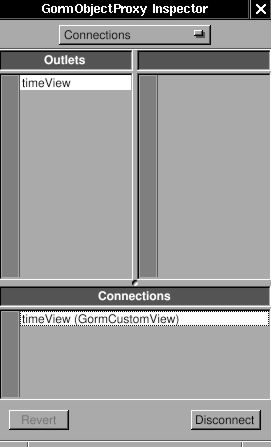
>As I did before, create another class for the "controller". Add one outlet for this "TimeView", and one action for the button. I name the outlet "timeView".
 >
> >
>Create an instance of class "Controller". Connect the button to the action "showCurrentTime", and the outlet "timeView" to the custom view "TimeView".
 >
> >
>  >
>Finally, create the class file for the classes "TimeView" and "Controller". Save this application as "TimeMachine.gorm".
Now, I need to design the interface for the class "TimeView". The class "TimeView" is actually four NSTextField in a NSBox. The reason that I made them in one class is because I can reuse it later on. Classes inherited from NSView will be initialized by calling method -initWithFrame:. Therefore, I only need to rewrite the method -initWithFrame: in the class "TimeView". Here are the files:
TimeView.h:
#import <AppKit/AppKit.h>

@interface TimeView : NSControl
{
   NSTextField *labelDate, *labelTime;
   NSTextField *localDate, *localTime;
   NSCalendarDate *date;
}

- (NSCalendarDate *) date;
- (void) setDate: (NSCalendarDate *) date;

@end |
TimeView.m:
#import <AppKit/AppKit.h>
#import "TimeView.h"

@implementation TimeView
- (id) initWithFrame: (NSRect) frame
{
   NSBox *box;

   self = [super initWithFrame: frame];
   box = [[NSBox alloc] initWithFrame: NSMakeRect(0, 0,
                                                  frame.size.width,
                                                  frame.size.height)];
   [box setBorderType: NSGrooveBorder];
   [box setTitlePosition: NSAtTop];
   [box setTitle: @"Local Time"];

   labelDate = [[NSTextField alloc] initWithFrame: NSMakeRect(10, 45, 35, 20)];
   [labelDate setStringValue: @"Date: "];
   [labelDate setBezeled: NO];
   [labelDate setBackgroundColor: [NSColor windowBackgroundColor]];
   [labelDate setEditable: NO];

   labelTime = [[NSTextField alloc] initWithFrame: NSMakeRect(10, 15, 35, 20)];
   [labelTime setStringValue: @"Time: "];
   [labelTime setBezeled: NO];
   [labelTime setBackgroundColor: [NSColor windowBackgroundColor]];
   [labelTime setEditable: NO];

   localDate = [[NSTextField alloc] initWithFrame: NSMakeRect(55, 45, 130, 20)];
   localTime = [[NSTextField alloc] initWithFrame: NSMakeRect(55, 15, 130, 20)];

   [box addSubview: labelDate];
   [box addSubview: labelTime];
   [box addSubview: localDate];
   [box addSubview: localTime];
   RELEASE(labelDate);
   RELEASE(labelTime);
   RELEASE(localDate);
   RELEASE(localTime);

   [self addSubview: box];
   RELEASE(box);

   return self;
}

- (NSCalendarDate *) date
{
   return date;
}

- (void) setDate: (NSCalendarDate *) aDate
{
   ASSIGN(date, aDate);
   [date setCalendarFormat: @"%a, %b %e, %Y"];
   [localDate setStringValue: [date description]];
   [date setCalendarFormat: @"%H : %M : %S"];
   [localTime setStringValue: [date description]];
}

- (void) dealloc
{
  RELEASE(date);
  [super dealloc];
}

@end |
When Gorm generates the class files, it contains some default codes in it. Since I don't need any of them, they are safe to be removed. In TimeView.h, I declare four NSTextField for display, and on NSCalendarDate to store the date. I also declare two accessory methods to set and get the date. In the -initWithFrame, one NSBox is set up, and four NSTextField is put into it. And class "TimeView" is a subclass of NSView, I add the NSBox as the subview of the class "TimeView".
Other parts of this application should be very easy. Here are the files:
Controller.h:
#import <AppKit/AppKit.h>
#import "TimeView.h"

@interface Controller : NSObject
{
   id timeView;
}
- (void) showCurrentTime: (id)sender;
@end |
Controller.m:
#import <AppKit/AppKit.h>
#import "Controller.h"

@implementation Controller
- (void) showCurrentTime: (id)sender
{
   /* insert your code here */
   NSCalendarDate *date = [NSCalendarDate date];
   [timeView setDate: date];
}

@end |
main.m:
#import <AppKit/AppKit.h>

int main(int argc, const char *argv[])
{
   return NSApplicationMain (argc, argv);
} |
GNUmakefile:
include $(GNUSTEP_MAKEFILES)/common.make APP_NAME = TimeMachine TimeMachine_HEADERS = Controller.h TimeView.h TimeMachine_OBJC_FILES = main.m Controller.m TimeView.m TimeMachine_RESOURCE_FILES = TimeMachineInfo.plist TimeMachine.gorm TimeMachine_MAIN_MODEL_FILE = TimeMachine.gorm include $(GNUSTEP_MAKEFILES)/application.make |
You should notice that I didn't instantiate the class "TimeView" in class "Controller" because when I add an custom view to the window, it is instantiated automatically. I only need to specify the class the custom view should be. On the contrary, I have to instantiate the class "Controller" in Gorm because it is not a GUI component. Without instantiation, I can't connect the "controller" to the "view".
Drawing
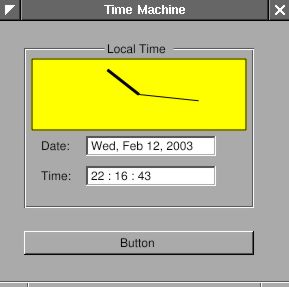
I want a graphic clock, which looks like this:
 >
>It is very simple. I only need to add a new GUI component in the class TimeView. I call this new class "ClockView". Since "ClockView" will be the subview of "TimeView", when "TimeView" is update, I also need to update the "ClockView".
ClockView.h:
#import <AppKit/AppKit.h>
#include <math.h>

@interface ClockView : NSView
{
   NSPoint posHour, posMinute;
}

- (void) setDate: (NSCalendarDate *) aDate;
@end |
ClockView.m:
#import "ClockView.h"

@implementation ClockView
- (id) init
{
   self = [super init];
   posHour = NSMakePoint(0,0);
   posMinute = NSMakePoint(0,0);
   return self;
}

- (void) drawRect: (NSRect) frame
{
   NSPoint origin = NSMakePoint(frame.size.width/2, frame.size.height/2);

   NSBezierPath *bp = [NSBezierPath bezierPathWithRect: [self bounds]];
   [[NSColor yellowColor] set];
   [BP fill];

   BP = [NSBezierPath bezierPathWithRect: NSMakeRect(1, 1,
                                                     frame.size.width-2,
                                                     frame.size.height-2)];
   [[NSColor blackColor] set];
   [BP stroke];

   BP = [NSBezierPath bezierPath];
   [BP setLineWidth: 3];
   [BP moveToPoint: origin];
   [BP relativeLineToPoint: posHour];
   [BP stroke];

   [BP setLineWidth: 1];
   [BP moveToPoint: origin];
   [BP relativeLineToPoint: posMinute];
   [BP stroke];
}

- (void) setDate: (NSCalendarDate *) date;
{
   int hour = [date hourOfDay];
   int minute = [date minuteOfHour];
   float hour_x = 40*sin((M_PI*hour/6)+(M_PI*minute/360));
   float hour_y = 40*cos((M_PI*hour/6)+(M_PI*minute/360));
   float minute_x = 60*sin(M_PI*minute/30);
   float minute_y = 60*COs(M_PI*minute/30);

   posHour = NSMakePoint(hour_x, hour_y);
   posMinute = NSMakePoint(minute_x, minute_y);
   [self setNeedsDisplay: YES];
}

@end |
ClockView inherits from NSView. The most important method it should override is -drawRect:. When this view need to update, -drawRect: will be called. Therefore, I put all the drawing in this method. NSBezierPath is how GNUstep draws. I assign the path, set the color, then draw. There are good article about drawing: Introduction to Cocoa Graphics, Part I, Part II.
A few codes are needed to include ClockView in TimeView. One is to add ClockView as a subview of NSBox in TimeView. Another is to update ClockView when TimeView is update. In method -setDate: of ClockView, it uses [self setNeedsDisplay: YES] to make this view update. This modification is easy to do. You can play around it.
Panel
Panel is a special kind of window. Read the Cocoa document for more details: Windows and Panels. Since I have a clock already, I want to know the time in different time zones. My idea is that when I click the title of the NSBox, a panel will show up and ask the time zone. Once the time zone is inputted, it will display the time in that area. Since NSPanel is a subclass of NSWindow, the usage of NSPanel is similar to the NSWindow. Again, I need a "controller" to control the "view", which is NSPanel in this case. "View" is generated by Gorm, and I need to write the "controller" by myself. In this example, I'll show how to load the gorm file. There are many built-in panel in GNUstep. I also use one in this example.
Firstly, I need to build the interface for the panel. Open Gorm, Choose menu "Document -> New Module -> New Empty". Look at the palettes. There is one for panel.
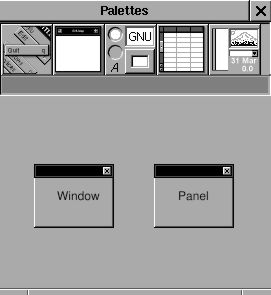 >
>Drag the panel out of palettes. Build the interface as below.
 >
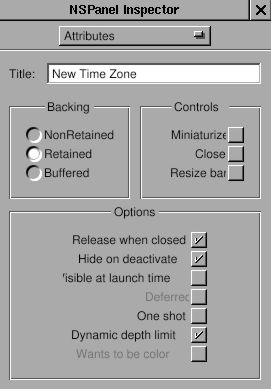
>You can change the size of panel in the inspector. Here is the attributes of this panel I use.
 >
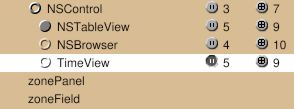
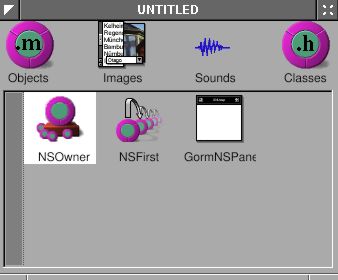
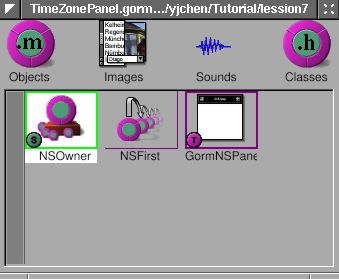
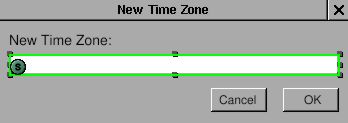
>Now, I got the "view". Then where is the "controller" ? Generally, I can write a new class as the controller of this view, but this is a small program. It is not necessary to write a new class only as the controller. So I decide to use the class "TimeView" as the controller for this panel. So class "TimeView" acts as the custom view for that main window interface, and the controller for the panel. Since "TimeView" is the controller of this panel, I need to connect the outlets and actions. Therefore, I need to create the class "TimeView" again in this gorm file, even though there is already one in TimeMachine.gorm file.
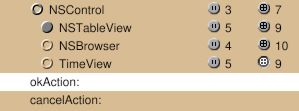
You already know how to create the class "TimeView". I add two outlets, "zonePanel" and "zoneField", and two actions, "okAction:" and "cancelAction:".
 >
> >
>But rather than creating an instance to connect the panel, I'll set the owner of this panel as the class "TimeView". The advantage is that I can reduce the number of instances to use.
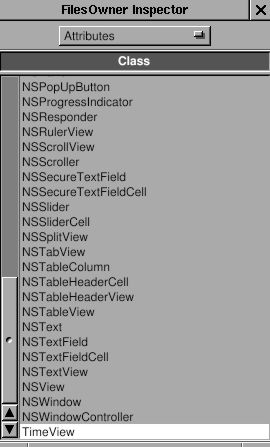
Select the NSOwner in Gorm main window, then select class "TimeView" in "attributes" of inspector.
 >
> >
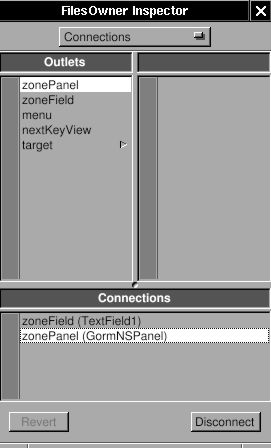
>By this way, I can connect the panel to the NSOwner, which is an instance of class "TimeView". Connect the two buttons to the actions in NSOwner, the outlet "zoneField" to the NSTextField in panel, and the outlet "zonePanel" to the panel. Pay attention to how the NSOwner connects to the panel.
 >
> >
>Save this interface as "TimeZonePanel.gorm" file, and quit Gorm. Don't generate the files for class "TimeView" because I already have the files. GNUstep can figure out where the classes are and where the outlets/actions are.
Now, I need to add the new outlets and actions into the files of "TimeView". Here is the header.
TimeView.h:
#import <AppKit/AppKit.h>
#import "ClockView.h"

@interface TimeView : NSControl
{
   id zonePanel;
   id zoneField;
   NSBox *box;
   NSTextField *labelDate, *labelTime;
   NSTextField *localDate, *localTime;
   NSCalendarDate *date;
   ClockView *clockView;
}

- (NSCalendarDate *) date;
- (void) setDate: (NSCalendarDate *) date;
- (void) okAction: (id) sender;
- (void) cancelAction: (id) sender;
@end |
I add the outlets and actions by myself.
TimeView.m:
- (void) mouseDown: (NSEvent *) event
{
   NSRect titleFrame = [box titleRect];
   NSPoint windowLocation = [event locationInWindow];
   NSPoint viewLocation = [self convertPoint: windowLocation fromView: [self superview]];
   BOOL status = NSMouseInRect(viewLocation, titleFrame, NO);
   if (status == YES)
     {
       [NSBundle loadNibNamed: @"TimeZonePanel.gorm" owner: self];
       [NSApp runModalForWindow: zonePanel];
     }
} |
The method -mouseDown: is called when mouse is clicked within this view. Here, I calculate whether the mouse is clicked in the area of the title of NSBox. If so, use [NSBundle loadNibName: owner:] to load the window, and [NSApp runModalForWindow] display it. Read Cocoa's document about "How Modal Windows Work".
Now, I just need to finish the actions part in TimeView.m.
TimeView.m:
- (void) cancelAction: (id) sender
{
   [NSApp abortModal];
   [zonePanel close];
}

- (void) okAction: (id) sender
{
   NSTimeZone *tempZone;
   tempZone = [NSTimeZone timeZoneWithName: [zoneField stringValue]];
   [NSApp stopModal];
   [zonePanel close];
   if (tempZone == nil)
      {
         NSRunAlertPanel(@"Warning!",
                         @"Wrong Time Zone !!",
                         @"OK", nil, nil);
      }
   else
      {
         [date setTimeZone: tempZone];
         [box setTitle: [tempZone description]];
         [self setDate: date];
      }
} |
In method -okAction:, I use a built-in panel, NSRunAlertPanel. There are several built-in panels in GNUstep ready to use. Now, you can display the current time in different time zone.
It is inconvenient to use this pop-up panel because you have to click the NSTextField before typing. Sometimes, it is more convenient to control the user interface via keyboard rather than mouse. Here, I touch a little bit this topic to make the panel more easy to use.
When a window pop-up, it is the first object to receive events and key-in. It is called the "First Responder". But usually we want some other objects in this window to receive the key-in. Therefore, we need to change the "first responder" of this window, which I can do that by using [NSWindow makeFirstResonpder:].
When I want to use "Tab" key to switch between different views in the window, I need to assign the "nextKeyView" for the next view when "Tab" key is pressed so that the application know where the responder should be.
Finally, when I finish typing in the NSTextField, I want to hit the "Return" key equivalent to press the "OK" button by mouse so that I don't need to move my hand out of the keyboard. In this case, since NSTextField is also a subclass of NSControl, I can set the target and action of NSTextField the same as the NSButton "OK". Therefore, when I hit the "Return", it is equivalent to click on the "OK" button.
These are small tune-ups for the application, but it makes users more easy to use the application.
Firstly, let's set the "first responder" of the window to the NSTextField:
TimeView.m:
- (void) mouseDown: (NSEvent *) event
{
   NSRect titleFrame = [box titleRect];
   NSPoint windowLocation = [event locationInWindow];
   NSPoint viewLocation = [self convertPoint: windowLocation fromView: [self superview]];
   BOOL status = NSMouseInRect(viewLocation, titleFrame, NO);
   if (status == YES)
      {
         [NSBundle loadNibNamed: @"TimeZonePanel.gorm" owner: self];
         [zonePanel makeFirstResponder: zoneField];
         [NSApp runModalForWindow: zonePanel];
      }
} |
Only one line is enough. Now, when this panel shows up, the cursor will automatically in the NSTextField, and this NSTextField are ready to type.
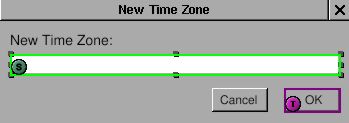
Secondly, I want to set the target and action of NSTextField the same as the NSButton "O.K.". Open the TimeZonePanel.gorm, connect the NSTextField to the method -okAction: of the NSOwner. That's it. Whenever you hit the "Return" key in the NSTextField, the method -okAction: is called.
 >
> >
>  >
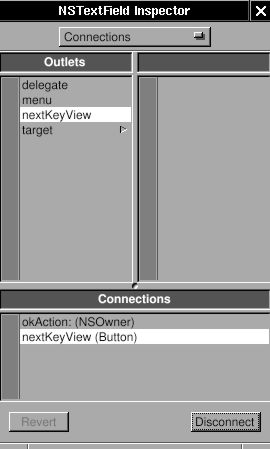
>Thirdly, I need to connect the nextKeyView outlet between the views in the window. I'll connect the nextKeyView of NSTextField to NSButton "O.K.", the nextKeyView outlet of NSButton "O.K." to NSButton "Cancel", and the nextKeyView outlet of NSButton "Cancel" to the NSTextField. By doing that, I can switch between these views by "Tab" key. Here, I just show how the nextKeyView of NSTextField connects to NSButton "O.K.". You can do the rest of the part.
 >
> >
>Source code: Panel-src.tar.gz.
Notification
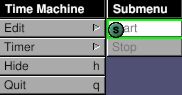
Since I can change the time zone, I would like to display several clock at the same window, and adjust the number of clocks dynamically. First, I need to add new submenu: "Edit", and two menu item in it: "Add Clock" and "Delete Clock". Then add two action in the class "Controller": "addClock:" and "deleteClock". Connect the menu item to the action in the instance of class "Controller" in the gorm file. Then I have done the part of interface. When user select the menu item "Add Clock", the method "addClock:" will be called, so does the menu item "Delete Clock".
Now, how do I manage these clocks dynamically ? I can trace each of them manually, but it will be complicated. Another way is that I don't trace any of them, but the problem is how do it control any of them ? I can use the notification in GNUstep, which is a pretty handy way to communicate between objects.
Here is a related article: NSNotificationCenter
Firstly, I need to adjust the interface according to the adding and deleting clock. I need trace how many clocks exist so that I won't accidentally delete the last clock.
Controller.h:
#import <AppKit/AppKit.h>
#import "TimeView.h"

@interface Controller : NSObject
{
   id timeView;
   unsigned int totalNumber;
}

- (void) showCurrentTime: (id) sender;
- (void) addClock: (id) sender;
- (void) deleteClock: (id) sender;
@end |
I add a variable, totalNumber to trace the number of clocks, and add two actions manually since I didn't generate the class files from Gorm.
Controller.m:
- (id) init
{
   self = [super init];
   totalNumber = 1;
   return self;
}

- (void) addClock: (id) sender
{
   TimeView *aView;
   NSWindow *mainWindow = [NSApp mainWindow];
   NSRect windowFrame, timeViewFrame;
   windowFrame = [mainWindow frame];
   timeViewFrame = [timeView frame];

   [mainWindow setFrame: NSMakeRect(windowFrame.origin.x,
                                    windowFrame.origin.y,
                                    windowFrame.size.width+timeViewFrame.size.width,
                                    windowFrame.size.height)
                display: YES];
   aView = [[TimeView alloc] initWithFrame: NSMakeRect(timeViewFrame.origin.x + totalNumber*timeViewFrame.size.width,
                                                       timeViewFrame.origin.y,
                                                       timeViewFrame.size.width,
                                                       timeViewFrame.size.height)];

   [[mainWindow contentView] addSubview: aView];
   RELEASE(aView);
   totalNumber ++;
}

- (void) deleteClock: (id) sender
{
   NSArray *subviews;
   NSWindow *mainWindow = [NSApp mainWindow];
   NSRect windowFrame, timeViewFrame;
   int i;
   windowFrame = [mainWindow frame];
   timeViewFrame = [timeView frame];

   subviews = [[mainWindow contentView] subviews];

   for (i = [subviews count]-1; i > 1; i--)
     {
       if ([[subviews objectAtIndex: i] isMemberOfClass: [TimeView class]])
       [[subviews objectAtIndex: i] removeFromSuperview];
       totalNumber--;
       [mainWindow setFrame: NSMakeRect(windowFrame.origin.x,
                                        windowFrame.origin.y,
                                        windowFrame.size.width-timeViewFrame.size.width,
                                        windowFrame.size.height)
                    display: YES];
       break;
     }
} |
In the method -init, I initiate the variable, totalNumber, as 1 since there is already one in the Gorm file. In method -addClock:, I have to calculate the change of window size and where to put the new clock. They are done by very simple calculation. Once I add the new clock into the window, the window will retain this clock. Therefore, I can release it and no longer trace it. In the method -deleteClock:, I also need to change the size of window by simple calculation. The only problem is that since I don't trace the clocks, how do I delete them ? I can get all the subviews from the window, and delete from the last "TimeView" object. That's the way I can access the objects in the window. Very easy to maintain.
Now, if you hit the button "Get Current Time", you will notice that only the origin clock is updated. That's because it is the only one which is connected by the outlet. I can get all the subviews from the window, and call their method one by one. That will work, but is not a elegent way. I can use the "Notification" and "Notification Center" to archive this goal. Read the Cocoa document for more details.
The idea is that an object can be a speaker, and many objects can be the audience. So one talks, many listen. That's the way it works. So when user press the button "Get Current Time", the "Controller" must speak to all the clocks. Below is how it speak:
Controller.h:
- (void) showCurrentTime: (id)sender
{
   [[NSNotificationCenter defaultCenter] postNotificationName: @"TimeViewShouldUpdateCurrentTime"
                                                       object: [NSCalendarDate date]];
} |
Actually, it talks to the "Notification Center", and the notification center will broadcast what it say. I need to specify the name of notification because there are so many notifications on the air. The name of notification is the way to distinguish them. And a notification can contain an object within it. That's how the speaker and audience transfer the information. It can be nil. Here, I use [NSCalendarDate date].
Now, the speaker speaks. How do the audience listen ? In this example, all the instance of class TimeView should listen in order to update the current time. I need to register the audience to the notification center so that they can receive the notification.
TimeView.m:
- (id) initWithFrame: (NSRect) frame
{
   self = [super initWithFrame: frame];

   box = [[NSBox alloc] initWithFrame: NSMakeRect(0, 0,
                                                  frame.size.width,
                                                  frame.size.height)];
   [box setBorderType: NSGrooveBorder];
   [box setTitlePosition: NSAtTop];
   [box setTitle: @"Local Time"];

   clockView = [[ClockView alloc] initWithFrame: NSMakeRect(0, 70,
                                                            frame.size.width,
                                                            frame.size.height)];
   labelDate = [[NSTextField alloc] initWithFrame: NSMakeRect(10, 45, 35, 20)];
   [labelDate setStringValue: @"Date: "];
   [labelDate setBezeled: NO];
   [labelDate setBackgroundColor: [NSColor windowBackgroundColor]];
   [labelDate setEditable: NO];

   labelTime = [[NSTextField alloc] initWithFrame: NSMakeRect(10, 15, 35, 20)];
   [labelTime setStringValue: @"Time: "];
   [labelTime setBezeled: NO];
   [labelTime setBackgroundColor: [NSColor windowBackgroundColor]];
   [labelTime setEditable: NO];

   localDate = [[NSTextField alloc] initWithFrame: NSMakeRect(55, 45, 130, 20)];
   localTime = [[NSTextField alloc] initWithFrame: NSMakeRect(55, 15, 130, 20)];

   [box addSubview: clockView];
   [box addSubview: labelDate];
   [box addSubview: labelTime];
   [box addSubview: localDate];
   [box addSubview: localTime];
   RELEASE(clockView);
   RELEASE(labelDate);
   RELEASE(labelTime);
   RELEASE(localDate);
   RELEASE(localTime);

   [self addSubview: box];
   RELEASE(box);
   [[NSNotificationCenter defaultCenter] addObserver: self
                                            selector: @selector(setDate:)
                                                name: @"TimeViewShouldUpdateCurrentTime"
                                              object: nil];
   [self showCurrentTime: self];
   return self;
} |
Only one line is needed for register. It specify what object to receive the notification (addObserver:), which method to handle the notification (selector:), what's the name of notification (name:), and what's the object of the notification. It is important that the name of notification should be the same as what the speaker use. So once the speaker say "TimeViewShouldUpdateCurrentTime", the objects which register them using "TimeViewShouldUpdateCurrentTime" will receive the notification, and the selector will be called. The "object: nil" means that this object accept all the notification with the name "TimeViewShouldUpdateCurrentTime" no matter what kind of object it carries on.
Now, I register the TimeView for the notification "TimeViewShouldUpdateCurrentTime". Once the speaker speak, the method -setDate: will be called. So I need to set up this method.
TimeView.m:
- (void) setDate: (NSNotification *) not { ASSIGN(date, [not object]); [date setTimeZone: [NSTimeZone timeZoneWithName: [box title]]]; [date setCalendarFormat: @"%a, %b %e, %Y"]; [localDate setStringValue: [date description]]; [date setCalendarFormat: @"%H : %M : %S"]; [localTime setStringValue: [date description]]; [clockView setDate: date]; } |
I reuse the -setDate in previous lesson, but change the interface because right now, it is called by notification center. And I can get the object the notification carries on by using [NSNotification object] method.
Finally, I need to remove the observer from notification center when it is released. Otherwise, it causes problems. So here is the -dealloc.
TimeView.m:
- (void) dealloc
{
   [[NSNotificationCenter defaultCenter] removeObserver: self];
   RELEASE(date);
   [super dealloc];
} |
To sum up, the speaker speak to notification center with a specific name of notification, and may or may not carry an object with the notification. The audience register themselves to notification center with what kinds of notification they want to receive by the name of notification. When notification center get the notification, it will call the registered method in the audience.
There are some source codes needed to be modified due to the change of setDate: method. They are not shown here, and it's not hard to figure them out.
Since I can update all the clocks manually, I can do it automatically. NSTimer is a timer which can trigger an action after a given time repeatly or not. Here, I'll use a NSTimer to make the clock "run".
I need to add new submenu: "Timer", and two menu item: "Start" and "Stop". Add two action in class "Controller": "startTimer:" and "stopTimer:". Then connect the menu item to the action. This should be very easy now.
 >
> >
> 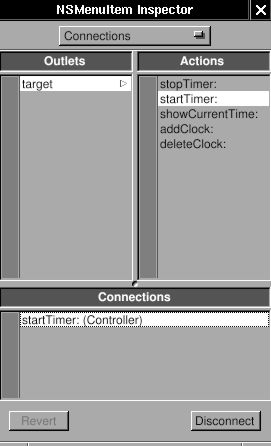 >
>Add these two actions and a NSTimer in Controller.
Controller.h:
#import <AppKit/AppKit.h>
#import "TimeView.h"

@interface Controller : NSObject
{
   id timeView;
   unsigned int totalNumber;
   NSTimer *timer;
}
- (void) showCurrentTime: (id) sender;
- (void) addClock: (id) sender;
- (void) deleteClock: (id) sender;
- (void) startTimer: (id) sender;
- (void) stopTimer: (id) sender;
@end |
Controller.m:
- (void) startTimer: (id) sender
{
  timer = [NSTimer scheduledTimerWithTimeInterval: 1
                                           target: self
                                         selector: @selector(showCurrentTime:)
                                         userInfo: nil
                                          repeats: YES];
}

- (void) stopTimer: (id) sender
{
  [timer invalidate];
} |
That's all. In NSTimer, set the interval, target, selector (action), and repeats. Then it will trigger the action -showCurrentTime: every second. Use -invalidate to stop the timer. Generally, you need to write a thread in order not to block the user interface. But with the help of timer, you can totally avoid this problem. Finger (in gnustep/usr-apps/) is another good example how to avoid thread using non-blocking I/O.
 | Since timer is autoreleased, it might disappear anytime in this example, which causes serious memory problem, and usually make application unstable. It would be better to retain the timer in -startTimer: and release it in -stopTimer:, and to ensure that only one timer exist when user click the "start" menu more than once. |
Money
Document-base application
The Document-base application is a kind of special, but commonly used applications. You can open multiple documents, edit and save each of them. Most text editors belong to the document-base application. The Ink.app in GNUstep is a very good example to look at. Here is the Cocoa document about document-base application. You have to read it first. Otherwise, you probably will not know what I am doing. It looks complicated at the first time. You have to deal with NSDocumentController, NSWindowController, NSDocument and NSWindow. Actually, since I use Gorm to build the NSWindow, and NSDocumentController and NSWindowController are not required to subclass, NSDocument is the only class I have to deal with. That makes everything very easy. In this tutorial, I only make the skeleton of the document-base application. The real functions will be add in the later tutorials.
Now, I have to create the main user interface first. Since it is a document-base application, there is not main window at all. I only need a menu so that users can open, save and close each document. So open Gorm, choose "Document->New Application". Click the window in the Gorm main window, use "Edit->Delete" to delete the window. Drag the menu "Info" and "Document" into the main menu. The main user interface will be like this:
 >
>Only the menu, no window.
Next, I need a NSDocumentController. Choose the class "NSDocumentController", use menu "Classes->Instantiate" to make an instance.
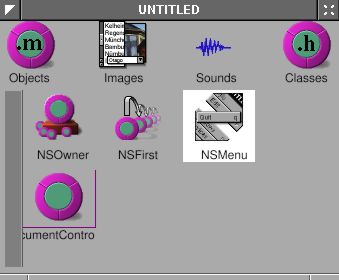 >
>The main user interface is done. Save to as "Money.gorm".
NSDocumentController will look at the property list of this application in order to know what kind of document it should handle. Here is an example of propery list.
MoneyInfo.plist
{
   ApplicationDescription = "Money";
   ApplicationIcon = "";
   ApplicationName = Money;
   ApplicationRelease = 0.1;
   Authors = "";
   Copyright = "Copyright (C) 200x by ...";
   CopyrightDescription = "Released under...";
   FullVersionID = 0.1;
   URL = "";
   NSTypes = (
      {
         NSName = "mon";
         NSHumanReadableName = "Money Document";
         NSUnixExtensions = ("mon");
         NSRole = Editor;
         NSDocumentClass = Document;
      }
   );
} |
The important part is that NSTypes define what kind of document it should handle, and what class to call. In this case, it is class "Document", which I haven't implement yet. This is a simplified property list, but it works. Look at the InkInfo.plist as a better one.
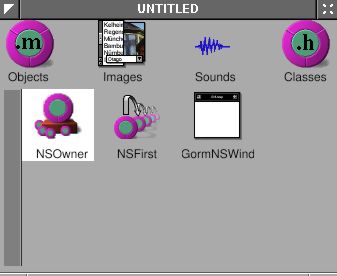
Now, I need to make the class "Document" as the property indicates, and the window for each document. Open Gorm, choose "Document->New Empty". Drag a window out of the palettes. Since this tutorial is only the skeleton, I do nothing in the window.
Look at the classes in the Gorm main window, and use "Classes->Create Subclass" to create a subclass of NSDocument, called "Document".
 >
>Don't instantiate it. Instead, it will be the owner of the document window. Click the NSOwner in the Gorm main window, Look at the "Attributes" in the inspector. Choose the "Document" class.
 >
> >
>Now, the NSOwner is the class of Document. I need to connect the _window outlet of NSOwner (class "Document") to the window,
 >
> >
>and the set the delegate of window to the NSOwner (class "Document").
 >
> >
>Finally, use "Classes->Create Class Files" to create the files of class "Document". Save them to Document.m and Document.h. Save the Gorm file into "Document.gorm".
Now, I have Money.gorm, MoneyInfo.plist, Document.h, Document.m and Document.gorm. Five files (Gorm files are actually directories).
NSDocumentController know what class to use because it is written in the property list file. How do NSDocument (or its subclass, "Document") know where the interface of document is ? In this case, the interface of document is Document.gorm. The simple way is to implement the -windowNibName: in NSDocument. The Document files created from Gorm won't work perfectly. Here is the working one:
Document.h:
#import <AppKit/AppKit.h>
#import <AppKit/NSDocument.h>

@interface Document : NSDocument
{
}
@end |
Document.m:
#import "Document.h"

@implementation Document

- (NSString *) windowNibName
{
   return @"Document.gorm";
}

@end |
I deleted the extra codes inherited from NSDocument. Include the NSDocument explicitly in the header file because AppKit.h doesn't include it. The most important part is that I return the name of the document interface, "Document.gorm", so that NSDocument can find where the interface are.
Here are the rest of files:
main.m:
#import <AppKit/AppKit.h>
int main(int argc, const char *argv[])
{
   return NSApplicationMain (argc, argv);
} |
GNUmakefile:
include $(GNUSTEP_MAKEFILES)/common.make

APP_NAME = Money
Money_HEADERS = Document.h
Money_OBJC_FILES = main.m \
                   Document.m
Money_RESOURCE_FILES = MoneyInfo.plist \
                       Money.gorm \
                       Document.gorm
Money_MAIN_MODEL_FILE = Money.gorm

include $(GNUSTEP_MAKEFILES)/application.make |
Here is the source code: Money-src.tar.gz
Once the application starts up, you will see only the menu. Use "Document->New" to open a new document. A empty window will show up. You can keep as many documents as you want. The menu items will be automatically enabled depending on the existance of the document. Most menu doesn't work yet.
GNUstep offer a greate framework for document-base applications. Right now, I only need to focus on the Document itself, and don't need to worry about how to manage the multiple documents/windows. GNUstep will handle it perfectly.
Table
I have the skeleton of document-base application already. I want it be a spreadsheet-like application to track the expense. If you are interested in text editors, Ink.app in GNUstep CVS is a pretty good one. It involves the text system of GNUstep, which is a big topic. Spreadsheet-like applications need a table. NSTableView is a good start. NSTableView is a more complicated user interface than NSButton, NSTextField, etc. So do NSBrowser, NSOutlineView, NSMatrix, etc. GNUstep does a great job to make it very easy to use. I'll try to explain it step by step.
Here is a related article: Getting Started With NSTableView
Use Gorm to open Document.gorm. Add a table view into the window. Try to resize it until it fit the whole window.
 >
>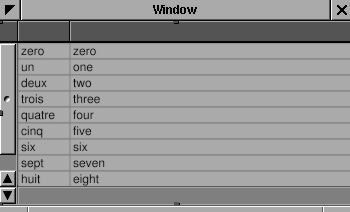 >
>Check the "Horizontal" scroller. Actually it doesn't matter for now.
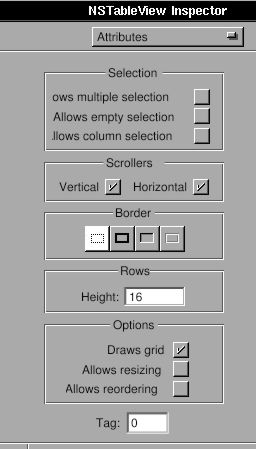 >
>Look at the "Size" in the inspector of NSTableView. Click the line in the box to make them the spring.
 >
>The box represent the NSTableView. The straight line or spring represent the distance relationship. Line outside the box is the distance between NSTableView and its superview. It is the window in this case. The line inside the box is the size of the NSTableView. Straight line means the distance is fixed, the spring means it is resizable. In this case, when window is resized, since the distance between NSTableView and window is fixed, NSTableView will be resized according to the window. That's the behavior I want.
You can change the title of the column by double-click on it. But it is not necessary for now. You will find that it is still hard to control the interface of NSTableView from Gorm. I'll do that programmingly. Therefore, I need a outlet connected to this NSTableView from NSOwner.
Add an outlet, tableView, in the class "Document".
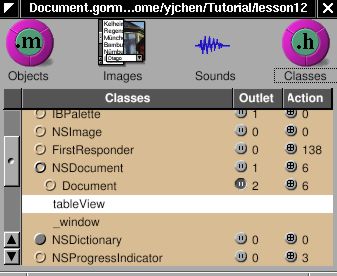 >
>Set NSOwner as the data source and delegate of the NSTableView. I'll explain the data source later.
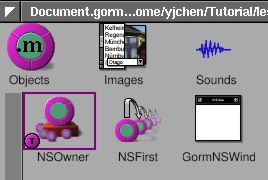 >
>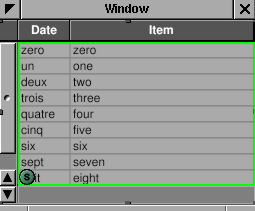 >
> 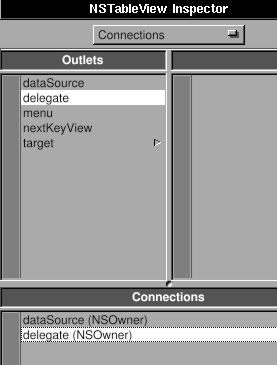 >
>Connect the outlet "tableView" to NSTableView.
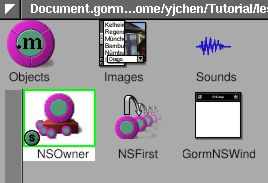 >
> 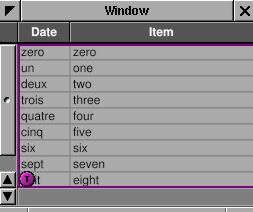 >
> >
>Save the Gorm file and quit Gorm.
Add the new outlet in Document.h.
Document.h:
#import <AppKit/AppKit.h>
#import <AppKit/NSDocument.h>

@interface Document : NSDocument
{
   id tableView;
}
@end |
The way NSTableView work is that when it need to display, it will ask its data source to provide the data it needs. So I need to implement some methods to provide NSTableView the data it need. There are necessary two methods:
Document.m:
- (int) numberOfRowsInTableView: (NSTableView *) view
{
   return 5;
}

- (id) tableView: (NSTableView *) view
       objectValueForTableColumn: (NSTableColumn *) column
       row: (int) row
{
   return [NSString stringWithFormat: @"column %@ row %d", [column identifier], row];
} |
Method -numberOfRowsInTableView: will ask how many rows NSTableView should display. I set it to 5. Method -tableView:objectValueForTableColumn:Row: will ask the object for a given column and row. I return a string with the identifier of column and the number of row.
Now, this application is ready to run, even though it does nothing but display the data of 5 rows. This is merely a demo how the NSTableView works. I provide the number of rows, and the object in a given column and row. As long as these two kinds of data are provided, the NSTableView can display anything, even a image in the cell. I'll talk about more details about data source later on.
Here is the source code: Table-1-src.tar.gz
Let's work on the interface first. NSTableView is a collection of NSTableColumn. I want three columns for date, item and amount. There are two default columns in the Gorm. Therefore, I need to add a NSTableColumn into it.
Document.m:
- (void) windowControllerDidLoadNib: (NSWindowController *) controller
{
   NSTableColumn *column;
   NSArray *columns = [tableView tableColumns];

   column = [columns objectAtIndex: 0];
   [column setWidth: 100];
   [column setEditable: NO];
   [column setResizable: YES];
   [column setIdentifier: @"date"];
   [[column headerCell] setStringValue: @"Date"];

   column = [columns objectAtIndex: 1];
   [column setWidth: 100];
   [column setEditable: NO];
   [column setResizable: YES];
   [column setIdentifier: @"item"];
   [[column headerCell] setStringValue: @"Item"];

   column = [[NSTableColumn alloc] initWithIdentifier: @"amount"];
   [column setWidth: 100];
   [column setEditable: NO];
   [column setResizable: YES];
   [[column headerCell] setStringValue: @"Amount"];
   [tableView addTableColumn: column];
   RELEASE(column);

   [tableView sizeLastColumnToFit];
   [tableView setAutoresizesAllColumnsToFit: YES];
} |
I adjust the interface of NSTableView in method -windowControllerDidLoadNib:, which quarantees that the Gorm file is loaded. This is similar to -awakeFromNib. Firstly, I get the existing columns, change their property. Secondly I create a new NSTableColumn and add it into NSTableView. Finally, I adjust the layout of NSTableView. By this way, I can arrange the user interface programmingly even though Gorm is not fully functional yet. Run this application again, and you will see the new column.
An important thing of NSTableColumn is the "identifier". Every NSTableColumn has an unique "identifier" to distinguish them. "Identifier" can be any object, but used to being NSString. The identifier is not necessary to be the same as the header of column, but used to being the same for easilier management. So we access the NSTableColumn via its identifier. You can find the "identifier" in many GNUstep objects.
The interface is done. Go back for the data source. Data source is an object which provide the data for NSTableView. Therefore, data source is the model of NSTableView in MVC paradigm. Depending on the behavior of NSTableView, I need to implement the proper methods in the data source of NSTableView. I already show the methods for display. But they are useless. Now, I will make them real functional.
The data for NSTableView can be considered as an NSArray of NSDictionary. The object in each index of NSArray corresponds to each row of NSTableView. And the object of each NSDictionary with a given key corresponds to each NSTableColumn with a given identifier. That's the simplest way to build the model for NSTableView. Therefore, I add an NSMutableArray in Document class.
Document.h:
#import <AppKit/AppKit.h>
#import <AppKit/NSDocument.h>

@interface Document : NSDocument
{
   id tableView;
   NSMutableArray *records;
}
@end |
The "records" will store the data of NSTableView. About the usage of NSMutableArray, read Basic GNUstep Base Library Classes.
I want there are always an empty row so that user can add data into the table. Before I add the function of adding data, look at the new methods for display.
Document.m:
- (id) init
{
   self = [super init];
   records = [NSMutableArray new];
   return self;
}

- (void) dealloc
{
   RELEASE(records);
   [super dealloc];
}

- (int) numberOfRowsInTableView: (NSTableView *) view
{
   return [records count] + 1;
}

- (id) tableView: (NSTableView *) view
       objectValueForTableColumn: (NSTableColumn *) column
       row: (int) row
{
   if (row >= [records count])
      {
         return @"";
      }
   else
      {
         return [[records objectAtIndex: row] objectForKey: [column identifier]];
      }
} |
I create the instance of NSMutableArray in method -init, and release it in -dealloc. In the method -numberOfRowsInTableView:, I return one more number because I want it to display an extra empty row. Hence, in the method -tableView:objectValueForTableColumn:row:, I have to check whether the row the NSTableView request is large than the actuall number of data. If so, it is request the empty row. I just return an empty string "". The trick to use a NSArray of NSDictionary is to make the key of NSDictionary the same as the identifier of NSTableColumn. So I can get the object directly by knowing the identifier of NSTableColumn. If you are not using the NSDictionary for each row, you can consider the Key Value Coding (KVC), which offer similar way to get the right object. Otherwise, you have to use if-else to get the right object. The advantage of NSDictionary (or KVC) will be more clear for data input.
Now, I'll add the function of data input. Firstly, I have to set the NSTableColumn editable.
- (void) windowControllerDidLoadNib: (NSWindowController *) controller
{
   NSTableColumn *column;
   NSArray *columns = [tableView tableColumns];

   column = [columns objectAtIndex: 0];
   [column setWidth: 100];
   [column setEditable: YES];
   [column setResizable: YES];
   [column setIdentifier: @"date"];
   [[column headerCell] setStringValue: @"Date"];

   column = [columns objectAtIndex: 1];
   [column setWidth: 100];
   [column setEditable: YES];
   [column setResizable: YES];
   [column setIdentifier: @"item"];
   [[column headerCell] setStringValue: @"Item"];

   column = [[NSTableColumn alloc] initWithIdentifier: @"amount"];
   [column setWidth: 100];
   [column setEditable: YES];
   [column setResizable: YES];
   [[column headerCell] setStringValue: @"Amount"];
   [tableView addTableColumn: column];
   RELEASE(column);

   [tableView sizeLastColumnToFit];
   [tableView setAutoresizesAllColumnsToFit: YES];
} |
Once the users double-click each cell in the table, they can input the data.
The way data source receive the data is in the method -tableView:setObjectValue:forTableColumn:row:, which is the opposite of the method for display.
Document.h:
- (void) tableView: (NSTableView *) view
         setObjectValue: (id) object
         forTableColumn: (NSTableColumn *) column
         row: (int) row
{
   if (row >= [records count])
      {
         [records addObject: [NSMutableDictionary new]];
      }
   [[records objectAtIndex: row] setObject: object
                                    forKey: [column identifier]];
   [tableView reloadData];
} |
Again, I need to take care the situation when user input in the last empty row. Since it is not in the records, I need to add a new NSMutableDictionary first. When ever user input the data, it will be store into records according its row and the identifier of column. And the key of NSDictionary is the same as the identifier of NSTableColumn. Hence I can retrieve the data according to the identifier of column. Finally I ask the NSTableView to reload the data in order to reflect the change of data source.
Now you can play around this application and input the data. Here is the source code: Table-2-src.tar.gz. This example shows how easy I can make a real document-base application without worry about the management of multiple documents and windows.
Load and Save
As a document-base application, it has to be able to load and save file. Depending on the structure of the files, I have several choices to override in NSDocument:
Table 4-1. Methods for loading and saving files
| Load file | Save file | |
| High level | loadDataRepresentation:ofType: | dataRepresentationOfType: |
| Middle level | loadFileWrapperRepresentation:ofType: | fileWrapperRepresentationOfType: |
| Low level | readFromFile:ofType:, readFromURL:ofType: | writeToFile:ofType:, writeToURL:ofType: |
Read How do I implement saving and loading for simple files?, How do I implement document packages (documents that are really folders, but appear to be opaque documents)?, and How do I implement loading and saving when the simple data or file wrapper API won't do?.
In this case, -loadDataRepresentation:ofType: and -dataRepresentationOfType: are enough.
Document.m:
- (NSData *) dataRepresentationOfType: (NSString *) type
{
   if (type == nil)
      type = @"mon";
   if ([type isEqualToString: @"mon"])
      return [NSArchiver archivedDataWithRootObject: records];
   else
      return nil;
}

- (BOOL) loadDataRepresentation: (NSData *) data ofType: (NSString *) type
{
   if ([type isEqualToString: @"mon"])
      {
         [records setArray: [NSUnarchiver unarchiveObjectWithData: data]];
         return YES;
      }
   return NO;
} |
When document is going to be saved, it will call -dataRepresentationOfType:. The type will be the NSName in the property list of this application (MoneyInfo.plist). Here, I use NSArchiver to transform the whole NSArray into NSData, and I don't need to worry about the internal format. When document is going to be loaded, it will call -loadDataRepresentation:ofType:. Again, I use NSUnarchiver to transform the NSData into NSArray. That's all. If you are using your own data structure, you have to deal with data archives by yourself. Here is a related article: Using the Property List Objects and the NSCoding Protocol.
The saved data is in binary format, which is usually undesired. Since I only use the basic data structure, I could save it into property list, which is human-readable.
Document.m:
- (NSData *) dataRepresentationOfType: (NSString *) type
{
   if (type == nil)
      type = @"mon";
   if ([type isEqualToString: @"mon"])
      return [[records description] dataUsingEncoding: [NSString defaultCStringEncoding]];
   else
      return nil;
}

- (BOOL) loadDataRepresentation: (NSData *) data ofType: (NSString *) type
{
   if ([type isEqualToString: @"mon"])
      {
        NSString *string = [[NSString alloc] initWithData: data
                                                 encoding: [NSString defaultCStringEncoding]];
        [records setArray: [string propertyList]];
        RELEASE(string);
        return YES;
      }
   return NO;
} |
I use -description to get the property list, which is NSString. Then use -dataUsingEncoding to transform property list (NSString) into NSData for saving. And do the opposite for the loading. Now, you can look at the saved file, which is very easy to read.
Here is the source code for the easy-read version: LoadSave-src.tar.gz.
If you are saving the document into a directory, such as HTML document, which contain text and images, you may want to use -loadFileWrapperRepresentation:ofType: and -fileWrapperRepresentationOfType:. Methods -readFromFile:ofType: and -writeToFile:ofType: offers the ability to access the file system directly.
Drag and drop in table
Drag and drop in general is easy, but even easier in NSTableView. Here is an article about it: Drag and Drop Destinations. Basically, drag and drop is copy and paste with graphic interactivity. Therefore, it involves the pasteboard. I'll add the fuction of drag and drop in this tutorial so that you can drag and drop in-between different document. NSTableView has its built-in drag and drop support. Therefore, it is sort of different from drag and drop in general. Here is the drag and drop in NSTableView from Cocoa.
Firstly, I need to set up the dragging source, the source you can drag something out. I need to register the table as dragging source, and implement one method.
Document.m:
- (void) windowControllerDidLoadNib: (NSWindowController *) controller
{
   NSTableColumn *column;
   NSArray *columns = [tableView tableColumns];

   column = [columns objectAtIndex: 0];
   [column setWidth: 100];
   [column setEditable: YES];
   [column setResizable: YES];
   [column setIdentifier: @"date"];
   [[column headerCell] setStringValue: @"Date"];

   column = [columns objectAtIndex: 1];
   [column setWidth: 100];
   [column setEditable: YES];
   [column setResizable: YES];
   [column setIdentifier: @"item"];
   [[column headerCell] setStringValue: @"Item"];

   column = [[NSTableColumn alloc] initWithIdentifier: @"amount"];
   [column setWidth: 100];
   [column setEditable: YES];
   [column setResizable: YES];
   [[column headerCell] setStringValue: @"Amount"];
   [tableView addTableColumn: column];
   RELEASE(column);

   [tableView sizeLastColumnToFit];
   [tableView setAutoresizesAllColumnsToFit: YES];

   [tableView registerForDraggedTypes: [NSArray arrayWithObjects: NSGeneralPboardType, nil]];
}

- (BOOL) tableView: (NSTableView *) view
         writeRows: (NSArray *) rows
         toPasteboard: (NSPasteboard *) pboard
{
   id object = [records objectAtIndex: [[rows lastObject] intValue]];
   NSData *data = [NSArchiver archivedDataWithRootObject: object];

   [pboard declareTypes: [NSArray arrayWithObject: @"NSGeneralPboardType"]
                                            owner: nil];
   [pboard setData: data forType: @"NSGeneralPboardType"];
   return YES;
} |
In method -windowControllerDidLoadNib:, NSTableView register what kind of pasteboard it will use. Once it registers, it is ready to drag and drop. The usage of pasteboard is not covered in this tutorial. Basically, you set the type of pasteboard, put data in, and take it out.
Method -tableView:writeRows:toPasteboard will be called when user try to drag some rows out of the table, It is the methods in the data source of table, not in the delegate of table. Therefore, in this method, I only need to put the data into pasteboard. Since this table only allow single selection, I only need to handle the data in one row, which is a NSDictionary. I archive NSDictionary into NSData, put it into pasteboard of NSGeneralPboardType, then return YES. Now, you can drag the row out of the table.
NSTableView will handle all the graphic interactivity. When users drop the data into another document, I need to implement two methods.
Document.m:
- (NSDragOperation) tableView: (NSTableView *) view
                    validateDrop: (id <NSDraggingInfo>) info
                    proposedRow: (int) row
                    proposedDropOperation: (NSTableViewDropOperation) operation
{
   if (row > [records count])
   return NSDragOperationNone;

   if (nil == [info draggingSource]) // From other application
     {
       return NSDragOperationNone;
     }
   else if (tableView == [info draggingSource]) // From self
     {
       return NSDragOperationNone;
     }
   else // From other documents
     {
       [view setDropRow: row dropOperation: NSTableViewDropAbove];
       return NSDragOperationCopy;
     }
}

- (BOOL) tableView: (NSTableView *) view
         acceptDrop: (id <NSDraggingInfo>) info
         row: (int) row
         dropOperation: (NSTableViewDropOperation) operation
{
   NSPasteboard *pboard = [info draggingPasteboard];
   NSData *data = [pboard dataForType: @"NSGeneralPboardType"];

   if (row > [records count])
     return NO;

   if (nil == [info draggingSource]) // From other application
     {
       return NO;
     }
   else if (tableView == [info draggingSource]) // From self
     {
       return NO;
     }
   else // From other documents
     {
       id object = [NSUnarchiver unarchiveObjectWithData: data];
       [records insertObject: object atIndex: row];
       [tableView reloadData];

       return YES;
     }
   return NO;
} |
When users hold the mouse button and move above the table, the table will keep receiving the call for method -tableView:validateDrop:proposedRow:ProposedDropOperation:. The only thing I need to do in this method is to examine the proposed drop and return the action I can accept. If the source is not from other documents, return NSDragOperationNone to indicate that this table doesn't accept drop. Otherwise, return NSDragOperationCopy to indicate that this table accept copy. In table, you can drop between rows or over rows. That's NSTableViewDropOperation means. I only want to insert the data. When it is proposed to drop, I change the propose by -setDropRow:dropOperation:. By this way, I can change all the drop in-between rows, not over rows. So this method gives the table chances to change its interface when mouse is moving above it.
Once users release the mouse button, method -tableView:acceptDrop:row:dropOperation: will be called. I get the dropped data from this method. Extract the data from pbastebord, unarchive into NSDictionary, and add into records. Don't forget to reload the table to reflect the change.
NSTableView offers the basic fuction of drag and drop, which is useful for general applications. If you want more support for drag and drop, you have to subclass NSTableView and write your own using the general drag and drop support of GNUstep. For example, NSTableView doesn't support drag and drop from other application. If you want to do that, you have to subclass NSTableView. I'll talk about the drag and drop in general later.
Here is the source code: DragDropInTable-src.tar.gz
Overview
NSOutlineView is a subclass of NSTableView. The only difference is that the rows of NSOutlineView act like a data-structure tree of multiple children. In NSTableView, we can use an array of dictionary to store the data of NSTableView. In NSOutlineView, we need a tree strcuture. Here, I will make an application to display several system information in outline view.
First, create "New Application" in Gorm and drag a NSOutlineView into the window
 >
>Change the Autoresizing attribute of NSOutlineView
 >
>Double-click on the column to select
 >
>Uncheck the "Editable" and change the identifier to "Attribute" in the first column and "Value" in the second column
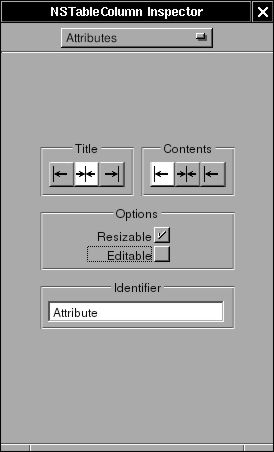 >
>The makeing of interface is done. Now, I need a controller for the interface. Create a subclass of NSObject, called "Controller"
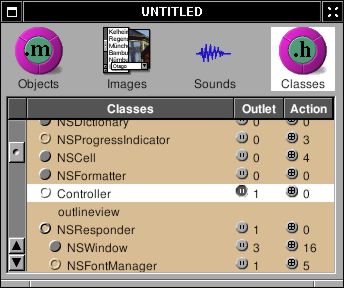 >
>Add a outlet called "outlineview"
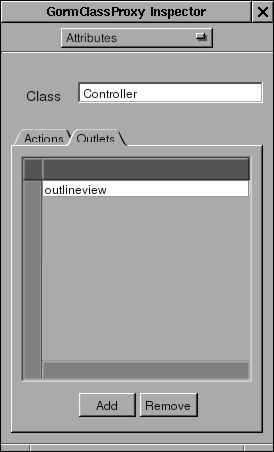 >
>Create an instance of Controller, and connect the outlet "outlineview" to the outline view in the window. Be sure that you connect to outline view, not the scroll view or the table column
 >
>Since NSOutlineView is the subclass of NSTableView, we need to assing the data source and delegate of NSOutlineView by connecting the "dataSource" and "delegate" from NSOutlineView to Controller.
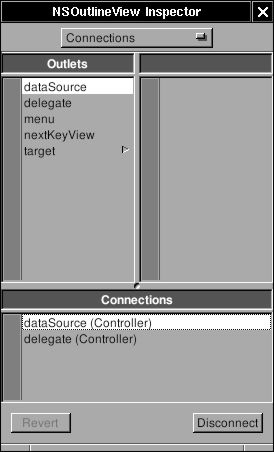 >
>Finally, we can assign Controller as the delegate of NSApp
 >
>Now, save the Gorm file as "Overview.gorm", and generate the files of Controller.
I need a data source for the NSOutlineView. I can do that by creating a tree sturcture with very simple nodes
Node.h
#ifndef _Overview_Node_
#define _Overview_Node_

#include <Foundation/NSObject.h>

@class NSArray;
@class NSMutableArray;
@class NSString;

@interface Node: NSObject
{
  NSString *name;
  NSString *value;
  NSMutableArray *children;
}

- (void) setName: (NSString *) name;
- (NSString *) name;
- (void) setValue: (NSString *) value;
- (NSString *) value;
- (void) addChild: (id) child;
- (NSArray *) children;
@end

#endif /* _Overview_Node_ */ |
Node.m
#include "Node.h"
#include <Foundation/Foundation.h>

@implementation Node

- (id) init
{
  self = [super init];

  children = [NSMutableArray new];

  return self;
}

- (void) setName: (NSString *) string
{
  ASSIGN(name, string);
}

- (NSString *) name
{
  return name;
}

- (void) setValue: (NSString *) string
{
  ASSIGN(value, string);
}

- (NSString *) value
{
  return value;
}

- (void) addChild: (id) child
{
  [children addObject: child];
}

- (NSArray *) children
{
  return children;
}

- (void) dealloc
{
  RELEASE(name);
  RELEASE(value);
  RELEASE(children);
  [super dealloc];
}

@end |
Now, I can build a tree by connect these nodes
In NSTableView, there are two necessary methods to display the data:
- (int) numberOfRowsInTableView: (NSTableView *) tableView;

- (id) tableView: (NSTableView *) tableView
       objectValueForTableColumn: (NSTableColumn *) column
row: (int) row; |
In NSOutlineView, due to the tree-like structure, there are 4 mecessary methods to display the data:
- (id)outlineView: (NSOutlineView *)outlineView
            child: (int)index
           ofItem: (id)item;

- (BOOL)outlineView: (NSOutlineView *)outlineView
        isItemExpandable: (id)item;

- (int)outlineView: (NSOutlineView *)outlineView
       numberOfChildrenOfItem: (id)item;

- (id)outlineView: (NSOutlineView *)outlineView
      objectValueForTableColumn:(NSTableColumn *)tableColumn
byItem:(id)item; |
"Item" means the node in the data source. If item is nil, it means it is root node. Starting from root node, NSOutlineView ask each node how many children it has ? is it expandable ? display the object value of the node, and get the next child. After it goes over the nodes, it finish displaying the data source.
So I have to build the tree first:
Controller.h
/* All Rights reserved */

#include <AppKit/AppKit.h>

@class Node;

@interface Controller : NSObject
{
  id outlineview;
  Node *root;

}
@end |
Controller.m
/* All Rights reserved */

#include <AppKit/AppKit.h>
#include "Controller.h"
#include "Node.h"

@implementation Controller

- (id) init
{
  Node *child, *temp;

  self = [super init];

  root = [Node new];

  child = [Node new];
  [child setName: @"System"];

  /* Add operating system */
  temp = [Node new];
  [temp setName: @"Operating System"];
  [temp setValue: [[NSProcessInfo processInfo] operatingSystemName]];
  [child addChild: temp];
  RELEASE(temp);

  /* Add user name */
  temp = [Node new];
  [temp setName: @"User Name"];
  [temp setValue: NSUserName()];
  [child addChild: temp];
  RELEASE(temp);

  /* Add home directory */
  temp = [Node new];
  [temp setName: @"Home Directory"];
  [temp setValue: NSHomeDirectory()];
  [child addChild: temp];
  RELEASE(temp);

  [root addChild: child];
  RELEASE(child);

  return self;
}

- (void) dealloc
{
  RELEASE(root);
  [super dealloc];
} |
I create a root node, add an "System" node. Then add three nodes into "System" node. That's a very simple tree for now. Once I have a tree, I can display it in outline view.
Controller.m
- (id) outlineView: (NSOutlineView *) outlineView
             child: (int) index
            ofItem: (id) item
{
  /* Root */
  if (item == nil)
    return [[root children] objectAtIndex: index];

  /* Others */
  if ([[item children] count])
    return [[item children] objectAtIndex: index];
  else
    return nil;
}

- (BOOL) outlineView: (NSOutlineView *) outlineView
         isItemExpandable: (id) item
{
  /* Root */
  if (item == nil)
    return YES;

  /* Others */
  if ([[item children] count])
    return YES;
  else
    return NO;
}

- (int) outlineView: (NSOutlineView *) outlineView
        numberOfChildrenOfItem: (id) item
{
  /* Root */
  if (item == nil)
    return [[root children] count];

  /* Others */
  return [[item children] count];
}

- (id) outlineView: (NSOutlineView *) outlineView
       objectValueForTableColumn: (NSTableColumn *) tableColumn
       byItem: (id) item
{
  if ([[tableColumn identifier] isEqualToString: @"Attribute"])
    return [(Node *)item name];
  else
    return [item value];
} |
These methods are straight-forward. Just need to take care the case when item is nil, which means it is root node.
Now, this application is ready to go. You can finish the main.m and GNUmakefile. Here is the source code: Overview-src.tar.gz
Actually I can get more information
Controller.m
- (id) init
{
  Node *child, *temp;
  NSCalendarDate *date;
  NSRect frame;
  id object;

#define ADD_NAME_VALUE(name, value) \
        temp = [Node new]; \
        [temp setName: name]; \
        [temp setValue: value]; \
        [child addChild: temp]; \
        RELEASE(temp);


  self = [super init];

  root = [Node new];

  child = [Node new];
  [child setName: @"System"];

  /* operating system */
  ADD_NAME_VALUE(@"Operating System", [[NSProcessInfo processInfo] operatingSystemName]);

  /* user name */
  ADD_NAME_VALUE(@"User Name", NSUserName());

  /* home directory */
  ADD_NAME_VALUE(@"Home Directory", NSHomeDirectory());

  /* gnustep root directory */
  ADD_NAME_VALUE(@"GNUstep Directory", NSOpenStepRootDirectory());

  /* host and address */
  ADD_NAME_VALUE(@"Host", [[NSHost currentHost] name]);
  ADD_NAME_VALUE(@"Address", [[NSHost currentHost] address]);

  /* Screen */
  ADD_NAME_VALUE(@"Screen Depth", [[NSNumber numberWithInt: [[NSScreen mainScree
n] depth]] description]);
  frame = [[NSScreen mainScreen] frame];
  object = [NSString stringWithFormat: @"%d x %d", (int)frame.size.width, (int)f
rame.size.height];
  ADD_NAME_VALUE(@"Screen Size", object);

  [root addChild: child];
  RELEASE(child);

  child = [Node new];
  [child setName: @"Date & Time"];

  /* Time Zone */
  ADD_NAME_VALUE(@"System Time Zone", [[NSTimeZone systemTimeZone] timeZoneName]
);
  ADD_NAME_VALUE(@"Local Time Zone", [[NSTimeZone localTimeZone] timeZoneName]);

  /* Date */
  date = [NSCalendarDate calendarDate];
  [date setCalendarFormat: @"%a, %b %e, %Y"];
  ADD_NAME_VALUE(@"Date", [date description]);
  [date setCalendarFormat: @"%H : %M : %S"];
  ADD_NAME_VALUE(@"Time", [date description]);

  [root addChild: child];
  RELEASE(child);

  child = [Node new];
  [child setName: @"Text Related"];

  /* default encoding */
  ADD_NAME_VALUE(@"Default Encoding", [NSString localizedNameOfStringEncoding: [NSString defaultCStringEncoding]]);

  /* Font */
  ADD_NAME_VALUE(@"System Font", [[NSFont systemFontOfSize: [NSFont systemFontSize]] displayName]);
  ADD_NAME_VALUE(@"System Font Size", [[NSNumber numberWithFloat: [NSFont systemFontSize]] description]);
  ADD_NAME_VALUE(@"System Font Encoding", [[NSFont systemFontOfSize: [NSFont systemFontSize]] encodingScheme]);
  ADD_NAME_VALUE(@"System Bold Font", [[NSFont boldSystemFontOfSize: [NSFont systemFontSize]] displayName]);

  [root addChild: child];
  RELEASE(child);

  return self;
} |
Now, it looks better:
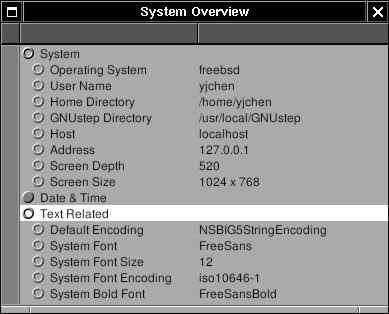 >
>You will notice that when window is close, the application is not quit. We can make the application quit when last window closes.
Controller.m
- (BOOL) applicationShouldTerminateAfterLastWindowClosed: (id) sender
{
  return YES;
} |
This is the method for NSApp delegate. Therefore, Controller must be the delegate of NSApp. I assign it already in Gorm
LunarCalendar
Solar calendar is commonly used worldwide, but lunar calendar is still used in many places since sun and moon play equivalent roles in the weather and ocean system. Here, I'll make a graphic interface for convert solar calendar into moon calendar.
The graphic interface for solar calendar looks like this:
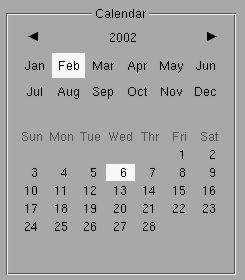 >
>The conversion from solar calendar to lunar calendar is not the point in this chapter. If you are interested, you can check the source code. The interface of LunarCalendarDate is:
LunarCalendarDate.h
#ifndef _LunarCalendarDate_
#define _LunarCalendarDate_

#include <Foundation/NSObject.h>

@interface LunarCalendarDate: NSObject
{
  int lunarDay, lunarMonth;
}

- (void) setDate: (NSCalendarDate *) date;
- (int) dayOfMonth;
- (int) monthOfYear;
@end

#endif /* _LunarCalendarDate_ */ |
Basically, you put the date into LunarCalendarDate, and get the month and day out of it. This conversion may not be bug-free, and only work between 1998-2031. But it is good enough as an example.
Now, use Gorm to build a interface like this:
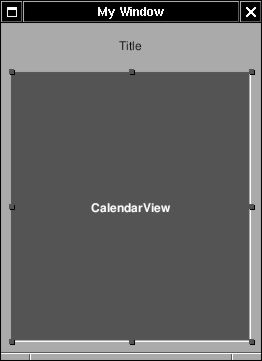 >
>Create a subclass of NSView, called CalendarView. Use this class for the custom class. The size of custom class must be width 240 and height 270. Add a NSTextField on top of it to display the lunar date.
Create a outlet called "label"in CalendarView.
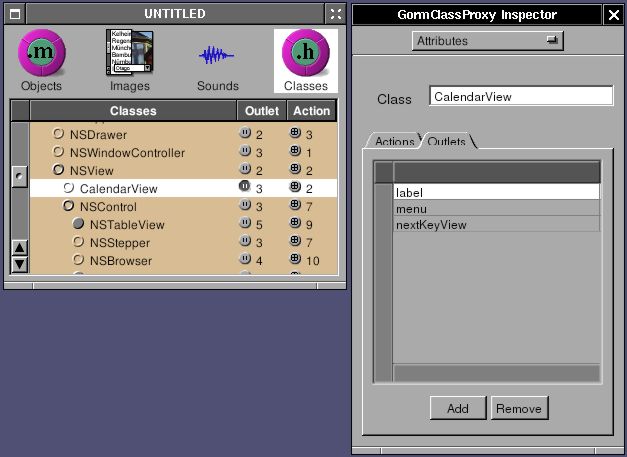 >
>Connect the outlet "label" to the NSTextField
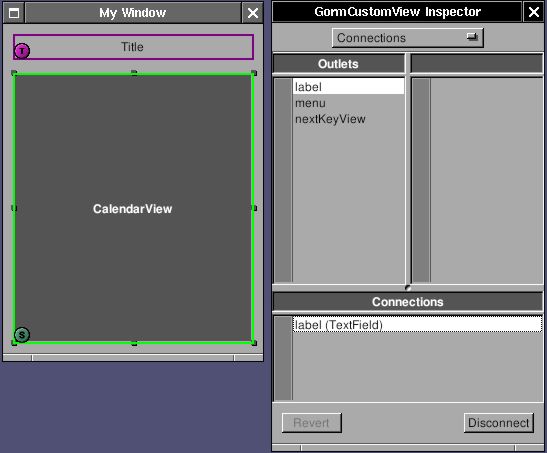 >
>Save the interface as LunarCalendar.gorm. Now, let's work on the CalendarView.
CalendarView.h
#ifndef _CalendarView_
#define _CalendarView_

#include <AppKit/AppKit.h>

@interface CalendarView : NSView
{
  NSBox *calendarBox;
  NSTextField *yearLabel;
  NSButton *lastYearButton, *nextYearButton;
  NSMatrix *monthMatrix, *dayMatrix;
  NSCalendarDate *date;
  NSArray *monthArray;

  /* Outlet */
  id label;
}

- (NSCalendarDate *) date;
- (void) setDate: (NSCalendarDate *)date;

/* Used by interface */
- (void) updateDate: (id) sender;

@end

#endif /* _CalendarView_ */ |
CalendarDate.m
Setup basic header and functions
#include "CalendarView.h"
#include "LunarCalendarDate.h"

@implementation CalendarView

#define isLeapYear(year) (((year % 4) == 0 && ((year % 100) != 0)) || (year % 400)
== 0)

static short numberOfDaysInMonth[] = {31, 28, 31, 30, 31, 30, 31, 31, 30, 31, 30, 3
1}; |
Here, I use several matrix to build the interface
- (id) initWithFrame: (NSRect) rect
{
   int i, j, count=0;
   NSImage *rightArrow, *leftArrow;
   NSButtonCell *monthCell, *dayCell, *tempCell;
   NSArray *weekArray;

[super initWithFrame: rect]; |
Everything is add into the NSBox
calendarBox = [[NSBox alloc] initWithFrame: NSMakeRect(0, 0, 240, 270)]; [calendarBox setBorderType: NSGrooveBorder]; [calendarBox setTitlePosition: NSAtTop]; [calendarBox setTitle: @"Calendar"]; |
Year is composed by two button and on text field. Press buttons to change the year. The arrow images come with GNUstep. Buttons will call -updateDate: when pressed.
yearLabel = [[NSTextField alloc] initWithFrame: NSMakeRect(85, 220, 60, 20)]; [yearLabel setStringValue: @"This Year"]; [yearLabel setBezeled: NO]; [yearLabel setBackgroundColor: [NSColor windowBackgroundColor]]; [yearLabel setEditable: NO]; [yearLabel setSelectable: NO]; [yearLabel setAlignment: NSCenterTextAlignment]; leftArrow = [NSImage imageNamed: @"common_ArrowLeft.tiff"]; rightArrow = [NSImage imageNamed: @"common_ArrowRight.tiff"]; lastYearButton = [[NSButton alloc] initWithFrame: NSMakeRect(10, 220, 22, 22)]; [lastYearButton setImage: leftArrow]; [lastYearButton setImagePosition: NSImageOnly]; [lastYearButton setBordered: NO]; nextYearButton = [[NSButton alloc] initWithFrame: NSMakeRect(198, 220, 22, 22)]; [nextYearButton setImage: rightArrow]; [nextYearButton setImagePosition: NSImageOnly]; [nextYearButton setBordered: NO]; [lastYearButton setTarget: self]; [lastYearButton setAction: @selector(updateDate:)]; [nextYearButton setTarget: self]; [nextYearButton setAction: @selector(updateDate:)]; [calendarBox addSubview: yearLabel]; [calendarBox addSubview: lastYearButton]; [calendarBox addSubview: nextYearButton]; RELEASE(yearLabel); RELEASE(lastYearButton); RELEASE(nextYearButton); |
Matrix is used to put cells together. Cell is a light-weight of NSView. Read Introduction to Controls and Cells. Firstly, I define the cell prototype for the matrix. Matrix will use this prototype to display every cell. Each cell has a tag to identify itself.
   monthArray = [[NSArray alloc] initWithObjects:
                   @"Jan", @"Feb", @"Mar", @"Apr", @"May", @"Jun",
                   @"Jul", @"Aug", @"Sep", @"Oct", @"Nov", @"Dec", nil];

   monthCell = [[NSButtonCell alloc] initTextCell: @""];
   [monthCell setBordered: NO];
   [monthCell setShowsStateBy: NSOnOffButton];
   [monthCell setAlignment: NSCenterTextAlignment];

   monthMatrix = [[NSMatrix alloc] initWithFrame: NSMakeRect(10, 165, 210, 50)
                                            mode: NSRadioModeMatrix
                                       prototype: monthCell
                                    numberOfRows: 2
                                 numberOfColumns: 6];

   for (i = 0; i < 2; i++)
      for (j = 0; j < 6; j++)
      {
         tempCell = [monthMatrix cellAtRow: i column: j];
         [tempCell setTag: count];
         [tempCell setTitle: [monthArray objectAtIndex: count]];
         count++;
      }
   RELEASE(monthCell);

   weekArray = [NSArray arrayWithObjects: @"Sun", @"Mon" @"Tue", @"Wed",
                                          @"Thr", @"Fri", @"Sat", nil];

   dayCell = [[NSButtonCell alloc] initTextCell: @""];
   [dayCell setBordered: NO];
   [dayCell setShowsStateBy: NSOnOffButton];
   [dayCell setAlignment: NSCenterTextAlignment];

   dayMatrix = [[NSMatrix alloc] initWithFrame: NSMakeRect(10, 20, 210, 120)
                                          mode: NSRadioModeMatrix
                                     prototype: dayCell
                                  numberOfRows: 7
                               numberOfColumns: 7];

   for (j = 0; j < 7; j++)
   {
      tempCell = [dayMatrix cellAtRow: 0 column: j];
      [tempCell setTitle: [weekArray objectAtIndex: j]];
      [tempCell setAlignment: NSCenterTextAlignment];
      [tempCell setEnabled: NO];
   }

   RELEASE(dayCell);

   count = 0;

   for (i = 1; i < 7; i++)
      for (j = 0; j < 7; j++)
         {
           [[dayMatrix cellAtRow: i column: j] setTag: count++];
} |
When each cell in the matrix is pressed, it will call the action of matrix. It is -updateDate: here.
[monthMatrix setTarget: self]; [monthMatrix setAction: @selector(updateDate:)]; [dayMatrix setTarget: self]; [dayMatrix setAction: @selector(updateDate:)]; [calendarBox addSubview: monthMatrix]; [calendarBox addSubview: dayMatrix]; RELEASE(monthMatrix); RELEASE(dayMatrix); [self addSubview: calendarBox]; RELEASE(calendarBox); return self; } |
The title of cell in dayMatrix depending on the month. Therefore, when set date in CalendarView, it has to display days in correct cells.
- (void) setDate: (NSCalendarDate *) newDate
{
   int i, currentDay, currentMonth, currentYear;
   int daysInMonth, startDayOfWeek, day;
   NSCalendarDate *firstDayOfMonth;
   NSButtonCell *tempCell;
LunarCalendarDate *lunarDate; |
Retain the date. It will be released in -dealloc.
ASSIGN(date, newDate); |
Update year.
[yearLabel setStringValue: [date descriptionWithCalendarFormat: @"%Y"]]; |
Update month.
currentMonth = [date monthOfYear]; [monthMatrix selectCellWithTag: currentMonth-1]; |
Update day.
   currentYear = [date yearOfCommonEra];
   firstDayOfMonth = [NSCalendarDate dateWithYear: currentYear
                                            month: currentMonth
                                              day: 1
                                             hour: 0
                                           minute: 0
                                           second: 0
                                         timeZone: [NSTimeZone localTimeZone]];

   daysInMonth = numberOfDaysInMonth[currentMonth - 1];

   if ((currentMonth == 2) && (isLeapYear(currentYear)))
      daysInMonth++;

   startDayOfWeek = [firstDayOfMonth dayOfWeek];

   day = 1;

   for (i = 0; i < 42; i++)
   {
      tempCell = [dayMatrix cellWithTag: i];
      if (i < startDayOfWeek || i >= (daysInMonth + startDayOfWeek))
      {
         [tempCell setEnabled: NO];
         [tempCell setTitle: @""];
      }
      else
      {
         [tempCell setEnabled: YES];
         [tempCell setTitle: [NSString stringWithFormat: @"%d", day++]];
      }
   }

   currentDay = [date dayOfMonth];
[dayMatrix selectCellWithTag: startDayOfWeek + currentDay - 1]; |
Use LunarCalendarDate to get the lunar date and update in the NSTextField.
/* Update label */ lunarDate = [LunarCalendarDate new]; [lunarDate setDate: date]; [label setStringValue: [NSString stringWithFormat: @"%@ %d", [monthArray objectA tIndex: [lunarDate monthOfYear]-1], [lunarDate dayOfMonth]]]; RELEASE(lunarDate); } |
When this application starts, I want it to show the date of today. Since CalendarView is not the delegate of NSApp, how do I know this application start ? In the graphic application with Gorm interface, -awakeFromNib will be called when the interface shows up. Therefore, -awakeFromNib is a good place to initialize this instance.
- (void) awakeFromNib
{
  [self setDate: [NSCalendarDate calendarDate]];
} |
Finally, I have to handle the user event, which all go into -updateDate:. Depending on the sender, it calculate the new date.
- (void) updateDate: (id) sender
{
   int i=0, j=0, k=0;
   NSCalendarDate *newDate;

   if (sender == lastYearButton)
   {
      i = -1;
   }
   else if (sender == nextYearButton)
   {
      i = 1;
   }
   else if (sender == monthMatrix)
   {
      j = [[[sender selectedCells] lastObject] tag] + 1 - [date monthOfYear];
   }
   else if (sender == dayMatrix)
   {
      k = [[[[sender selectedCells] lastObject] stringValue] intValue] - [date dayO
fMonth];
   }

   newDate = [date addYear: i
                     month: j
                       day: k
                      hour: 0
                    minute: 0
second: 0]; |
Since LunarCalendarDate only work between 1998-2031, do nothing if it is out of range
   if (([newDate yearOfCommonEra] > 1998) && ([newDate yearOfCommonEra] < 2031))
     [self setDate: newDate];
} |
Now, you can check the status of moon. Here is the source code: LunarCalendar-src.tar.gz
Chapter 5. Services
NSLookupService
System service is an important feature of GNUstep, which connects applications together. The basic idea is that any application can be a service provider. Service provider will offer some functions for other applications. Through service menu, one application can use the functions of other applications. They can also exchange the data in-between. GNUstep offer several basic service by default. Try open Ink.app. Type something, select some word, choose menu "Services->To upper", then selected word change to upper case. The function of converting letter into upper case is provider by exampleService, not Ink. Ink simply send the word to exampleService and get the result back. Through system service, you can simply throw an email address in the document to a mail client, throw the url in the document to web browser, or throw the image in imageviewer to a filter and get the result back. With system service, applications can concentrate more on its own and communicate with other applications to expand the functions.
Firstly, let's start with an application which can use system service. I'll make an simple application which can look up the address of a hostname. That's the graphic version of nslookup.
Open Gorm, make an interface looks like this:
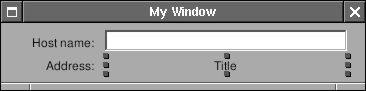 >
>Create a subclass of NSObject called "Controller", and add two outlets: "hostname" and "address". Connect the outlet to the NSTextField in the interface.
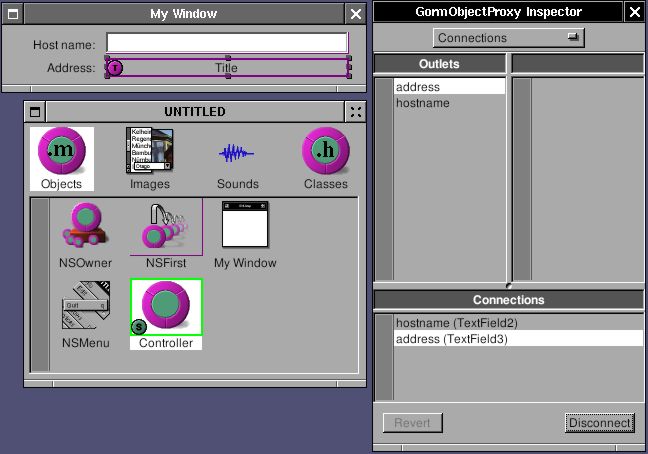 >
>Add an action called "action:" in Controller and connect action of NSTextField to "action:"
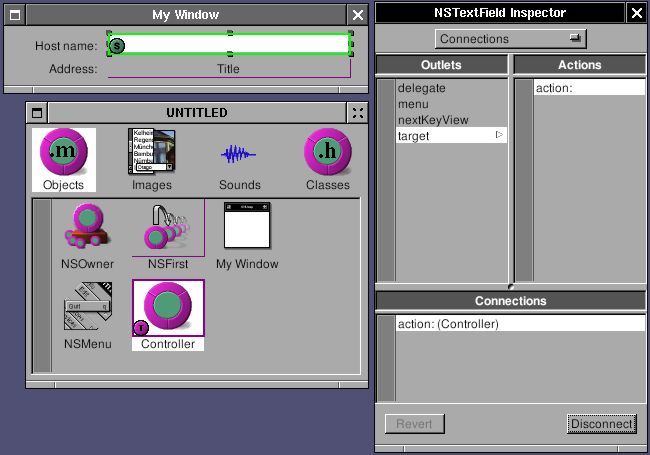 >
>Connect delegate of NSOwner (NSApp in this case) to Controller since service is associated with NSApp. It will be useful in the later.
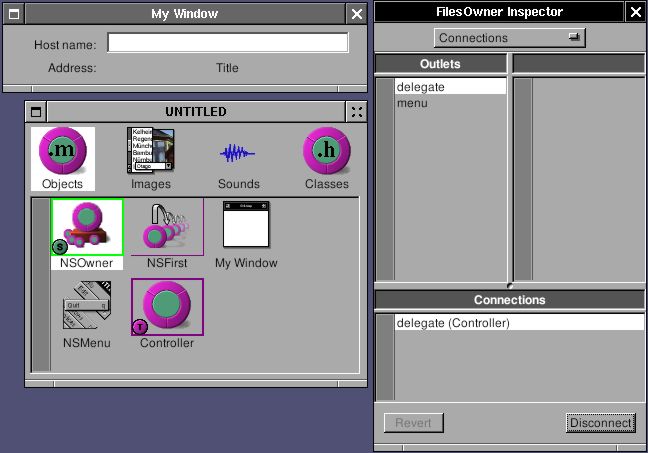 >
>Modify Controller.m
Controller.m
- (void) action: (id)sender
{
  [address setStringValue: [[NSHost hostWithName: [hostname stringValue]] address]];
} |
It takes the value in hostname text field and convert into the address.
Now, I want this application be able to use system service provided by other applications. I only need to add a menu so that menu of system service can shows up.
Controller.m
- (void) awakeFromNib
{
  NSMenu *mainMenu, *serviceMenu;

  mainMenu = [NSApp mainMenu];

  [mainMenu insertItemWithTitle: @"Services"
                         action: NULL
                  keyEquivalent: @""
                        atIndex: 0];

  serviceMenu = [[NSMenu alloc] initWithTitle: @"Services"];
  [mainMenu setSubmenu: serviceMenu
               forItem: [mainMenu itemWithTitle: @"Services"]];
  [NSApp setServicesMenu: serviceMenu];
  RELEASE(serviceMenu);
} |
After the Gorm interface is loaded, add a Services menu. The most important is to assign this menu as the service menu of NSApp. Now, start this application, type something in the NSTextField, and default services can be used. The service menu changes depending on the object you select. If there is no selection, there is no item in the service menu.
Now, I can provide the service for other applications. Only two things are need: one is to write the interface of system service, the other is to implement the system service. The interface of system service is in the property list of the application. In this case, it is NSLookupServiceInfo.plist since I name this application as NSLookupServiceInfo.
NSLookupServiceInfo.plist
{
  NSServices = (
    {
      NSPortName = NSLookupService;
      NSMessage = getAddress;
      NSSendTypes = (NSStringPboardType);
      NSMenuItem = {
        default = "Get Address";
        English = "Get Address";
      };
      NSKeyEquivalent = {
        default = "G";
      };
    }
  );
} |
In property list, NSPortName is the name of the application. NSMessage is the method I need to implement later. NSSendTypes is the type of pasteboard to use when other application want to send data to this application. In other word, this application only accept NSStringPboardType, not other data type. NSMenuItem and NSKeyEquivalent is the menu which will show up in the service menu of all the applications. The menu will show up only when the selection is the type of string.
As the NSMessage is getAddress, I have to implement getAddress method. The interface of this method is fixed as:
- (void) getAddress: (NSPasteboard *) pboard
           userData: (NSString *) userData
error: (NSString **) error |
getAddress: is the name the same as NSMessage. pboard is the pasteboard which contain the data from other applications. userData is the string if you have NSUserData in the property list of NSServices. error is the error message you want to shows up if something wrong.
Now, let's implement this method in Controller.m
Controller.m
- (void) getAddress: (NSPasteboard *) pboard
           userData: (NSString *) userData
              error: (NSString **) error
{
  NSArray *allTypes;
NSString *name; |
Check whether pasteboard reall contain NSString type. If not, show the error.
  allTypes = [pboard types];

  if ( ![allTypes containsObject: NSStringPboardType] )
    {
      *error = @"No string type supplied by pasteboard";
      return;
} |
Get the string out of pasteboard. If there is no string, show the error.
  name = [pboard stringForType: NSStringPboardType];

  if (name == nil)
    {
      *error = @"No string value supplied by pasteboard";
      return;
} |
Put the hostname into the NSTextField, check whether it is valid. If not, show the error. Use -action: to get the address
  [hostname setStringValue: name];
  if ([[NSHost hostWithName: name] address] == nil)
    {
      *error = @"Host name is not valid";
      return;
    }
  [self action: self];
} |
Finally, I have to let NSApp know which object in this application provides the service.
- (void) applicationDidFinishLaunching: (NSNotification *) not
{
  [NSApp setServicesProvider: self];
} |
In other word, you can have an object specialized for providing service.
You have to install this application to make the service work, and you have to run make_services so that GNUstep can know there is a new service. make_services is a tool of GNUstep, and is called in GNUstep.sh or GNUstep.csh. Therefore, everytime you login, it is called automatically. If you install new application which offer system service, you must manually run make_services or login again.
After runing make_services, open Ink. Type something and select them. Now, service menu of Ink should show the service provide by NSLookupService. Choose the menu, and NSLookupService will start automatically. If the selected string is valid hostname, NSLookupService will show its address, otherwise, Ink will show the error message provided by NSLookupService.
If I want to get the value back from NSLookupService, it's easy. Add the return type in property list:
NSLookupServiceInfo.plist
{
  NSServices = (
    {
      NSPortName = NSLookupService;
      NSMessage = getAddress;
      NSSendTypes = (NSStringPboardType);
      NSReturnTypes = (NSStringPboardType);
      NSMenuItem = {
        default = "Get Address";
        English = "Get Address";
      };
      NSKeyEquivalent = {
        default = "G";
      };
    }
  );
} |
The return type is also string in this case. In the end of -getAddress:, I just need to put the return value back into the pasteboard. Whatever application use this service will get the return value from the pasteboard.
Controller.m
- (void) getAddress: (NSPasteboard *) pboard
           userData: (NSString *) userData
              error: (NSString **) error
{
  NSArray *allTypes;
  NSString *name;

  allTypes = [pboard types];

  if ( ![allTypes containsObject: NSStringPboardType] )
    {
      *error = @"No string type supplied by pasteboard";
      return;
    }

  name = [pboard stringForType: NSStringPboardType];

  if (name == nil)
    {
      *error = @"No string value supplied by pasteboard";
      return;
    }

  [hostname setStringValue: name];
  if ([[NSHost hostWithName: name] address] == nil)
    {
      *error = @"Host name is not valid";
      return;
    }
  [self action: self];
  /* For return value */
  allTypes = [NSArray arrayWithObject: NSStringPboardType];
  [pboard declareTypes: allTypes owner: nil];
  [pboard setString: [NSString stringWithFormat: @"%@ (%@)", name, [address stringValue]]
            forType: NSStringPboardType];
} |
In this case, I return the original string with its address appended. You can test it in Ink again.
Here is the source code: NSLookupService-src.tar.gz
Chapter 6. Regular expressions
Regular Expression
Besides application, GNUstep also support library, bundle and tool. Here is the demonstration of them. I'll write a regular expression library, which will be used by a tool.
Library is very simple. It's just a collection of classes. Unix usually have a built-in posix regular expression engine. Here, I wrap it into a library.
GNUmakefile
include $(GNUSTEP_MAKEFILES)/common.make LIBRARY_NAME = libRegEx libRegEx_OBJC_FILES = RegEx.m libRegEx_HEADERS = RegEx.h # The Headers that are to be installed libRegEx_HEADER_FILES = RegEx.h libRegEx_HEADER_FILES_DIR = . libRegEx_HEADER_FILES_INSTALL_DIR = RegEx include $(GNUSTEP_MAKEFILES)/library.make |
That's almost the same as the GNUmakefile for application. It use LIBRARY_NAME instead APP_NAME. libRegEx_HEADER_FILES is the files to be installed as headers. libRegEx_HEADER_FILES_DIR is where the header files are in the source code. libRegEx_HEADER_FILES_INSTALL_DIR is where the headers to be install. Once this library is installed, the headers should be in GNUstep/Local/Library/Headers/RegEx/. There is a document for GNUstep Makefiles Package
Then here is a source code of RegEx class, which use C library
RegEx.h
#ifndef _RegEx_H_
#define _RegEx_H_

#include <Foundation/Foundation.h>
#include <regex.h>

@interface RegExPattern : NSObject
{
  regex_t *preg;
  /* Mask could be regex options. For example: REG_ICASE, REG_NEWLINE*/
  unsigned int _mask;
}

+ (RegExPattern *) regexPattern: (NSString *) pattern;

- (id) initWithPattern: (NSString *) pattern options: (unsigned int) mask;
- (regex_t *) pattern;

@end

@interface RegExParser: NSObject
{
}

/* The return range is related to the whole string.
 * Not related to the given range.
 */
+ (NSRange) rangeOfString:(NSString *) pattern
                 inString: (NSString *) string;

+ (NSRange) rangeOfPattern: (RegExPattern *) pattern
                  inString: (NSString *) string;

+ (NSRange) rangeOfString: (NSString *) pattern
                 inString: (NSString *) string
                    range: (NSRange) range;

+ (NSRange) rangeOfPattern: (RegExPattern *) pattern
                  inString: (NSString *) string
                     range: (NSRange) range;
@end

#endif /* _RegEx_H_ */ |
RegEx.m
#include "RegEx.h"

@implementation RegExPattern

+ (RegExPattern *) regexPattern: (NSString *) pattern
{
  id object = [[RegExPattern alloc] initWithPattern: pattern
                                            options: REG_EXTENDED];

  return AUTORELEASE(object);
}

- (void) dealloc
{
  regfree(preg);
  free(preg); /* Not sure about this */
  [super dealloc];
}

- (id) initWithPattern: (NSString *) pattern options: (unsigned int) mask
{
  int result;
  char errbuf[255];
  _mask = mask;

  preg = malloc(sizeof(regex_t));
  result = regcomp(preg, [pattern cString], mask);

  if (result != 0)
    {
      regerror(result, preg, errbuf, 255);
      NSLog(@"RegEx Error: Couldn't compile regex %@: %s", pattern, errbuf);

      regfree(preg);
      return nil;
    }

  self =  [super init];
  return self;
}

- (regex_t *) pattern
{
  return preg;
}
@end

static  regmatch_t pmatch[1];
static  char errbuf[255];

@implementation RegExParser

+ (NSRange) rangeOfString:(NSString *) pattern
                 inString: (NSString *) string
{
  return [RegExParser rangeOfString: pattern
                           inString: string
                              range: NSMakeRange(0, [string length])];
}

+ (NSRange) rangeOfPattern: (RegExPattern *) pattern
                  inString: (NSString *) string
{
  return [RegExParser rangeOfPattern: pattern
                            inString: string
                               range: NSMakeRange(0, [string length])];
}

+ (NSRange) rangeOfString: (NSString *) pattern
                 inString: (NSString *) string
                    range: (NSRange) range;
{
  return [RegExParser rangeOfPattern: [RegExPattern regexPattern: pattern]
                            inString: string
                               range: range];
}

+ (NSRange) rangeOfPattern: (RegExPattern *) pattern
                  inString: (NSString *) string
                     range: (NSRange) range
{
  int result;
  int location, length;
  int mask = 0;

  /* Considering the situation of beginning line */
  if (range.location != 0)
    mask = mask | REG_NOTBOL;
  if ((range.location + range.length) != [string length])
    mask = mask | REG_NOTEOL;

  result = regexec([pattern pattern],
                   [[string substringWithRange: range] cString],
                   1, pmatch, mask);
  if (result != 0)
    {
      if (result != REG_NOMATCH)
        {
          regerror(result, [pattern pattern], errbuf, 255);
          NSLog(@"RegEx Error: Couldn't match RegEx %s", errbuf);
        }
      return NSMakeRange(NSNotFound, 0);
    }

  location = range.location + pmatch->rm_so;
  length = pmatch->rm_eo - pmatch->rm_so;

  return NSMakeRange(location, length);
}

@end |
There is nothing special in the RegEx source code. Just use C library from Objective-C source. After compilation and installation, I can use it as library.
Here is a little tool to test the library, called regex_test
GNUmakefile
include $(GNUSTEP_MAKEFILES)/common.make

TOOL_NAME = regex_test

regex_test_OBJC_FILES = \
        main.m

regex_HEADERS =

ADDITIONAL_TOOL_LIBS += -lRegEx

include $(GNUSTEP_MAKEFILES)/tool.make |
Again, use TOOL_NAME instead APP_NAME. ADDITIONAL_TOOL_LIBS include the new libRegEx library.
main.m
#include <Foundation/Foundation.h>
#include <RegEx/RegEx.h>

int main (int argc, const char **argv)
{
  NSRange range;
  NSAutoreleasePool *pool = [NSAutoreleasePool new];

  range = [RegExParser rangeOfString: @"middle"
                            inString: @"head middle end"];
  NSLog(@"%@", NSStringFromRange(range));

  RELEASE(pool);
  return 0;
} |
Generally, GNUstep tools are the same as unix commands. You can type the command name directly with correct path environment variable, or you can use opentool to open GNUstep tools. opentool can avoid the problem of paths if any.
If you want to put all the tools, libraries in a project rather than many separated directories, you can use the subproject function of GNUstep-make.
Say I want to put everything in the ~/foo/ directory. Tool is in ~/foo/, and library is in ~/foo/RegEx/. Then the GNUmakefile of this tool can be:
GNUmakefile
include $(GNUSTEP_MAKEFILES)/common.make SUBPROJECTS = RegEx TOOL_NAME = regex_test regex_test_OBJC_FILES = \ main.m regex_HEADERS = ADDITIONAL_TOOL_LIBS += -lRegEx ADDITIONAL_LIB_DIRS += -LRegEx/$(GNUSTEP_OBJ_DIR) include $(GNUSTEP_MAKEFILES)/aggregate.make include $(GNUSTEP_MAKEFILES)/tool.make |
SUBPROJECTS indicates the subproject is in the directory RegEx. ADDITIONAL_LIB_DIRS can access the compiled library under the directory RegEx so that I don't need to install the libRegEx first, then compile the tool. aggregate.make told gmake that there are sub-projects so that it will go into the sub-directories.
By doing this, all the source code is under the ~/foo/ directory. Here is the source code:RegEx-1-src.tar.gz
Instead of library, GNUstep support dynamically loaded bundle, which act as plug-in in other applications. Bundles can be loaded anytime, and library has to be linked at compilation.
Now, change the RegEx library into bundle.
GNUmakefile
include $(GNUSTEP_MAKEFILES)/common.make BUNDLE_NAME = RegEx BUNDLE_EXTENSION = .bundle BUNDLE_INSTALL_DIR = $(GNUSTEP_INSTALLATION_DIR)/Library/Bundles RegEx_OBJC_FILES = RegEx.m RegEx_HEADERS = RegEx.h RegEx_PRINCIPAL_CLASS = RegExParser include $(GNUSTEP_MAKEFILES)/bundle.make |
Just change LIBRARY to BUNDLE. Most important one is the RegEx_PRINCIPAL_CLASS. You can get the principal class from a bundle without known its name. That's all for the bundle. No change in source code.
You have to access the bundle by its path, then get the class inside either by class name or by principal class. Here is the example:
GNUmakefile
include $(GNUSTEP_MAKEFILES)/common.make SUBPROJECTS = RegEx TOOL_NAME = regex_test regex_test_OBJC_FILES = main.m regex_HEADERS = include $(GNUSTEP_MAKEFILES)/aggregate.make include $(GNUSTEP_MAKEFILES)/tool.make |
main.m
#include <Foundation/Foundation.h>
#include <RegEx/RegEx.h>

int main (int argc, const char **argv)
{
  NSRange range;
  NSAutoreleasePool *pool;
  NSArray *paths;
  NSFileManager *fileManager;
  NSString *path;
  NSBundle *bundle;
  Class RegExClass;
  int i;

pool = [NSAutoreleasePool new]; |
Search the bundle first
  fileManager = [NSFileManager defaultManager];

  /* Search for the bundles */
  paths = NSSearchPathForDirectoriesInDomains(NSLibraryDirectory,
                                              NSLocalDomainMask, YES);

  for (i = 0; i < [paths count]; i++)
    {
      path = [[paths objectAtIndex: i] stringByAppendingPathComponent: @"Bundles/RegEx.bundle"];
      if ([fileManager fileExistsAtPath: path])
        break;
} |
Get the bundle by its path. Then get the principalClass, which is the regular expression parser.
bundle = [NSBundle bundleWithPath: path]; RegExClass = [bundle principalClass]; |
Once the class is got, use it as normal class from libraries
  range = [RegExClass rangeOfString: @"middle"
                           inString: @"head middle end"];

  NSLog(@"%@", NSStringFromRange(range));

  RELEASE(pool);
  return 0;
} |
Here is the source code: RegEx-2-src.tar.gz
The advantage of bundle is to load it dynamically. For example, if the application can't find the RegEx bundle, it can disable the functions at runtime. In this way, many function can be put into bundle, and depending on which bundle is installed, an application can offer different kind of function. Bundle can also be used as plug-in. For example, an application can have many bundles for different file formats. They only need to share a common header, either using protocal or using the same super class. An application can give a file to all the bundles, and ask which one can handle it. Then use the one to process the file format. The way to install header of bundles is the same as library. Use _HEADER_FILES in GNUmakefile to specify the headers to install.
Bundle is something really useful in GNUstep. You should take some time to read the header of it. You can even have some resources (images, sound) in the bundle.
Chapter 7. Language support
Localization
Localization is pretty simple in GNUstep. Strings in the source code and in the Gorm interface use different methods to localize. Here, I write an useless application to demonstrate both localization methods.
Open Gorm, make an interface like this:
 >
>Make a subclass of NSObject called "AppDelegate" as application delegate. Add an outlet "window", connect this outlet to the window. I don't not plan to use this Gorm as main interface. There, I set the NSOwner to AppDelegate. I'll load this interface manually.
Save the Gorm file as "Localization.gorm". Here is the code of AppDelegate.
AppDelegate.h
#ifndef _AppDelegate_
#define _AppDelegate_

#include <Foundation/NSObject.h>

@interface AppDelegate: NSObject
{
  id window;
}
@end

#endif /* _AppDelegate */ |
AppDelegate.m
#include "AppDelegate.h"
#include <AppKit/AppKit.h>

@implementation AppDelegate

- (void) applicationWillFinishLaunching: (NSNotification *) not
{
NSMenu *menu; |
The way to localize string in source code is to use bundle. But GNUstep offer a macro to make thing more easy. By use _() around the strings, they are ready to be localized later.
  menu = [[NSMenu alloc] initWithTitle: _(@"Main Menu")];

  [menu addItemWithTitle: _(@"Hide")
                  action: @selector(hide:)
           keyEquivalent: @"h"];
  [menu addItemWithTitle: _(@"Quit")
                  action: @selector(terminate:)
           keyEquivalent: @"q"];

  [NSApp setMainMenu: menu];

  RELEASE(menu);
}

- (void) applicationDidFinishLaunching: (NSNotification *) not
{ |
The Gorm file is loaded manually
[NSBundle loadNibNamed: @"Localization.gorm" owner: self]; [window makeKeyAndOrderFront: self]; } @end |
Since the main() is so simple, I write it in the same file
int main(int argc, const char **argv)
{
   NSAutoreleasePool *pool = [NSAutoreleasePool new];

   [NSApplication sharedApplication];

   [NSApp setDelegate: [AppDelegate new]];

   NSApplicationMain(argc, argv);

   RELEASE(pool);

   return 0;
} |
GNUmakefile
include $(GNUSTEP_MAKEFILES)/common.make

APP_NAME = Localization

Localization_OBJC_FILES = AppDelegate.m

Localization_HEADERS = AppDelegate.h
Localization_LANGUAGES = English TraditionalChinese

Localization_LOCALIZED_RESOURCE_FILES = \
        Localizable.strings \
        Localization.gorm
include $(GNUSTEP_MAKEFILES)/application.make |
In GNUmakefile, the most important is the Localization_LANGUAGES and Localization_LOCALIZED_RESOURCE_FILES. _LANGUAGES tell gmake which language to support. Here are English and TraditionalChinese, which correspond to the English.lproj/ and TraditionalChinese.lproj/ directories. _LOCALIZED_RESOURCE_FILES are the files in these language directory. Localizable.strings are the translated string. Localization.gorm is the interface I just saved from Gorm.
Now, let's look at the English.lproj/Localizable.strings
Localizable.strings
"Main Menu" = "Main Menu"; "Hide" = "Hide"; "Quit" = "Quit"; |
Left side are the strings in the source code and surrounded by _(). Right side are the translated strings. Since it is English translation, they are the same. But you can still change the string at right side to see what will happen.
For the traditional Chinese, I just copy Localizable.strings and Localization.gorm into TraditionalChinese.lproj/ directory. Change the right side of Localizable.strings into traditional Chinese. And use Gorm to change every string in the Localization.gorm into Chinese. Then this application is localized for English and traditional Chinese.
The way an application know which language to use is the NSLanguages in the user defaults. You can check out the chapter "Languages Setup" in this tutorial.
Here is the source code: Localization-src.tar.gz. It contains translation in English and traditional Chinese. You can play around it and add the support of your native language.
Some people think it is troublesome to make Gorm interfaces for each languages. The reason for that is that length of strings in each language may not be the same. A custom-designed interface for each language would give the best result. That's also the reason why Gorm use absolute position for graphic interface component. If you would rather want to use relative position interface system, you should try Renaissance.
To sum up, use _() in the source code for every string you want to localized. Make language.lproj/ directory for each language and specify the language in GNUmakefile. Put the translation named "Localizable.strings" in each language.lproj/ directory. Put all translated Gorm interface in each language.lproj/ directory. That's all.
Non-blocking I/O
GNUstep supports non-blocking I/O on file and network access, which prevent freezing on user interface and avoid using hard-to-debug thread. Here I'll make an application which use the Unix command find to search the files. You can also check the Finger in gnustep-examples, which is the reference of this example.
Use Gorm to make this interface. Adjust the resizing attributes if needed.
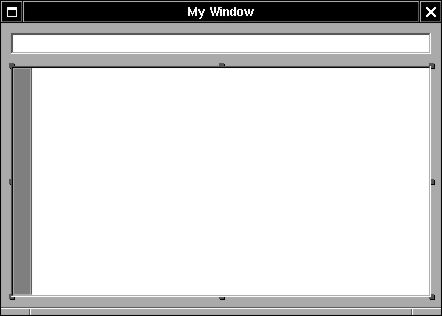 >
>Make a subclass of NSObject called "Controller" and instaniate it. Add outlets: "label" and "textView", and connect them to the interface. Add one action: "searchAction:" and connect NSTextField to the action. Set Controller object as the delegate of NSOwner (NSApp).
Create the source code of Controller class.
When user hit the ENTER key in the NSTextField, -searchAction: will be called and use find to search the file. GNUstep use NSTask to access other non-GNUstep command, and use notification to return the result of non-blocking I/O. Here is the source code of -searchAction:
Controller.m
- (void) searchAction: (id) sender
{
  NSString *file;
  NSArray *args;
  NSTask *task;

  file = [sender stringValue];
  args = [NSArray arrayWithObjects: NSHomeDirectory(), @"-name", file, @"-print", nil];

  ASSIGN(pipe, [NSPipe pipe]);
  task = [NSTask new];
  [task setLaunchPath: @"/usr/bin/find"];
  [task setArguments: args];
  [task setStandardOutput: pipe];
  fileHandle = [pipe fileHandleForReading];
  [[NSNotificationCenter defaultCenter] addObserver: self
                                        selector: @selector(taskEnded:)
                                        name: NSTaskDidTerminateNotification
                                        object: nil];
  [[NSNotificationCenter defaultCenter] addObserver: self
                                        selector: @selector(readData:)
                                        name: NSFileHandleReadCompletionNotification
                                        object: fileHandle];
  [fileHandle readInBackgroundAndNotify];
  [task launch];
} |
NSTask requires launching path as the path of the Unix command, and arguments as the parameters for the command. I redirect the output of NSTask to a NSPipe, and get a NSFileHandle from this NSPipe so that I can access the result of NSTask. Once the environment is set up, I add the Controller as the observer for the notifications, which listens to the end of task and the end of output.
Finally, I ask the NSFileHandle to read in the background and start the NSTask. That's the way to use non-blocking I/O on NSFileHandle.
Now, I need the methods for the notification.
Controller.m
- (void) readData: (NSNotification *) not
{
  NSData *data = [[not userInfo] objectForKey: NSFileHandleNotificationDataItem]
;
  NSString *string = [[NSString alloc] initWithData: data
                                       encoding: [NSString defaultCStringEncoding]];
  [textView setString: string];
}

- (void) taskEnded: (NSNotification *) not
{
  [[NSNotificationCenter defaultCenter] removeObserver: self];
  [fileHandle closeFile];
} |
Once the reading of output is ended, notification center will call -readData: as specified in the -searchAction:. Then I get the output out of NSFileHandle and put it into NSTextView. Once the task is ended, I remove the observer for notification and close the NSFileHandle.
About the names and keys to use in notification, you can check the header of NSFileHandle and NSTask. Here is the source code: Search-src.tar.gz
NSFileHandle serve as the port to read and write file, and it can also be used to access network by connecting to the BSD socket. GNUstep/OpenSTEP don't have interface for the socket. You have to make one using C library. But GNUstep offer some extension to access network. You can check the header for NSFileHandle for GNUstepExtensions category.
Besides NSFileHandle, NSURL and NSURLHandle also support non-blocking I/O for access data through URL. In NSURL, set up a client object and use -loadResourceDataNotifyingClient:usingCache: to read in the background. The client will receive the data. In NSURLHandle, set up a client object and use -loadInBackground. That's pretty much the classes you want them to be non-blocking. If you want to make a class which is non-blocking, you need to study the run loop of GNUstep, which is out of the range of this Tutorial.
There is also a netclasses which can be use to access network as client or server port if you don't want to write the socket in C. It has been used in several GNUstep projects especially in instant messengers.