|
|
Ⓒ 2005, 2006 Dennis Leeuw
Permission to use, copy, modify and distribute this Guide and its
accompanying documentation for any purpose and without fee is
hereby granted in perpetuity, provided that the above copyright
notice and these paragraphs appear in all copies.
The copyright holders make no representation about the suitability of this Guide for any purpose. It is provided “AS IS” without expressed or implied warranty.
GWorkspace is an GNUstep-based application that handles the Workspace. The Workspace is the desktop, a file manager and a place that holds the icons of the running applications.
This guide will help you to manage the Workspace. It will explain all the elements that you might encounter and even the more hidden features of GWorkspace. Since you can run GWorkspace on more systems then I can afford, things might not be exactly the same on your system.
Things that might be different for you are e.g. the layout of the filesystem as is represented in this guide. This document is written using a GNU/Linux system with a default GNUstep installation. Meaning that GNUstep itself is located in /usr/GNUstep.
This version of the guide is based in the GWorkspace 0.8.x releases, this means that with future versions and previous versions there might be differences.
Other omissions, errors and mistakes are my faults. Please let me know at dleeuw@made-it.com.
GNUstep uses a special keyboard scheme to control the graphical environment. For historic reasons (the OpenStep standard) there are three different keyboard modifiers: control, command and alternate.
If you are using a default GNUstep installation the mapping between the actual keyboard and the functions is as follows:
|
The command key is used to access commands from the menu. The control and alternate keys are used to give keys a different meaning in a certain context.
Since keymappings can be changed, within this document the full function names are used to descibe which keys need to be used.
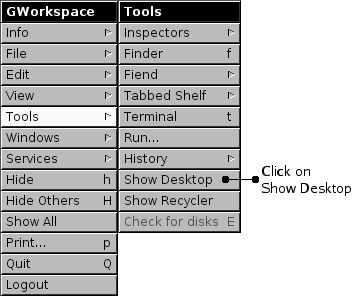
Before we start to work with GWorkspace we will enable the Desktop. To do this, start GWorkspace if it is not already started. Click on the Tools menu entry as shown in figure 1.
The most important features of the Workspace is the maintenance of files, folders and applications. You can rename, delete and copy files and folders. With the Workspace you can also access harddisks, floppies, CDs and DVDs or USB-sticks.
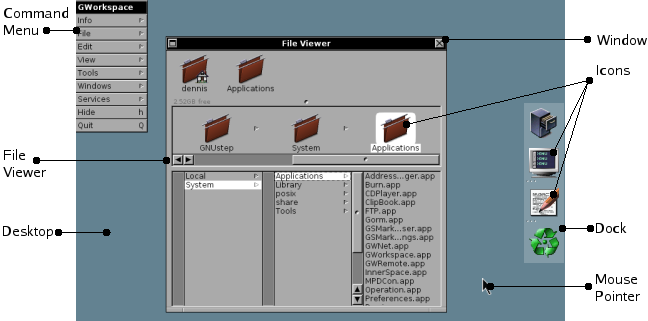
This might all seem complex at first, but the Workspace only consists of a few basic parts: The FileViewer for browsing and manipulating files, a menu containing commands and an application Dock for easy access to applications. The Dock also contains the Recycler for deleting files. To get a quick overview see figure 1.1.
Pointers follow the movements of your mouse. If you move your mouse to the left the pointer will move to the left. The standard pointer is the Arrow pointer. If you perform special operations with your mouse, the pointer changes. Table 1.1 gives you an overview of the different pointers.
Icons give a graphical representation of what can be found on your system. It shows you objects that you can access or view. There are a couple of default icons available.
The idea behind a graphical interface is that everything on your system is represented by an icon.
The left most icon in table 1.2 represents a folder. Folders are place holders for other objects like files and applications.
And the second one is the Tool icon. Tools are commandline programs, they can not be run in a graphical environment, and thus have a generic icon to represent them.
Every application that is supported by the GNUstep system has an icon that represents that application. In very rare cases you could come across the Unknown Application icon. But in normal cases you should not.
Files are objects that can be handled by applications, like text files, or spreadsheets. If the system does not know how to handle a certain file type (does not know which application can handle the file), the Unknown FileType icon is shown.
A window is a part of the screen where you can view the results of your actions. It can hold a document, or a spreadsheet, or in the case of the Workspace the contents of the filesystem. It is in a window where you perform your actions.
A window consists of a Titel bar and a Resize bar with in between the contents of a window. The Title bar displays the window name and a couple of control elements, as shown in figure 1.2
When the minimize button is clicked a mini-windows is placed at the bottom of the screen. Double clicking this mini-window resizes it again to full size.
The button on the right closes the window, but is also a status indicator. As
long as the cross is solid you can close the window or use command-w to close it.
If however the cross changes to  then something in de window has changed
which you might want to safe first. So if you edited a document, but did not safe
it the cross shows this by being broken. Clicking the broken cross will pop-up a
panel asking you if you want to safe or discard the changed contents of the
window.
then something in de window has changed
which you might want to safe first. So if you edited a document, but did not safe
it the cross shows this by being broken. Clicking the broken cross will pop-up a
panel asking you if you want to safe or discard the changed contents of the
window.
The bottom of the window is made up of a bar that is refered to as the Resize bar:
The middle part of the Resize bar can be used to make a window longer or shorter. The width stays the same. To also change the width of a window you can use the two smaller parts on the left or the right. Clicking such a part of the Resize bar and holding down your mouse button while moving your mouse, resizes the window in width and height.
A special kind of window is the command menu. It does not have a close or minimize button, but otherwise it acts exactly like the other windows.
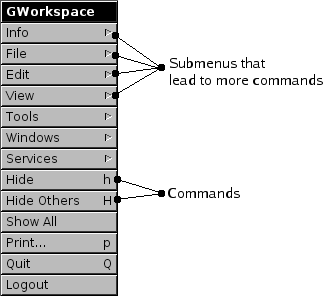
The command menus hold the commands you can use to control the computer. The entries within this menu are commands you can access directly like Quit or Hide, but they can also have a triangle next to it, which means that those entries lead to a submenu, like Info and Edit.
Clicking on a command with a triangle next to it will open the submenu, which is another window on its own, holding even more commands.
Every application has its own list of commands that can be used. The one presented in this section is the one from GWorkspace, which can be seen by the Title bar of the menu. Menus can be moved with the mouse. Put your mouse pointer on the Title bar of the menu, click and keep the mouse button pressed. Now you can move the menu around. Releasing the mouse button will release the menu.
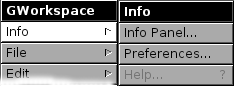
If you click the Info command a submenu appears, like shown in figure 1.5.
The name of the submenu window gets the name of the menu entry you choose.
If you now try to move the Info menu you will notice that the main menu stays where it is, but the Info menu will get detached. It becomes a standalone menu which you can moved around as shown in figure 1.6.
Another thing you will notice is that it gets a close button in the upper right corner. Clicking this button closes the menu.
Menus are windows that belong to the main menu, but can be moved independantly. The Title bar of the menu indicates the name of the command you have choosen. Not the entire path, but just the name of the command from the previous menu entry.
Another thing that you might have noticed is the fact that the entry you selected, like Info stayed highlighted when the menu was still attached to the main menu. This is to indicate how you got to a certain submenu. But as soon as you detached the menu the path highlighting stops at the last entry shown.
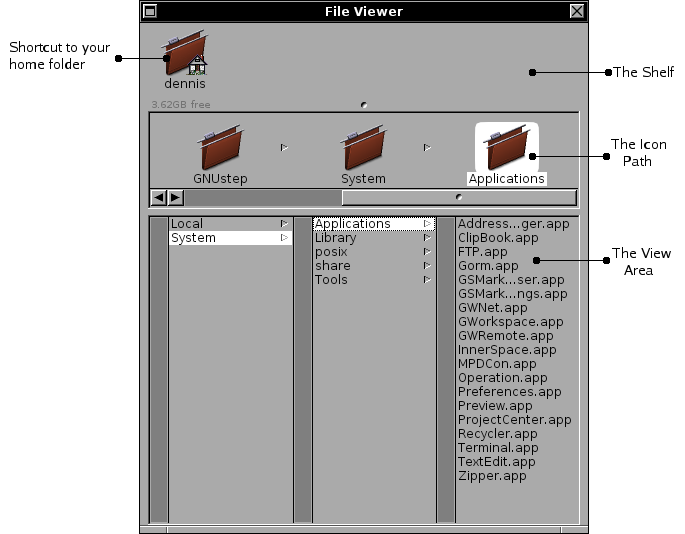
The most important feature of the Workspace is access to the filesystem. An example of this feature is presented in figure 1.7.
A computer organises everything that is stored on the harddisk into logical elements. The basic organisation is files and folders, where a folder is an element that can contain files. Another name for a folder that you might know, or see, is: directory.
Files are all other objects like documents, spreadsheets, images, etc.
The Shelf is a place holder for shortcuts. Initially the only shortcut present is the one to your home folder. If you click the icon you are immediately transfered to the place where you store your files and folders. By dragging files, folders or applications to the Shelf you can create your own shortcuts.
The Icon Path represents the path from the root of the filesystem towards the point where you are now. It always ends at an highlighted folder or file. It is this highlighted element on which you can perform operations, like dragging and dropping.
And the last section is the viewing area. Here the contents of the filesystem is displayed. It presents to you in a graphical way the surroundings of the highlighted item.
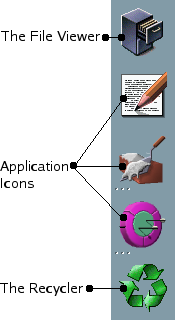
The Dock is a place to store often used applications. The top of the Dock contains the icon that corresponds with the File Viewer and the bottom icon is the Recycler. All others might not be available on your system. The Dock is explained in more detail in 5.1.
|
|
In the upper left corner of the File Viewer window, you find an icon with your username (the name with which you logged into the system) under it. Clicking it will bring you to the folder that is called your home folder. This is the place where you can store your documents and create additional folders.
The place where you end up depends on your system. Most Unix-like systems use /home/<username> as the home folder of a user. To make it easy for you the entire /home/<username> can be abbreviated to the ~ (tilde character), which saves a lot of typing.
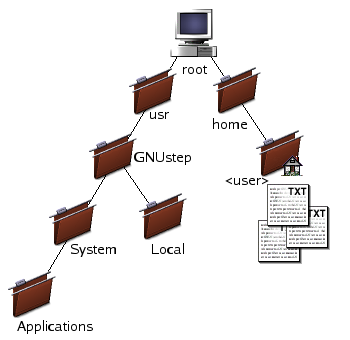
A filesystem is organised as a hierarchical tree where the highest part is called the root. If you look at the picture in figure 2.1 and turn it upside down you understand the tree analogy.
Everything within the filesystem is placed in folders. Folders can contain files, applications, and even other folders.
This way of organizing your data is very efficient. Assume you have a folder in your home folder where you want to store your MP3 collection. Just create one folder called Sounds and then subdivide it per artist and then per album.
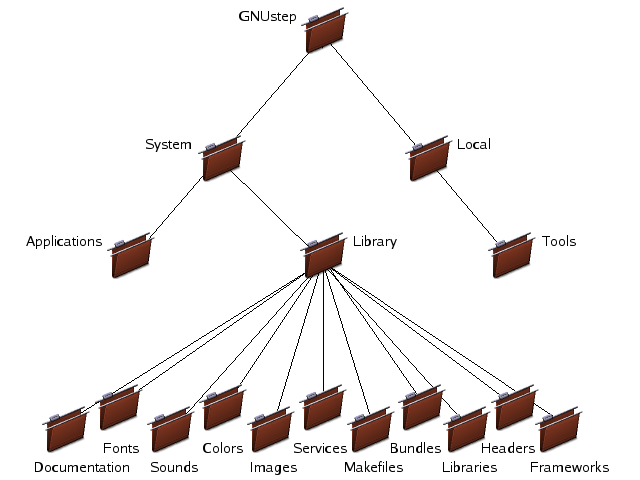
If you organize your work this way, it is very easy to find your data. The folder tree of GNUstep is setup in a similar fashion, like you can see in figure 2.2.
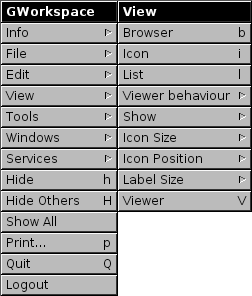
GWorkspace gives you a great deal of flexibility of how you want to view the filesystem. If you are quickly browsing through a large tree of folders the browser might be fine for you. But if you are trying to locate an application it would be easier if you can look at the icons, instead of only the names. The different ways to view the filesystem can be selected through the menu like shown in figure 2.3.
The Browser view and the Icon view you have already seen, and now you know how to access them. New is the List view. If you encounter that the commands in the View menu are grey instead of black it means you have not selected a viewer. Move your mouse to the viewer and click on it, so its title bar gets black and the commands in the menu are accessable.
With the arrow keys you can walk through the objects of a view. Sometimes this is easier then using the mouse to select elements. Another keyboard replacement for the mouse is the Enter. Pressing Enter while an object is selected is equal to double clicking the same object.
Within the Icon view mode or the List view mode you can use the PgUp to scroll an entire screen up or PgDn to scroll an entire page down.
And the last way to walk fast through a list is by selecting the first letter. It moves you immediately to the first matching item. If you want to jump to the objects that start with a k, type the letter k on your keyboard. Note that this is a case sensitive action. The k and K are two different places.
If you hold down the Shift key while selecting objects the selection gets expanded with the new objects. This way you can select multiple objects before performing a certain operation. Of course in the Icon view mode this can also be performed with the mouse. Hold down the left mouse button and select an area. All objects within the area will light up.
In the Icon view you can also change the size of the Icon Size, Icon Position and Label Size. Using the Icon Size submenu you can change the size of the icons from 48x48 pixels to e.g. 24x24 size.
Instead of having the name of the file below the icon, you could use the Icon Position to have the title to the left of the icon.
And the last option you can change is the size of the filename. Which is called the Label Size. This can be lowered to a font size of 10 points, or as great as 16 points.
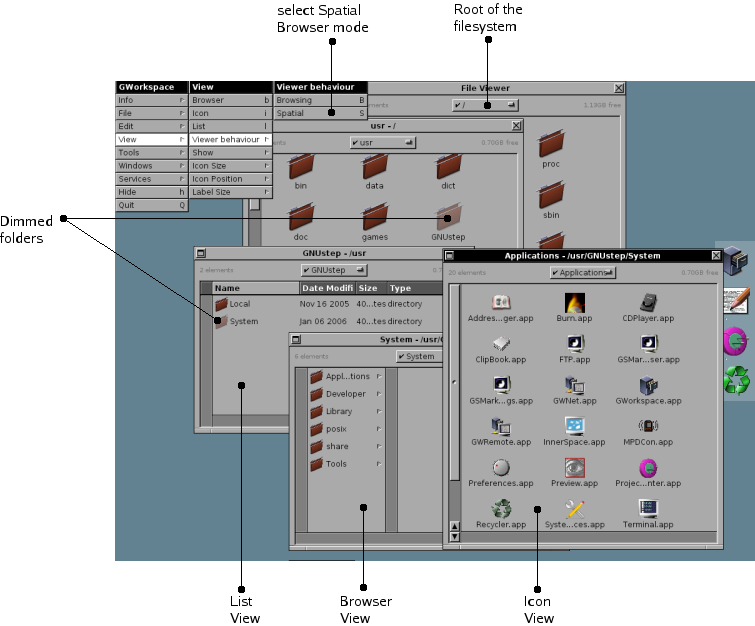
By selecting from the View the View Behaviour entry you can select the Spatial mode. This mode is quite different from the browsing mode. It does not have a Shelf, and it does not have an Icon Path. You only have the viewing area. Selecting the Spatial browser mode puts you at the root (/) of the filesystem.
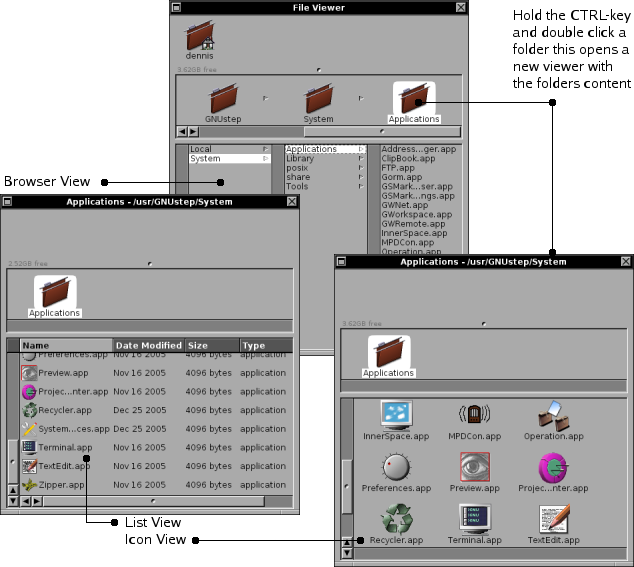
Double clicking on a folder automatically opens a new viewer with the contents of that folder. All options for viewing like, Icon view, List view and Browser view are still available.
The dimmed objects in the different views are the path you have followed.
Your screen might get quite busy with all the open folders, so there are some special tricks that might help you to keep an overview. If you hold down the alternate while double clicking on a folder, a new viewer will be opened with the contents of the folder, but the old one will be closed. Which, of course, can also be accomplished with Enter and holding down the alternate key.
This chapter will not teach you how to organize you files, that is more a matter of personal taste, but it will teach you how to create files and folders, delete and move them and how to maintain some basic security measures.
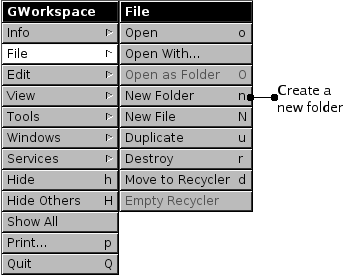
To create a new folder go to the GWorkspace menu and click on File like shown in figure 3.1. This will open a submenu. Click New Folder. The new folder will appear in the FileViewer icon path. Double click on the NewFolder name and type the name you want the folder to have. For now we call it Documents.
With command-n you can create new folders without using the menu, which is much faster when you have to create more then one folder.
Create two more folders called Test and Backup within this newly created folder.
We do not want everybody to have access to our files. So lets make sure that we are the only one who has access rights to this folder.
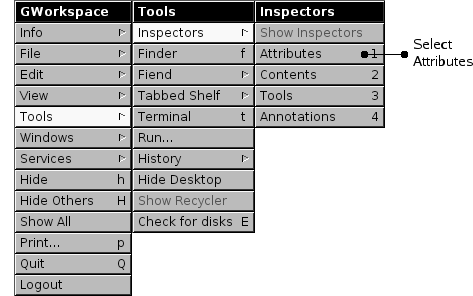
Make sure the Documents folder we just created is the one highlighted in the Icon Path. Then select the Attributes from the Inspectors menu as shown in figure 3.2.
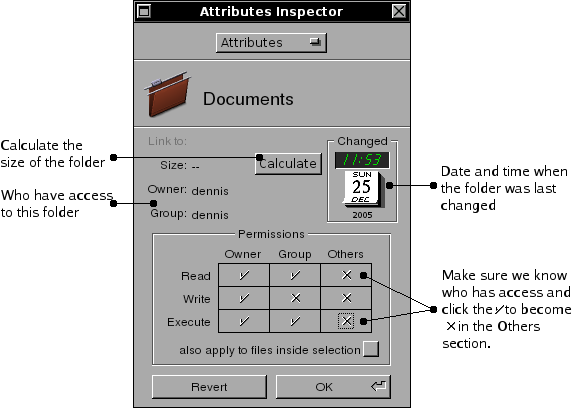
A panel will pop up (figure 3.3) that shows you more information about the folder you created.
On Unix-like systems the rights someone has are devided into the owner of the file, a group of users and everybody else (others). The owner does not have to belong to the group, but most of the times does.
For each of these you can set read, write and execute permissions. The execute permission gives someone the right to start e.g. an application. But also folders have execute permissions. To have access to a folder one needs the execute permission and the read permission to view the content of the folder. With read, write and execute one is allowed to create files or other folders in a folder.
In 3.3 the user dennis, belongs to the group dennis and is the only one who can access the file. People belonging to the group dennis can read the contents of the folder, but not write to it. While the owner can read and write to the folder.
Hold down the control-key and double click on the Documents folder, to open a new viewer with your Documents folder as the root.
|
|
Now you have two viewers one with the entire filesystem, and one starting from the folder you double clicked.
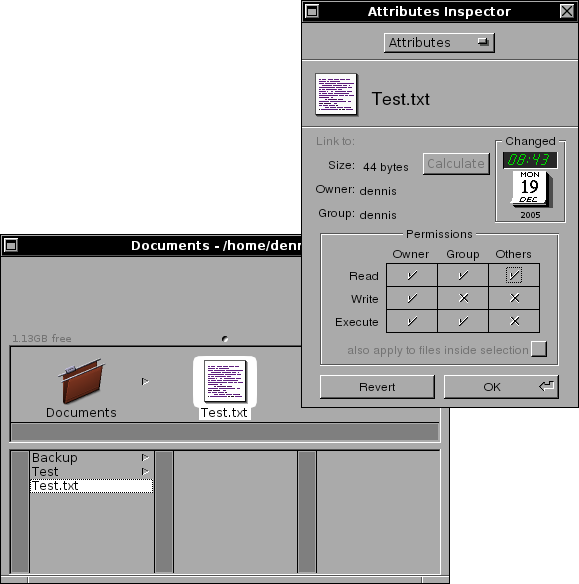
Go back to the File menu command and select New File. Rename it with the same procedure as above (use Test.txt as its name).
In the GWorkspace menu select Tools and go to the Inspectors. Select Attributes. A panel will popup with the file attributes. Check that the rights on the file are the way you want them.
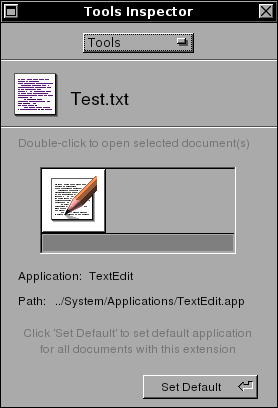
The only available application on my system to open this kind of file is TextEdit, so it is the only available choice.
Because we are the one that created the file through GWorkspace it is completely empty. The only way the computer guesses the type of application is because we gave it a .txt extension (text file).
To prove that it is an empty file select Contents from the Inspectors list. Clicking Edit in the Inspector opens TextEdit with our file. So add the following line to the file:
The quick brown fox jumps over the lazy dog
|
Save the document and see the Content view in the Inspector change.
File annotations are keywords you can give to a file to make it easier to find it back later. FIXME
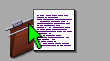
When you select a file from the Icon Path and start to move it around, you will notice that the pointer changes. It is changed to the NoAccess pointer. Which means that if you release your mouse button, nothing happens. Every area where you release the file, while the systems says you can not drop a file, means the system will not do anything and everything will stay as it was.
If however the pointer changes into a green arrow it means you can perform an operation, which will change your system. The green arrow means that the file is moved from its current position to the position the pointer is pointing to.
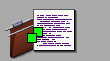
Before releasing your mouse button, you can press the alternate-key and you again see a change in pointer. If you release the mouse button now, the file will be copied. So an identical file will be created in the folder you are pointing to and the original will stay where it was.
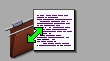
And the last option you have is to not press the alternate-key, but use your left control-key. This will create a link if you release the mouse button. A link means that the file stays at its original place and in the new position a file is created with an identical name, which tells the system where the original is.
Moving files or folders means you put the file or folder in a different location. It will not be available in the old location anymore after the move. An alternative for the drag and drop procedure is to use command-x and command-v (or Cut and Paste from the Edit menu).
Copying files or folders means you put a copy of the file or folder in a different location. The file or folder still exists in the old location. Changing one of the files, does not affect the other one and they are no longer identical copies, you can even remove the original witout affecting the copy. To make a copy of a file in the same folder, press command-u.
Another way of copying a file is using the command-c and command-v key combinations (or the Copy and Paste commands from the Edit menu).
Linking a file or folder means that you create a new file or folder in another location that is linked to the original. Changing the contents of the original, or the link, keeps both files identical. To be precise when you change the linked file or folder, you are actually changing the original. Removing the link does not alter the original. Removing the original however creates a dead link. The link will persist, but there is no destination it is pointing to anymore.
Create a copy of the Text.txt file in the Backup folder and a link to the Test.txt file in the Test folder.
The easiest and quickest way to delete a file or folder is to select it in the File Viewer window and to press command-r one single popup asks for a confirmation and pressing Enter is all that is needed to definitively remove the file. The same thing can be accomplished through the File menu and selecting Destroy.
The downside of this way of working is the definitive nature. Files deleted this way can not be retrieved, they are gone, for good!
A more subtle way of doing things is through the use of the Recycler. This gives you the benefit of undoing the delete action.
The Recycler is part of the Dock. The bottom icon on the Dock is always the Recycler. The icon can change based on the state of the Recycler. It can indicate that there are no files in the Recycler (it is empty) or that there are files in it.
There are various ways to place a file in the Recycler. The first one is to drag the file towards the Recycler icon on the Dock and as soon as the pointer turns green release the mouse button.
Another way is to select the file and press command-d (or the Backspace key) on your keyboard.
And the last version is by using the File menu entry Move to Recycler. If the option on the menu is greyed out, you forgot to select the file.
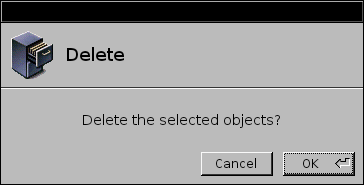
Before the action is performed a panel will popup to ask for your confirmation.
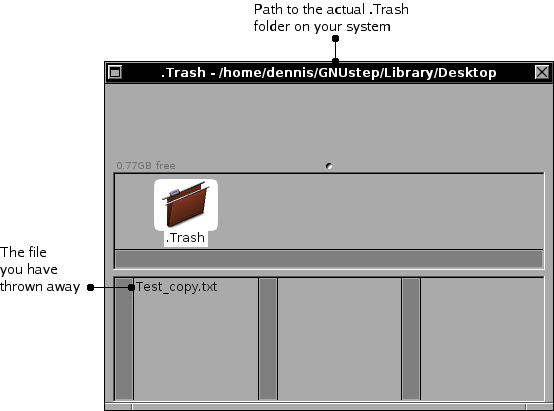
When you started with an empty Recycler icon, you will after using one of the above options on e.g. the Test_copy.txt file see the icon of the Recycler change.
Double clicking on the Recycler icon in the Dock opens a viewer on the .Trash folder, see figure 3.9.
Dragging the file back to a folder on the system removes it from the recycler.
The downside of the Recycler is that it is a temporary store for files or folders that need to be thrown away. By placing items in the Recycler they are still part of the filesystem and thus take up space. So placing files in the Recycler, does not create more disk space on your system.
To free the diskspace occupied by the items in the Recycler you must empty the Recycler. Select from the File menu the command Empty Recycler and the files will be removed from your system.
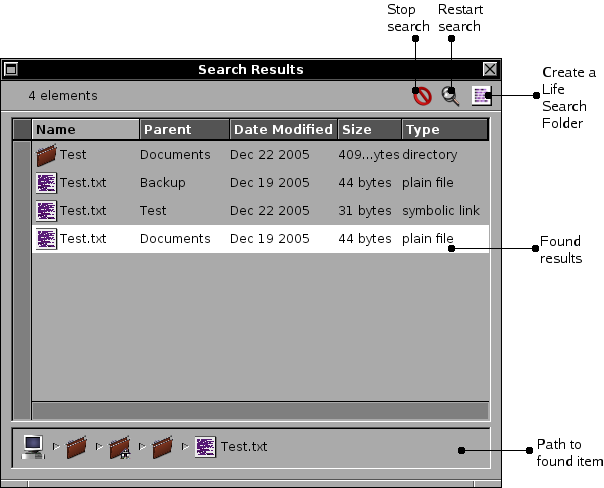
If you search on Name contains est and click Search you get:
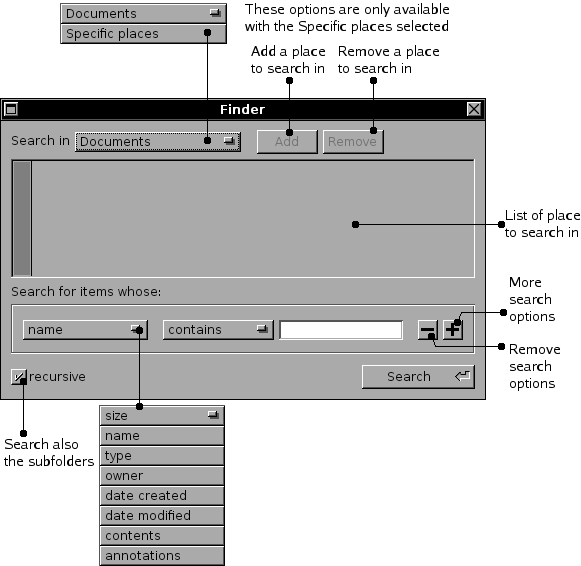
Using the plus (+) and minus (-) signs to add or remove more search options. This way you can create very complex constructions for very exact matches.
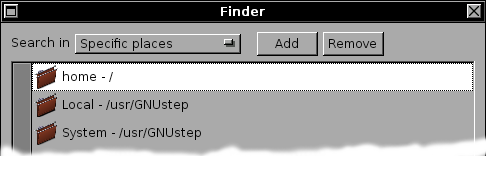
You can search in a single folder, or you could build a list of folders where you want to search. Select the Specific places item and use the Add button to build a list of places to search in.
|
|
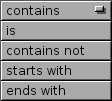
The Name search option gives you the ability to search a file or folder by its name. To search on the exact match select ‘is’. If you only know a part of the name then ‘contains’ might be better for you. To further refine your search you can use the ones that ‘contains not’ or that ‘start with’. If you know the extension of the file you could e.g. filter out all .txt files by using the ‘ends with’ option.
The text field, in which you can type text, is case sensitive. So there is a distinction between uppercase and lowercase.
|
|
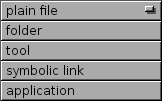
The file type search can be searched for in a match or does not match variant: ‘is’ or ‘is not’.
Currently the Finder functionality can be used to find folders, tools, applications, symbolic links and of course normal files like documents.
Using the ‘contents’ search option, one can search through the contents of documents for matches. Note that this might be a heavy task for your computer, since this will inspect the contents of the files and it needs to open and read them.
The text you enter is case sensitive, so only exact uppercase and lowercase matches are performed.
|
|
Through the Annotations Inspector one can add keywords to a file. And with the Annotations search option you can search on the added keywords. There are several ways to search through the annotations.
|
|
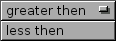
This search feature is quite simple. You can search on ‘is greater then’ or on is ‘is less then’. Combining the two using the + button you can define an almost exact match on the size of a document.
Using the ‘is’ or ‘is not’ search options and filling in the username on which you want to search you can quickly filter out the documents created by a certain user.
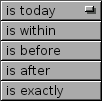
There are two ways a date is connected to a file. The first one is the date on which the file is created and the other is the last modified date. The Finder gives you the ability to search on both of these (date created and date modified).
Both options have a uniform structure for searchig the dates. The options in figure 4.4 are the ones you can choose from, and after that you can, with some options, enter a date.
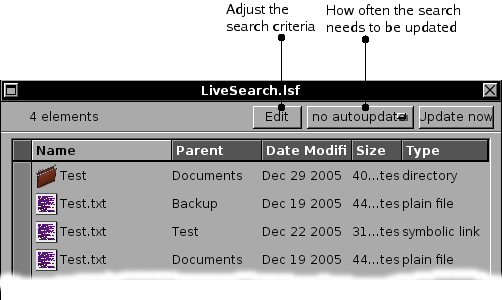
By dragging the Live Search Folder from your Search results window to e.g. the Desktop you can store the search for future use. A Live Search Folder is a Finder search saved in a file and capable of auto-updating itself.
To reuse a search double click the Live Search Folder. The LSF window that will open has two buttons and a popup; the Edit button opens the folder editor where you can modify the search criteria used by the folder, the popup let you choose the auto-update cycle time and the Update now button updates the results.
|
|
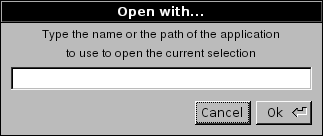
An alternative for this is to highlight the document and use Open with to open it with an application of your choice.
|
|
However there are cases where you want to start an application to create a file or there is no file to work with, just some functionality that you want to use, like a chat program.
The GNUstep filesystem has three logical places where applications are stored. First of all there is the System/Applications folder where the applications are stored that belong to the initial installation. In this folder you will find GWorkspace (the Workspace is also an application).
The second place is the Local/Applications folder wher applications can be stored by your local system administrator.
And the last place is ~/GNUstep/Applications where you can store applications you want.
Using the FileViewer you can browse to these places and by double clicking the application icon, the application will be started. It is as simple as that. And of course there is more and that is what the rest of this chapter is about.
The Dock is a place to store applications that you want to have ready at hand. From the Icon Path you can drag applications to the Dock.
|
|
Applications you start will also be visible in the Dock. Started applications will not have the ‘. . . ’ marker, while the not started applications have the ‘. . . ’ marker.
To make an application the active one you can double click its icon on the Dock. Hidden applications are shown in the Dock with a single ‘.’ in their icon. By double clicking this icon the application gets unhidden and becomes the active one.
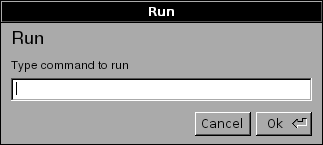
With the Run command from the File menu, you can start applications if you know the name. Just type the name in the panel and click Ok.
|
|
All kinds of objects can be stored on the Shelf (applications, folders or files). Beter explained is to say the links can be created on a Shelf. The actual object stays where it is, but a symbolic link is created so you can find it easier.
In the Browser mode the main Shelf is the one in your File Viewer window. Since the space on that one is limited there are two other Shelfs available to you. The TabbedShelf and the Fiend.
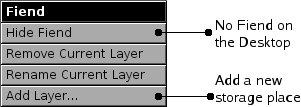
The Fiend is another way of storing applications, files or folders. From the Tools, Fiend menu you can select the Show Fiend command. This gives you the Fiend, which is probably empty on your system:
|
|
and the Fiend menu:
|
|
With the green arrows you can switch from one ‘shelf’ to another and by dragging and dropping you can add icons to a certain ‘shelf’, like I did for the development tools. By giving each layer another name you can create distinguishable shelfs e.g. related to the type of application, or by project type.
The Tabbed Shelf is comparable with the Shelf. One can stick applications, documents and folders for future use on the Tabbed Shelf. To activate the Shelf select from the Tools menu the Tabbed Shelf entry. This will activate the Shelf at the bottom of your screen.
|
|
Double clicking an folder object in the Tabbed Shelf opens a new viewer with the folder. If you click the object with the control-key pressed, the selection is opened in the current viewer.
fswatcher monitors your filesystem and makes sure that the Fileviewer gets updated with the changes on your filesystem.
ddbd is the GWorkspace database system.
lsfupdater is ...
These daemons are automatically started the first time you start GWorkspace. Note however that when you end your GWorkspace session, that they are not automatically killed.
The GWorkspace database used by the ddbd daemon can be found in de users home directory:
$GNUSTEP_USER_ROOT/Library/ddbd
|
http://www.gnustep.it/enrico/gworkspace/gworkspace-0.8.2.tar.gz
|
To check out GWorkspace from SVN use:
svn co http://svn.gna.org/svn/gnustep/apps/gworkspace/trunk
|
To build GWorkspace use:
./configure
make GNUSTEP_INSTALLATION_DIR=$GNUSTEP_SYSTEM_ROOT install cp -a Apps_wrappers/* $GNUSTEP_SYSTEM_ROOT/Applications |
If GWorkspace crashes it normally leaves core dumps, however some distributions have a ulimit -c 0 set. This is done to prevent diskspace loss for the normal user, but you might want to override it if you run into trouble with GWorkspace.
Deleting the defaults:
defaults delete GWorkspace
defaults delete ddbd |
I assume that GWorkspace was installed using the GNUSTEP_SYSTEM_ROOT variable.
rm -rf ${GNUSTEP_SYSTEM_ROOT}/Applications/GWorkspace*
GNUSTEP_LIB_ROOT=${GNUSTEP_SYSTEM_ROOT}/Library rm ${GNUSTEP_LIB_ROOT}/Libraries/libDBKit* rm ${GNUSTEP_LIB_ROOT}/Libraries/libFSNode* rm ${GNUSTEP_LIB_ROOT}/Libraries/libInspector* rm -rf ${GNUSTEP_LIB_ROOT}/Headers/FSNode rm -rf ${GNUSTEP_LIB_ROOT}/Headers/Inspector rm -rf ${GNUSTEP_LIB_ROOT}/Frameworks/FSNode.framework rm -rf ${GNUSTEP_LIB_ROOT}/Frameworks/Inspector.framework rm -rf ${GNUSTEP_LIB_ROOT}/Bundles/*.inspector rm -rf ${GNUSTEP_LIB_ROOT}/Bundles/*.finder rm -rf ${GNUSTEP_LIB_ROOT}/Bundles/*.extinfo rm -rf ${GNUSTEP_LIB_ROOT}/Bundles/*.thumb rm ${GNUSTEP_SYSTEM_ROOT}/Tools/ddbd rm ${GNUSTEP_SYSTEM_ROOT}/Tools/fswatcher rm ${GNUSTEP_SYSTEM_ROOT}/Tools/indexer rm ${GNUSTEP_SYSTEM_ROOT}/Tools/lsfupdater rm ${GNUSTEP_SYSTEM_ROOT}/Tools/resizer rm ${GNUSTEP_SYSTEM_ROOT}/Tools/searchtool rm -rf ${GNUSTEP_USER_ROOT}/Library/Bundles/*.inspector rm -rf ${GNUSTEP_USER_ROOT}/Library/GWorkspace rm -rf ${GNUSTEP_USER_ROOT}/Library/ddbd |
Browser view, 11
Command Menu, 5
Desktop
Show desktop, iv
Destroy, 24
Dock, 8, 34
File
delete, 24
extension, 21
permissions, 16
File permissions, 16
File rights, 16
File Viewer
Viewing Area, 7
Files, 22
copy, 22
Create, 20
link, 22
move, 22
Rename, 20
rights, 20
type, 21
undelete, 25
Unknown FileType Icon, 3
Files,searching, 27
Filesystem, 10
FileViewer, 7
Folder
Rename, 16
Folders, 3, 10
Create, 16
delete, 24
searching, 27
undelete, 25
GNUstep tree, 10
Group(s), 18
Home, 9
Icon Path, 7
Icon view, 11
Icons, 3
Default Icons, 3
Folder, 3
Tool, 3
Unknown Application, 3
Unknown FileType, 3
Inspector
Attributes, 16
Inspectors, 20
Attributes, 20
Contents, 21
List view, 11
Owner, 18
Pointers, 2, 22
copy, 22
link, 22
move, 22
Recycler, 24
delete, 24
empty, 26
undelete, 25
root, 10
Shelf, 7
Spatial Browsing, 14
Submenu, 5
Tools, 3
Unix permissions, 16
username, 9
View
Icon, 11
List, 11
Viewer
new, 19
Views
Browser, 11
Windows, 4
Close button, 4
Minimize button, 4
Resize bar, 4
Title bar, 4