- Table of Contents
- Preface
- 1. First Contact
- 2. Using GNUstep applications
- 3. Managing files and folders
- 4. Configuring the system
- 5. Working with text
Preface
This manual "A GNUstep Dektop Manual" is a general introduction to a working environment around the GNUstep development system. Some elements described in this document might be a bit different on your system. We have however tried to be a generic as possible, so most things described here should be the same on your system.
Who should read this book?
Anyone new to the GNUstep look and feel should read this book to get aquinted with its basics. In a step-by-step manner we will guide you through everyday tasks like managing files, starting and stopping applications and configuring your system.
Chapter 1. First Contact
The first time you come in contact with a GNUstep system, it might surprise you. It is very different from any other system you might know. Except for those that have once worked with a NeXT(tm) system, the entire interface is new to you. It looks different, because the system is different.
This book is written as a How Do I Do... kind of guide. In small chapters is explained how to perform basic tasks, based on everyday use. I hope it provides you with the basic knowledge to further explore the system. Please don't hesitate to contact me if you feel things can be written beter. I am always open to suggestions. I can be contacted at dleeuw@made-it.com.
Words can be misleading. Often the word desktop is used for anything that happens on your screen. It is said that it happened on your desktop. To hopefully clear some of the confusion this document has a consistent naming.
With desktop I mean your screen without all the icons and programs. It's the purple (at least in our images) like thing. You can't do anything with your desktop other then give it another color or replace it by an image. It's on your desktop that things happen.
Another word I would like to introduce is Workspace. The Workspace is the environment that you first get in contact with on a GNUstep system. The following chapter will introduce you to the Workspace.
Your Workspace
Files, application programs and other items you work with on a computer are represented by images or objects. The basic look of a GNUstep Workspace is something like this (Your desktop will probably not exactly match this picture).
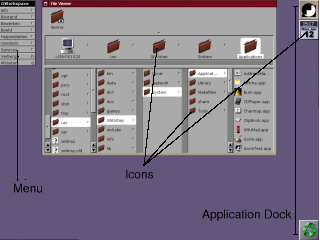
Icons. Pictorial representations of this you can work with, like files, programs, etc.
Menu. A list of commands that you choose.
Application Dock. Often refered to as just 'The Dock'. A place to store often used programs, with on top the Dock icon and at the bottom the Recycler.
FileViewer. The large grey field in the middle of the image with all those colored icons is called the FileViewer. It is your access window to files and programs.
Pointer. The black arrow that moves around your screen when you move your mouse.
Controling the environment
The most things you do when using the computer is clicking on the items of the programs to perform certain actions. GNUstep provides you with a consistent interface, meaning that a lot of the items: buttons, sliders, textfields, etc. will be looking the same in the different programs. That's why we will guide you through the most important elements of the interface.
 Buttons are objects that you can click to confirm a dialog, with ofcourse a possibly different text on them.
 Buttons can be used to set certain actions. A button that is active is white, while non-active buttons are grey.
 When a certain default action is assumed, the button has a dotted frame on it. This means that just pressing <Enter> will activate this botton.
Buttons can have various states.
Buttons can be used as confirm buttons, which means that if you click them a certain action is performed.
A button can be used as a toggle button, which means that clicking them sets a certain state. More like a on/off switch.
CheckBoxes give the user the ability to choose one or more options from a list.
 The option is not selected.
 The option is selected.
Radio buttons are used to give a user a single selection option. The user can choose one option from a list.
 The inactive radio button is transparent in the middle, thus showing the background that it is on.
 The active radio button has a white middle.
On white backgrounds you will not see the difference between a active or non-active radio button.
 Pop-up lists are indicated in a window by the fact that they have a nibble
 on the right. When you click the bar and hold your mouse button a list of choices pops up.
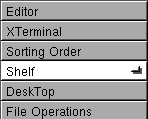
By moving your mouse up and down you can select an entry. Releasing the mouse button with an item in white, selects this item.
Chapter 2. Using GNUstep applications
Where to find applications
Computer programs are stored on a harddisk inside your computer. With programs you can access files like photo's, text documents or financial sheets. To work with these files you need to start a program. Programs can be identified by an icon which tells you more about the functions the program provides.
The first place to look for the program icons is the Dock. The Dock is the bar on the right hand side of your screen; with on top the GNUstep logo.
Through the FileViewer
Applications supplied by the system can be accessed through the FileViewer in the System/Applications folder.
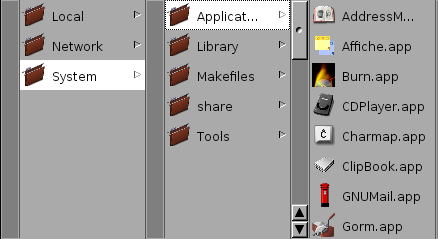
Other application locations are the folders Local/Applications which initially is an empty folder, and that can be used by you to store your own applications or applications that you install. The other application store is Network/Applications this folder is only used for applications that are not stored on your computer but that can be accessed from somewhere on the network. It is a less often used repository and initially empty.
Starting and stopping applications
Starting applications
Applications can be started by double clicking their icon. One can use the applications on the Dock, but also via the File Viewer window in the different Applications/ directories.
Active applications
Only a single application can be active at a given time. You can watch this behaviour by looking at the application menus. Only the menu of the active application is presented on the screen. The title of the menu holds the name of the active application. Ofcourse many applications can be running at the same time, but only the active one can receive keyboard input.
A started and active application consists of two parts. It has a menu, and atleast one window. The menu is used to control the application and the window is used to communicate with you.
To make an application active one can click on one of its windows or panels, when the application is already running. Or you could double click on the application icon at the bottom of the screen. Newly launched applications always become the active application.
Stopping applications
To stop an application from running, one has to first make that application the active one. Then go to its menu and click the
 menu option.
Using menus
Every application has its own menu. A menu is a list of options that can be accessed, or that lead to submenus. If the menu option has a grey rectangle to its right then that option leads to a submenu.
Menu options without the rectangle are commands that can be executed. They might have a letter to their right, in which case you can use the First Command key and the letter to access the menu option from the keyboard.
On the top of your menu you will always find an item that gives you acces to the submenu
 which leads to atleast
Info->Info...
and most of the time also to
Info->Preferences...
And possibly some other options.
which leads to atleast
Info->Info...
and most of the time also to
Info->Preferences...
And possibly some other options.
On the bottom other options that can be found which are on every menu.
 is such an item. It brings the entire application, menus and all its windows, back to a single icon on the bottom of your screen. Double clicking this icon returns everything to its previous state. Another menu item found on every menu is the
which closes the application.
is such an item. It brings the entire application, menus and all its windows, back to a single icon on the bottom of your screen. Double clicking this icon returns everything to its previous state. Another menu item found on every menu is the
which closes the application.
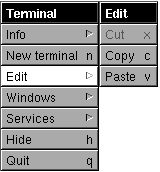
Most menus will also have items like File for opening and saving files, Edit for copying and pasting data to and from the documents you are working on Windows, which contains a list of all windows that are associated with the application and Services for additional features available to this application.
Moving menus
Menus can be moved with the mouse. Put your mouse pointer on the title-bar of the menu, click and keep the mouse button pressed. Now you can move the menu around. Releaseing the mouse button will release the menu.
Detaching menus
When you click on menu item that has a grey rectangle a submenu is opened.

 | Detached menus get a close box on the top bar. |
| The non-detached menu path is displayed by the white colored entries, so you an always see how you got to a certain submenu. |
Closing menus
Non-detached submenus can be closed by clicking on one of the white colored menu entries in the menu path.
Detached submenus can be closed by clicking the grey box marked
 in the top bar.
Controlling windows
Every application has next to its menu one or more windows. Some applications will start with only a menu. Those application expect you to perform an action first, e.g. to open a file, before their window appears on the screen.
Using windows
A window consists of a top-bar and a bottom-bar. The top bar displays the window name and a couple of control elements, like this:

When you click on the middle of the bar and hold your mouse button pressed you are able to move the window, by moving the mouse. The black arrow will change in to a four pointed arrow.
Another way of moving a window is with the combination of the mouse and the keyboard. Press the First Command key, now click anywhere in the window and move your mouse. Again you can drag the window anywhere you want to.
On the left side of this bar you will find the minimize button
 . Clicking this button, will reduce the window to the sice of an icon and place it on the bottom of the screen. You can use this feature to reduce the amount of windows on your workspace, without actually closing the application.
Double clicking the icon, will put everything back to its previous state.
On the right hand side of the bar there is the close button:  . This button can be used to close the window. When the button looks like this
  , the content of the window has changed. You are advised to save the content first. If you don't save the content and click the close button anyway, a panel will popup asking you what to do.
| Closing a window will not quit an application |
Resizing windows
The bottom of the window is made up of a bar that is also refered to as the resize-bar:

Chapter 3. Managing files and folders
Your files

Creating folders
To create a new folder go to the GWorkspace menu and click the File item. This will open a submenu. Click new folder. The new folder will appear in the FileViewer icon path. Click on the NewFolder name and type the name you want the folder to have. For now we call it TestFolder.
Setting the permissions
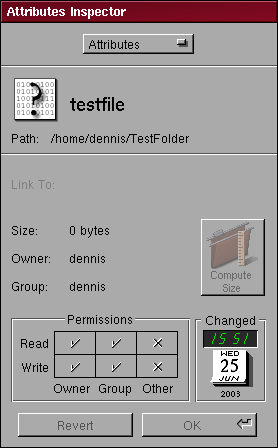
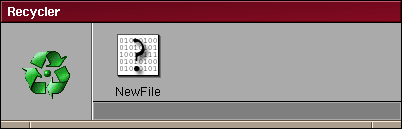
The first thing you notice is the Icon with the question mark on it. It means that the the inspector was not able to detect the file type we created, which in our case is correct since we created an empty file. Now move your cursor to the TestFolder and click it. The icon will now change into a folder icon.
Changing permissions
The matrix containing the permissions is already filled. When a file is created the default permissions are given. So we don't have to set them, but we can change them.
On the bottom the Revert and OK buttons are grey, which means they are not active, clicking them will do nothing. As soon as you click in the Permissions matrix on one of the  or
or  markers, they change to active buttons. Also note that when you click an it turns into a and the otherway around.
means no permission and means permission. The Revert button resets all your changes and OK accepts them and changes the file.
You can not change the group and user ownership. Only who has the right to read, write or execute a file or directory.
File and Folder size
Using the above Attributes Inspector, you might have noticed that the Compute Size icon went from grey to full color, when switching from file to folder. This indicates that the icon can now be clicked. Once clicked it will grey out again. And the Size: parameter is updated with the new value, the total bytes used in this Folder.
For files the size is computed at once. For folders you have to click the button, since calculating the size of a folder might take a long while on very large folders and that would interfere with the information we want to see, so folder sizes are only calculated on request.
Copying files and folders
Select the file or folder you want to duplicate, and press the First Command key and u. This will create a copy of the file which you can drag to everywhere.
Moving files and folders
Moving files and folders is most easily done with two File Viewer windows. To open a second File Viewer window there are two options. One is to choose from the menus Tools->Viewer. This will open a second viewer on the root (/) of your file system, that is it is an identical copy of the default viewer.
An often more logical option is to open a second viewer with just the content you need. If you e.g. want to move files from your home directory, make sure your home directory is in the Icon Path and, while holding the control key, double click on the Home Directory folder. This will open a viewer like this:
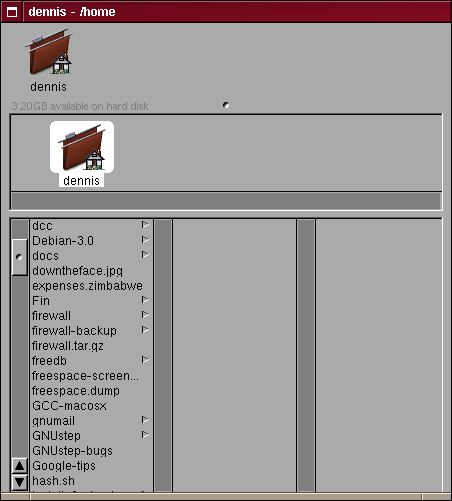
You can now drag and drop files and folders from one viewer to the other.
When you drag an item around the cursor changes to indicate what is possible. looks like this:
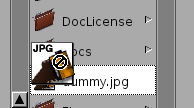
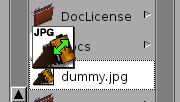
If you hold down the control key when dragging the file or folder is not moved, but a link is created. This way you can create short-cuts throu out the file system. A special cursor indictates if you use the linking option:
Deleting files and folders
The easiest way to delete a file or folder is to select it in the File Viewer window and the from File menu select Destroy. This will remove the File or Folder.
A more subtle way of doing thing is through the use of the Recycler. This gives you the benefit of undoing the delete action.
The Recycler
On your desktop there is an icon which is called the recycler.
![]()
Deleting files
From the file path drag the file or folder you want to throw away to the recycler icon. As soon as it is above the icon release your mouse button and the file will be gone.
If the recycler was empty before you performed this operation. The icon of the recycler will change. It will now have a green dot in the center.

Undeleting files
To undelete files double click on the recycler icon.
Emptying the recycler
Files stored in the recycler take up diskspace. To free this diskspace you have to empty the recycler once in a while. After you have emptied the recycler you will no longer be able to undelete the files it hold.
To empty the recycler go to the GWorkspace menu, select the File option and click on the Empty Recycler item. A panel will pop up asking you for confimation. Click OK if you are sure. The green dot will disappear from the recycler and your the diskspace is freed.
Chapter 4. Configuring the system
Preferences.appSetting language, time zone, fonts, keys
Below the Dock icon you should find a running clock. If not then go to the Applications directory that holds Perferences.app.
FIXME: this is about the CVS version.
Double click the icon and you should see a window like this:
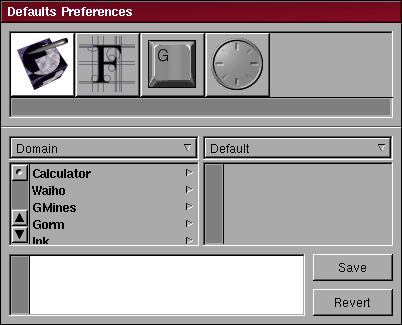
Not all options will be explained. I hope that with the following three examples you will be able to furter explore the system on your own.
Setting the system font
By selecting the
 font icon from the preferences window you are able to configure the default system fonts.
Setting the Keyboard settings
By selecting the
 keyboard icon from the preferences window you can asign which keys correspond to the Command, Alternate and Control keys.
Setting the timezone
By selecting the
 clock icon from the preferences window you can configure your timezone and some the layout of the clock.
Chapter 5. Working with text
Editing text
 The first action you will usually perform is to enter some text into a text editing area. This can be a word processor, or a simple text field where you have to fill out e.g. your name.
To start inputting data, click on the white field. If you see the cursor appear, like this |, you can start to add text.
Selecting text
Move you mouse to the place where you want to start. Press your mouse button and drag the mouse to where you want to end. Release the mouse button. The grey field that appeared is the selected text.
Some Edit menus have the Select All option. Clicking this option will select everything that is in the current text field. The first command key and a are the keyboard equivalent.
Deleting text
Deleting text can be done in several ways.
Deleting characters
To delete text that is to the left of the cursor use the backspace key.
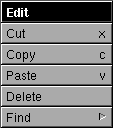
To delete text that is on the right of the cursor use the delete key. Another option is to use the Delete entry from the Edit menu.
Deleting selected parts
After you have selected the text press the delete or the backspace key. You can also select the Delete option from the Edit menu. All have the same effect.
Copying text
Copying is done through the first command key and c or the copy entry in the Edit menu.
First select the part you want to copy, press first-command-key+c. The data is now copied to the pasteboard.
Paste text
Pasting of data from the clipboard is done through the first command key and v or the Paste entry from the Edit menu.
Move the cursor the position where you want the part to be placed, and click the mouse to place the cursor. Now press first-command-key+v to paste the data.
Cutting text
The cutting of text is like replacing text. The first command key x or the Cut option from the Edit menu are used for this. The data you have selected and cut, will be removed from the text field and copied onto the pasteboard.
Finding text
Select from the Edit menu the Find menu. On the Find menu you have the Find Panel option. If you select this you get a panel like this:

Type in the Find: text field the string you want to find and click Next to find something that is located to the right or below the cursor, or click Previous if you want to find the string to the left or above the cursor.
If you are not sure about the case you can set the Ignore Case box before searching. Then all matches, ignorant of case will be found.
Replacing text
Go to the Find panel as described in the previous section.
Fill in the text you want to find and the text with which you want to replace it. Now you have different options.
You can click the Replace All button to replace all found matches. With this option you can choose between doing this in the entire document, or just in a by you selected piece.
Another option is the use Replace & Find, which will replace the first match and find the next one, which is then highlighted.
Clicking Next will search the next match without replacing.
Clicking Replace & Find again will replace the text and will highlight the next match.
Or you can click replace. Which will replace the highlighted match and the stop (it keeps the replaced match highlighteed).
Fonts
Printing